|
|
©1999-2003. All rights reserved. |
Fence with Barbed Wire
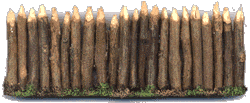
1) - Log Palisade
 Collect some twigs. (These ones are from an ash tree). Use a knife to cut them to length and roughly sharpen them.
Next, lie them flat and glue them together with PVA, using a straight edge to ensure the bottom end of the twigs are level. You may need to only glue a few at a time to avoid disturbing the others. Once they are dry, glue them with PVA to a piece of mounting board. For the paint job, I just gave the twigs a dark brown wash and then drybrushed them very lightly with cream coloured paint.
2) - Brick wall
 This wall was made by casting plaster into silicone rubber moulds made by a company called 'Linka'.
These produce rectangular sections with interlocking 'teeth', which can just be seen in the illustration above.
Once dry, it was painted with Sandtex masonry paint to seal it and then given a light yellow-brown wash.
The bricks were then dry-brushed on in a dark red brown. I applied several slightly different colours in
patches for a more realistic look.
This wall was made by casting plaster into silicone rubber moulds made by a company called 'Linka'.
These produce rectangular sections with interlocking 'teeth', which can just be seen in the illustration above.
Once dry, it was painted with Sandtex masonry paint to seal it and then given a light yellow-brown wash.
The bricks were then dry-brushed on in a dark red brown. I applied several slightly different colours in
patches for a more realistic look.The capping stones were mounting card, painted grey and then dry-brushed. The base of the wall is also made from mounting card. One of the gallery pictures shows a shed, which was made using the same wall pieces, with some additional sloping and window sections.
3) - Concrete Wall
 This stuff is really quick to produce, and is a good way to divide up the battlefield if you haven't much scenery.
The base is a 12mm strip of mounting board, and the top is a 7mm strip. These are stuck onto a piece of foam card or very heavy cardboard (not corrugated cardboard). A few foam card buttresses have been added to make it look a bit more interesting. and some sand was stuck to the base with PVA. The wall was painted with Sandtex and here I have sprinkled the wet paint with sand to give more texture. Next I washed the wall with dark brown emulsion, and then drybrushed on the cream coloured Sandtex again. Finally the base was drybrushed with browns and greys and an acrylic wash was used to stain the bottom of the wall a more saturated brown.
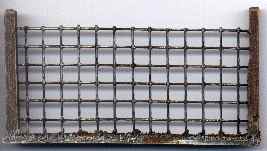
4) - Wire fence
 This is another quick piece of scenery, which has the interesting feature of blocking movement while
providing almost no cover.
This is another quick piece of scenery, which has the interesting feature of blocking movement while
providing almost no cover.The base is a 12mm strip of mounting board with sand stuck to it with PVA. The mesh is a 6mm aluminum grid, and the posts are balsa wood. Cut the vertical strip of wire off the mesh at each end, and then push the balsa wood onto the sticking out pieces of horizontal wire. You can cut the mesh with pliers or tough-cut scissors. |

©1999. All rights reserved.
| |
