Materials
An inkjet printer
Bamboo skewers
PVA
UHU
Card for base
Constructing the Palace
Template
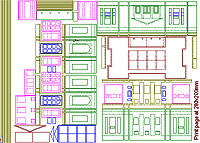
 First download this PDF template (by right clicking on the thumbnail and selecting Save As).
This needs to be printed at A4 onto thin card (go for as thick as your printer can handle).
The colour coding is to help work out how to put it together, so it isn't essential
that the actual card is printed in colour, as you can just refer to it on-screen.
How to interpret the template
Solid lines are cut through, dotted lines indicate where a piece will be stuck on top. The
colour coding indicates the 'layer' that the card comes at in the building. I'll just say
that again ..... Don't cut through the dotted lines (only the solid ones).
Start by cutting out all the green bits. These form the main surface of the building.
Next cut out all the magenta bits, which fit behind the green bits to fill in the window
openings. Stick them behind the green bits by painting the back of the green bits
with an old brush and slightly watered down PVA.
Once these have set, you are ready to build the basic shell. Cut the roof out, and then
stick the walls to them, leaving about a 5mm parapet of wall sticking above the level
of the roof . The best thing for this is
UHU, but you could get away with PVA if you
prop it carefully. As you go along, stick small triangles of card inside the corners
to brace them.
The Palace Gardens
When I planned out the gardens in my head, I had very grandiose ideas, of tree-lined avenues
and intricate geometric pathways along the lines of the Palace of Versailles. I marked
out a foot-square, which seemed like a reasonable
scenery module size. As soon as I started to sketch out the plan onto it, I realised that
there was very little space, and that it would have to be a lot simpler than originally
intended. Nevertheless, I managed to shoehorn the main elements into it. The following are
in order of construction.
The Base Board
I used foam board for this, but this has warped much more than expected, so with
hindsight, I would have used
hardboard
which is a bit more stable.
Walls
The walls round the outside were cut from foamboard, and stuck to the base with PVA.
Lawns
The turf is made from a grass matting which comes pre-made with static grass stuck to
brown paper. This gives a lovely, even finish like a bowling green, which would be impossible to recreate
if you flocked the surface yourself.
Path edging
The next stage was to finish the edges of lawns. The four rear areas were each lined
with very thin strips of card, stuck down with PVA. You will need a scalpel and
a metal ruler to cut these accurately.
Paths
After the grass had been stuck down, the paths were covered in a very thin
Hedges
These are made from blister pack foam, cut into strips. Paint them black with
watered down acrylic and let it try. Then paint with watered down PVA and
flock.
Trees
For the trees I wanted a very regular look, almost like topiary. I rolled small
balls of fine steel wool, and poked a section of cocktail stick with a blob of
PVA on the end into them. Once this was dry they were painted black with watered
down acrylic. The final stage, once the paint was dry, was to paint them with
watered down PVA and flock them. They were stuck into holes poked into the
base board.
Fountain
The man on the fountain is from Alternative Armies sci-fi range. He's a bit
bigger than most 6mm stuff (even GW), which helps give the impression of him
being a statue. The pedestal he is standing on is a section out of a Berol
felt-tip, and the pool section of the fountain is some kind of plastic lid.
The water is XXXXX. It looks really nice, and was relatively easy to use. The
only problem with it is that the surface tension has caused it to form a sort
of meniscus and curve up where it meets the wall of the pool. This reduces
the sense of scale and makes it look less realistic.