|
|
©1999-2003. All rights reserved. |
Scratch-Building &
Modelling with Putty
Materials
Green Putty | |||||||||||||||
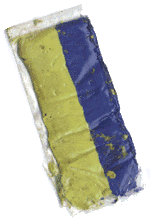
| The first step in producing good models or serious conversion is to get hold of some green putty. This is the stuff that is actually used by Games Workshop to produce the original of each figure. It is an epoxy putty similar to the widely used Milliput, however it has very different characteristics when used for modelling. It is much stickier and stretchier than Milliput, and it also does not have Milliput's unfortunate tendency to crumble when wet. Unfortunately it is far more expensive. You can get it from Games Workshop by mail order or in their shops. |
|
Modelling Tools
- Knife blade - Very useful for cutting and smoothing the putty.
- Needle - The sharp end is more delicate than a pin's and the other end is curved about right for doing bits like faces and folded cloth.
- Pins - The blunt end can be used for gentle concave curves like flowing robes.
- Other Tools - You can also buy special tools for working clay and putty from some craft shops.
Alternatively make your own. I used the plastic tube from a cotton bud, two pins, and some Milliput to make a handy two ended tool, by sticking the pins into the ends of the tube and securing them with putty. I then filed one of the pins off to make a blunt point and left the other sharp.
![]()
Scratch Building a Figure

This is a difficult and timing consuming job. To fully build a figure from scratch
will take about a day, and your first few are likely to be pretty poor. But don't
let that discourage you. There is nothing more satisfying than being asked where
you got a figure and being able to say breezily 'Oh, I just scratch built it.'It is best to start by making a creature such as a goblin rather than a normal person. If you make any part of a human the wrong size or shape, particularly the head, then it will be immediately obvious but since goblins are all twisted and malproportioned anyway, it is easier to get away with mistakes.
Armature
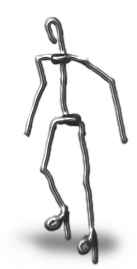
| The first step is to make a wire stick man to stick the putty around. I use thin, plastic coated electrical wire, it contains a single strand of copper, and the coated wire is just over a millimetre in diameter. It is easy to bend and glue, with just enough stiffness to give the required support. When making your stick-man, have a couple of figures handy to compare it to, so that you can check whether you have the correct proportions. | TIP |
|
1) Twist the wire into a loop to form the head. Mark the wire off where the
waist is, but continue it down to the end of the leg. Twist another small loop for
the foot and leave about a centimetre sticking down out of the base of the heel.
2) Make the second leg by twisting another piece of wire around the waist. Glue it into position and then cut off the wire after measuring it down to the end of the first leg, remembering to allow extra for the foot. Also leave a small amount of wire sticking out of the bottom of the foot which can be used to stick the figure to a base. 3) Make the arms by cutting a length to make both hands, both arms and the shoulders. This will be about XXmm for a standard figure. Wrap the centre around the body and glue it in place. Then twist small loops for the hands. Note: Use pliers to grip limbs just above the joint when you position the limbs. This makes sure you get a nice tight angle so that the figure doesn't have 'bendy bones'. |
Roughing it out
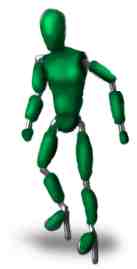
If you try to make an entire body component in one go, you will find it extremely difficult to maintain the
overall shape while modelling the surface detail. It is therefore best to model the entire figure as an approximate
shape first before starting on the fine detail.
|
Start by modelling the following areas.
Leave a small gap between each of the areas mentioned above, so that the figure can still be bent at all the main anatomical joints.
|
Fixing the pose
Wait until the putty has set before adjusting the figure into its final pose. The putty will ensure that your figure does not suffer from
'tentacle arms' as it will bend only in the right places at the joints between bones.
The next stage is to wrap a small quantity of putty around each joint, so that the limbs become completely wrapped in putty and the position of the figure can no longer be altered.
Adding the detail
I usually start with the head, then move onto the torso, and then do the limbs one by one. Let each
small section harden (if you are in a hurry then heat it as mentioned in the tips) before going on to the next. Keep
comparing your figure to other models to ensure that you are getting the scale right.
Examples

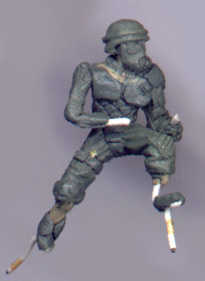 This figure is only half complete. The head and body have been sculpted, but one arm has only been roughed out,
and the boots remain to be done. Note the small traces of Milliput showing round the neck and feet, which was used
to rough out some of the initial shape.
|
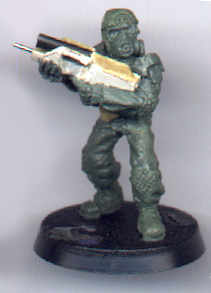 This armed policeman is very nearly complete. The weapon is made from card, Milliput, a small piece of sprue for the
grenade launcher barrel and a pin for part of the muzzle.
| |
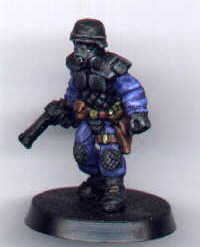 A finished model. You may find that getting the overall proportions of the model correct is actually more difficult than producing
good looking detail. In this example the waist is slightly too low, making the legs too small compared to the rest of the body.
These mistakes tend to only become evident later on when it is too late to alter them.
|
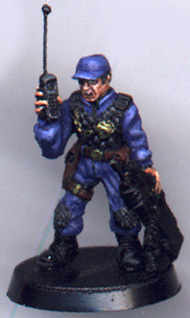 The quilted armour on this squad leader was created by cutting a grid of grooves with a knife and then pressing the
blunt end of a needle into each intersection.
|
Working with Milliput

There are a number of problems that Milliput has
as a medium for creating figures. It is somewhat difficult to describe why, but if
you use both types of putty, you will soon understand the difference.
Basically Milliput breaks apart easier, is less stretchy, and also less sticky.
However, it is not without its uses. It is good for:- Roughing out figures - it's cheaper than green putty.
- Gently curved robes.
- Weapons.
- Large areas with little detail such as marine armour.
Getting smooth surfaces
Milliput tends to create a rough and grainy surface, but you can avoid this in two ways.
First, when working the putty, damp your tools slightly to stop it sticking to them. Do this
sparingly because the putty soaks up the water and will eventually become soggy and crumbly.
When the figure is finished, take a very old brush and after damping it, gently brush the
putty. This will smooth it and remove the tiny crumbs of putty that tend to collect on the surface.
Making weapon blades
Roll out the Milliput into a flat sheet, roughly the size of the weapon and let it harden. You can then
use a sharp blade to cut and scrape it into the right shape. (Green putty is too rubbery to allow this to
be easily done). Finally file or sandpaper the surfaces flat.
This can also be used to make the basic shape of a gun, which can then be detailed by sticking on small
bits of green putty.

