©1999-2003. All rights reserved.

|
Base Preparation
1) - Preparation

 Slotta Bases - If the miniature has a Slotta base, then you usually just have to plug it in. If the tab on the figure doesn't fit the slot reasonably snugly then take a pair of pliers, grip the middle of the tab and gently twist (while holding onto the figure with the other hand). This will put a slight ripple in the tab which will then it make it fit more securely. If you overdo it then just use the pliers to slightly flatten it again. Slotta Bases - If the miniature has a Slotta base, then you usually just have to plug it in. If the tab on the figure doesn't fit the slot reasonably snugly then take a pair of pliers, grip the middle of the tab and gently twist (while holding onto the figure with the other hand). This will put a slight ripple in the tab which will then it make it fit more securely. If you overdo it then just use the pliers to slightly flatten it again.

Moulded Bases - If the base is moulded onto the bottom of the figure, then it
will usually need mounting on something larger to stop it perpetually falling over.
This may be a group base, particularly with figure scales smaller than 25mm. I find
standard card (such as that on the back of pads of lined A4 paper) adequate for 6mm
or even 15mm. A stronger alternative is Mounting Board
, but if you're basing something really large like a line of three 25mm figures then thin (2mm)
Plywood would be advisable. Heavy gauge
Plastic Card is another neat but
relatively expensive alternative.
 Inaccuracies in the moulding process mean that often the moulded base is not very flat underneath. To get a better fit, hold the figure over a bin and rub it up and down on a file or a bit of coarse sandpaper taped over a block of wood. Inaccuracies in the moulding process mean that often the moulded base is not very flat underneath. To get a better fit, hold the figure over a bin and rub it up and down on a file or a bit of coarse sandpaper taped over a block of wood.
|
2) - Sticking Down

|
Slotta Bases - To hold the figure firmly in place use a little
PVA. You could use
Super Glue, but then if you ever decide to rebase the figure you will probably
have to smash the base to get it out.
Moulded Bases - Generally I use PVA to
stick figures to bases, its not the strongest glue (
Epoxy Resin would be better,
but its a pain to mix it up). Super Glue
makes a stronger bond than PVA, but it's
very brittle, so a sharp impact, like dropping the figure, can easily break that
bond altogether. PVA is weaker but more
flexible. To base quickly, squirt a blob of PVA
onto a number of bases, then put the figures on, rather than gluing one at time.
|
3) - Smoothing off

|
Slotta Bases - If you are lucky, the tab of the figure will neatly fill the
slot, so it's all ready for painting, but that is rare. If some of the slot is
still showing, then use a small shred of masking tape, or paper stuck down with
PVA to cover it up.
Moulded Bases
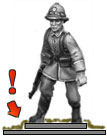
| A moulded base stuck to another larger base will create a step,
as shown here. Even after
the sand texture is applied, this may still be visible. This can be dealt with in
a number of ways. |

|
| Option 1: Round the step off by packing with
Milliput as shown here, but this is
a bit tiresome unless you happen to have some spare putty that you've mixed for something else. |

|
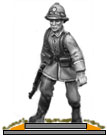
| Option 2: A quicker approach is to chamfer the right angled edge
off the moulded base with a Scalpel, something
which can be done intermittently along the edge, just to break it up a bit. |
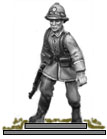
| Option 3: The easiest method is to wait till the texture has dried,
then add some extra blobs of PVA and more sand around the step. My basing techniques also have
patches of foam flock applied at the end, which can be positioned to further disguise the step. |

|
|
4) - Texturing the Base

|
I cover virtually all bases with coarse sand. This could be coral sand from a pet shop
or the sharp sand used in concrete. Don't use the orange sand commonly used in construction
because the particles are too fine and it's full of clay. If you've scavenged the sand
from somewhere and it's dirty, you can clean it up as described in the
Sand section of the materials.
To stick the sand down, use an old brush to paint the base with
PVA. A brush is quicker than a matchstick or
similar and will give a thinner, more even coating. It is also more accurate so
you will get less on the figure's feet.
When painting up to the edge of the feet, don't touch the brush down next to them,
because the tip will be engorged with a big blob of glue. Instead slide the brush
up to them, so the tip has less glue on it and the pressure flattens the tip. This
will allow you to be more accurate.
 |
 |
| Inaccurate: Blob on the tip | Accurate:
Slide carefully up to the foot |
Dip the figure in sand straight away and leave it there for a few minutes.
 |
 |
| Not enough sand | Crisper texture |
If you take it out immediately, you may not get enough sand to soak up all the glue
and the resulting finish won't drybrush as well because the glue fills in the gaps
and rounds out the sandy texture.
|
|
