|
|
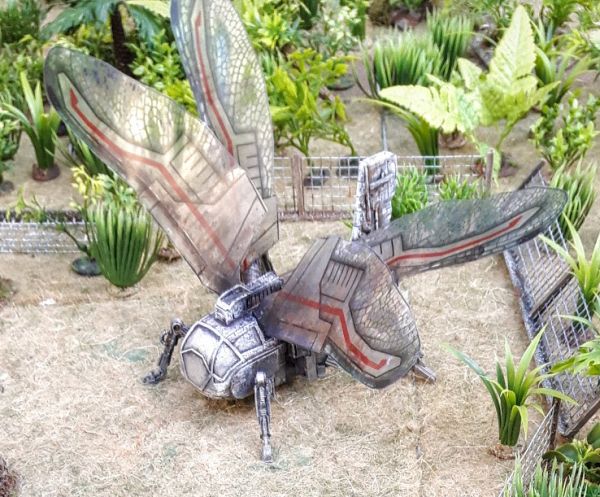
One of the key elements for the Inquisitor Cynole game at BOYL last weekend was the ornithopter. The story snippet from the original Chapter Approved that this game was based on describes it as follows “The ‘thopter was a local model, ancient and noisy, the dull beat of its engines drowning any attempt at conversation”.
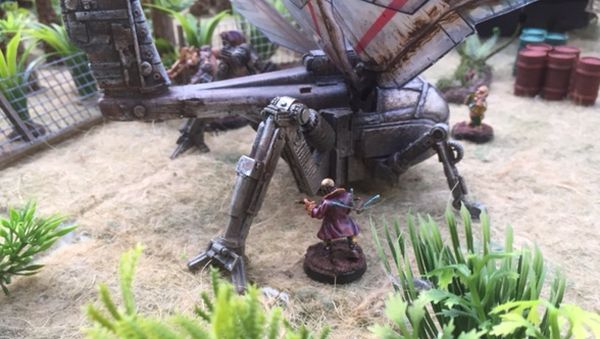
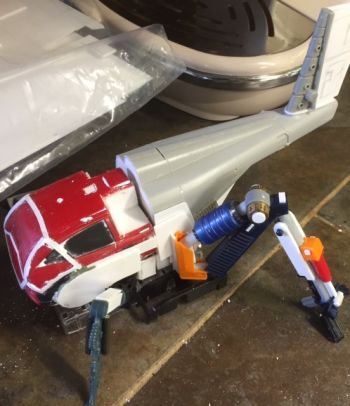
Here’s the finished model – Curtis of Ramshackle Games cast this in resin from a master that I built. He also created the wing designs which are printed on clear acrylic. Massive thanks to him – apart from the technical expertise and moulding equipment, he painted this one because I was away on holiday and didn’t have time. This will be on sale in due course on his website – expected price £25 including P&P, and it’s quite a big beast as you can see from the second shot with a models in front of it. I was working on some solid wings (still unfinished), and it will be available in two variants – one as below and one with the solid wings. If you are in a hurry and you want the ‘dragonfly’ wing option then contact him through his website and he will probably be able to sort you out.
 Ornithopter model – photo by James Holloway When I started planning the game last September, I realised I needed at least one ornithopter, but googling for one, there wasn’t much on offer. I really didn’t like the Revell Dune one: http://www.fantastic-plastic.com/HARKONNEN%20ORNITHOPTER%20PAGE.htm, and I couldn’t find anything else, so I was going to have to make one. I came up with the idea of actually making something that could be cast, as I was hoping to field two or three, and spoke to Curtis who agreed to do the casting.
 Ornithopter model I bought some old Robogear kits, with a view to using some of their bits, but in the end I just raided the big boxes of old model parts and plastic off-cuts that I have hoarded over the years. Long ago I played the old Dune 2 Amiga game, and that had relatively elegant white ornithopters flapping big, long wings – an image that stuck in my head. I wanted a more streamlined and technological look than later GW stuff – all square corners and riddled with rivets. As a Rogue Trader game, they should have more of a traditional sci-fi aesthetic, a bit like this tiny ornithopter from the rulebook, but I needed something pretty big that looked like it could carry a squad or so.
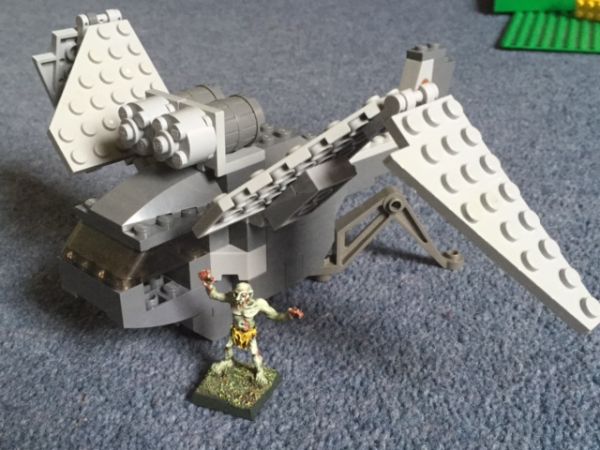
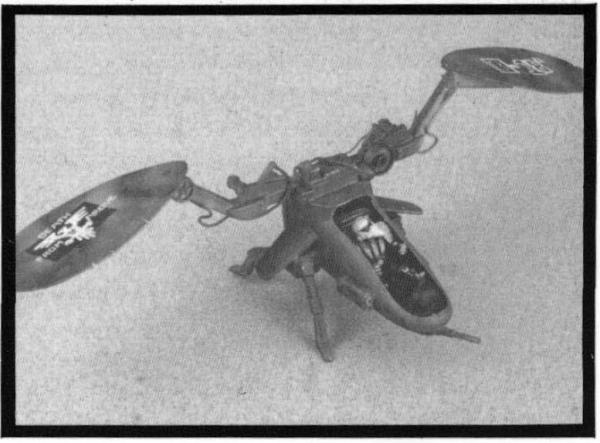 Illustration of ornithopter from WH40K 1st edition I started off with a really rough full size cardboard mockup (now binned), just to get the size of it. Next step, I mocked it up in Lego. This was a big help in imagining to overall size and shape of it. I was aiming for something that two people could sit side-by-side in the cockpit.
 Lego mockup Armed with this and a few bits I had been tinkering about with, I went to see Curtis at the end of May (August looming worryingly close) and he went over the basics of how to design stuff for resin casting. I didn’t have a clue about this, but you have to be very careful about designing to avoid trapping bubbles, and to get something that will go together well without weak spots. We sketched out a few ways to break down the model. An additional constraint is that the rubber is pressurised when making the mould. The master has to be really solid or it will cave in. I got round the fact that I was using some thin plastic shells for much of it by filling it with plaster after the basic shape had been made.
Some of my early sketches looked a bit like a helicopter gunship with wings, and that seemed a bit dull. I wanted something a bit more sci-fi and the legs seemed a good way to achieve that. I settled on big back legs, which gave it an interesting insectoid feel, and I imagined that it might use them to spring into the air on take-off. Coupled with a strange, bulbous cockpit, it was taking on the right look, but painfully slowly. Cutting a bit of plastic card to just the right shape and getting it neat and crisp is a lot more difficult in reality than it is in your head.
 Ornithopter scratch build in progress Over the next 6 weeks, I worked on the scratch building and got as far as this by mid July. As I was away the week before BOYL, I was almost out of time. With only two weeks to go, I dropped off what I had, and Curtis came to the rescue by sorting out the wings, doing the final tweaks to make it castable, making the mould, casting the first one and assembling it and painting it. I first saw it on Saturday, with just hours to go!
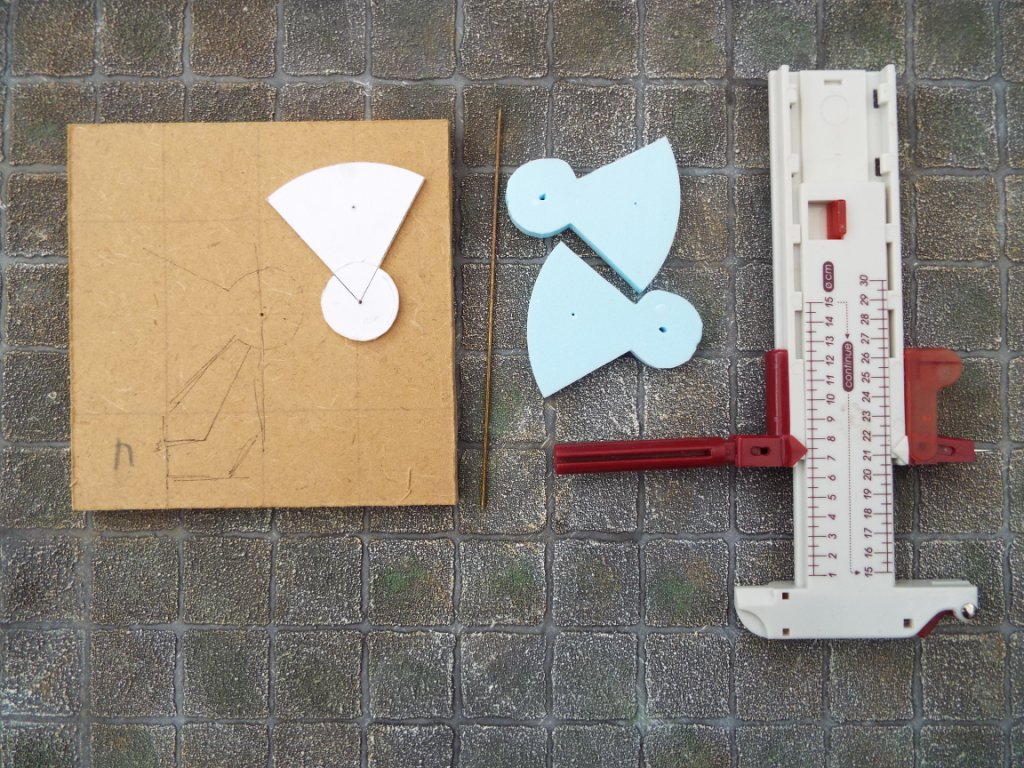
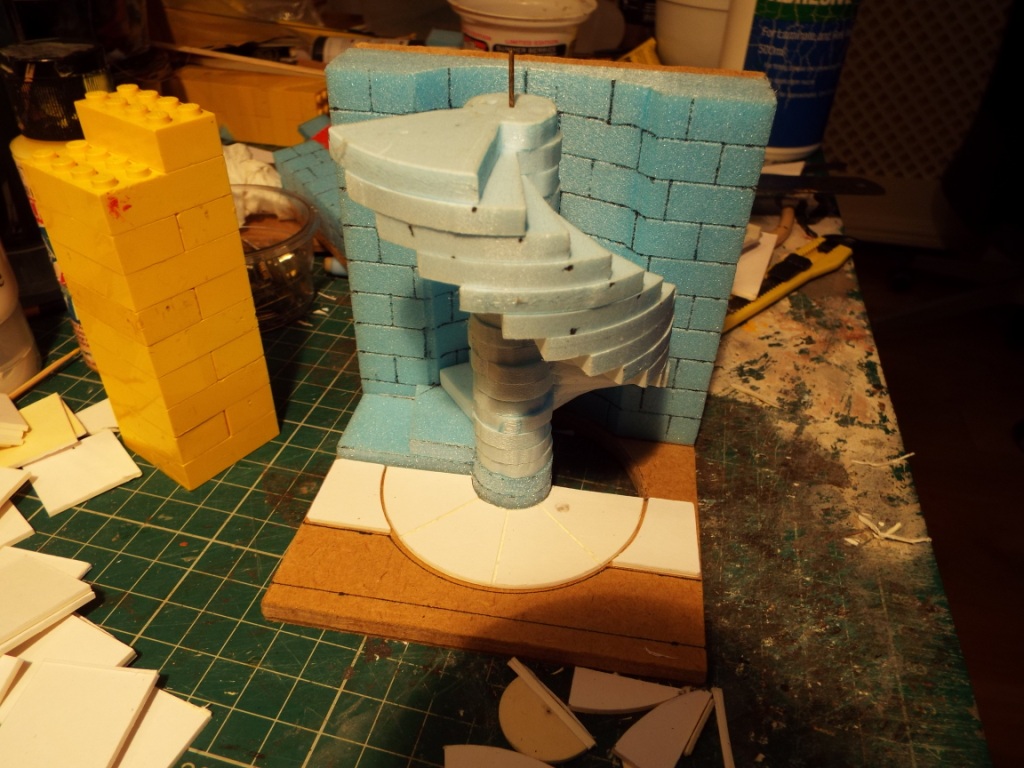
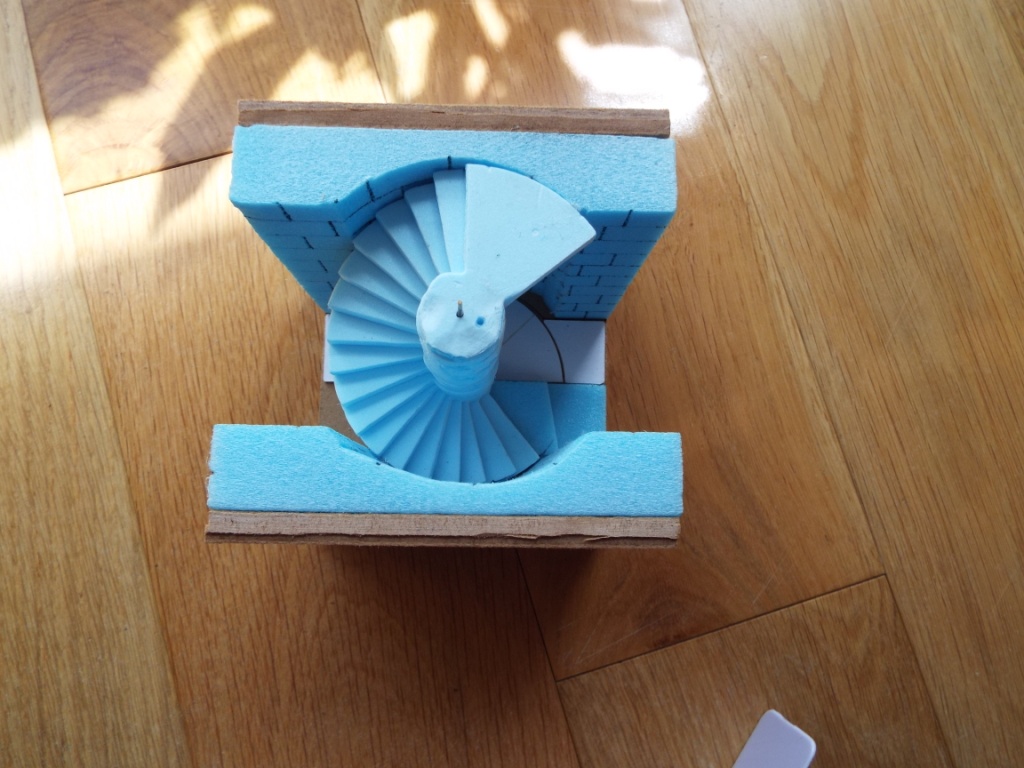
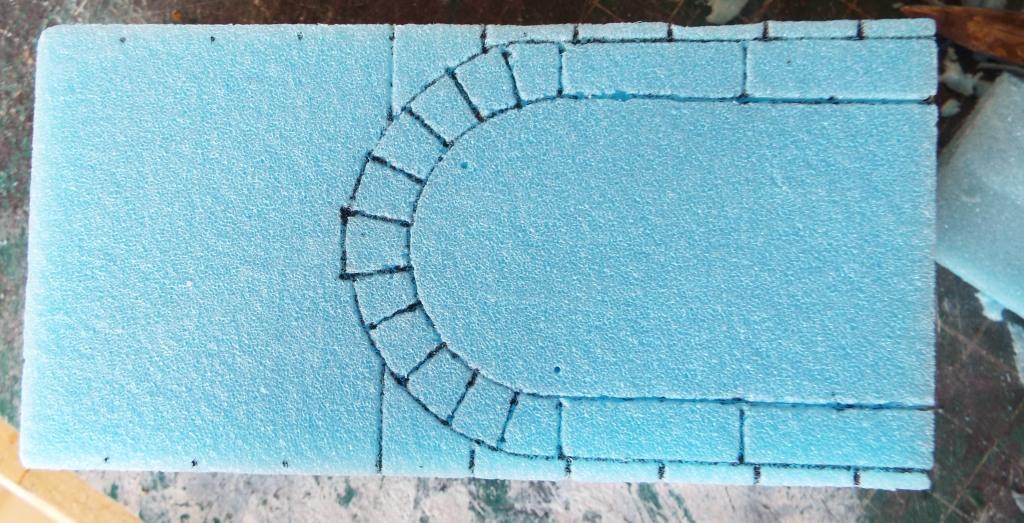
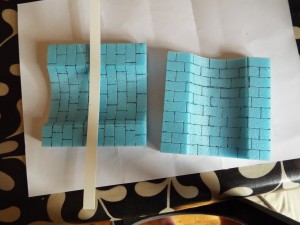
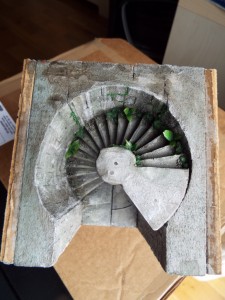
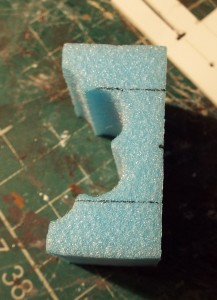
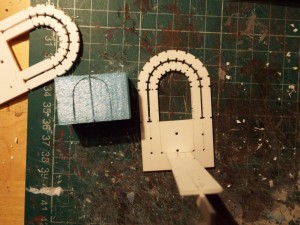
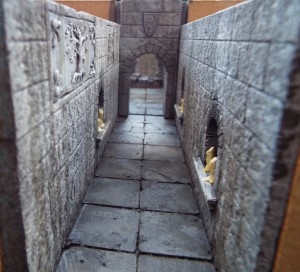
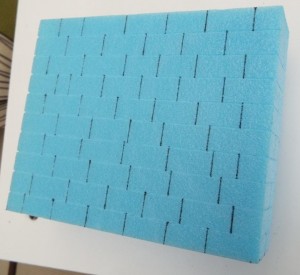
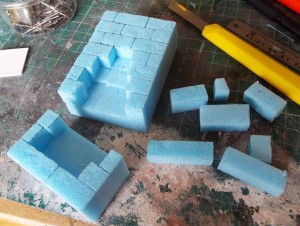
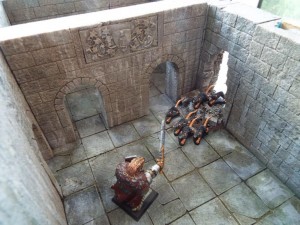
If your average medieval bod wanted to go down into a dungeon, it wouldn’t be using a lift (elevator in some parts.) I thought I’d have a go at making a set of spiral steps. I decided to put it on a 4 inch by 4 inch base and allow it to be accessed by a corridor from both sides. The diameter of the staircase is just a bit less than 3 inches, to enable some room for the side walls on the base. A keyhole shape felt like it would do the trick, so I marked up a piece of card, and cut the curves using my cheap rotary cutter. The photo doesn’t show it clearly, but there is a small blade instead of a piece of pencil lead. I then stacked 5 pieces of 5mm foam and pinned the template on top. Using the template as a guide, I used the hot wire cutter to create the shapes. 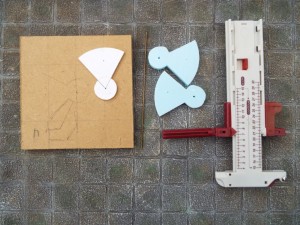
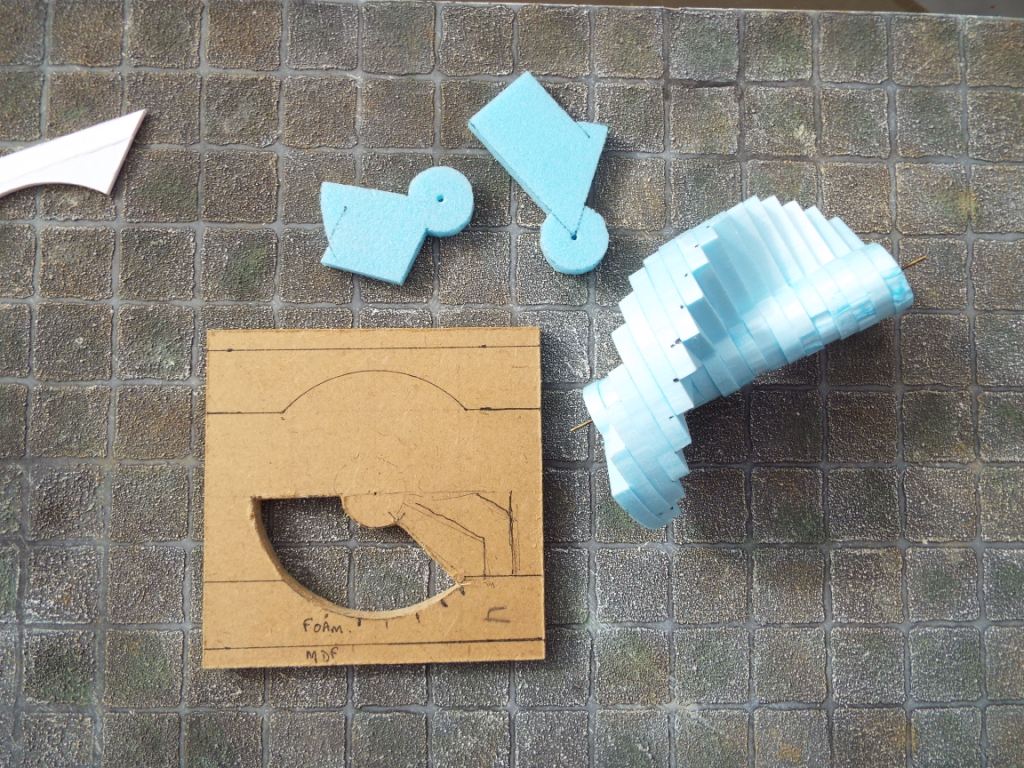
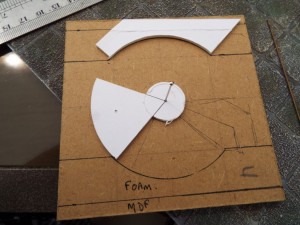
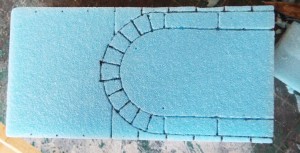
2 strips of foam gave me 18 steps in total. Stacked on top of each other they stood 9 cm tall. I needed 10 cm, so needed 2 more 5mm steps, and decided these would be differently shaped at the bottom of the steps. To get the right shape, I decided to mark up the base. This would also give me the shape of the side walls. A hole was drilled using the pin vise in the centre of the base, and a pin inserted through the hole in the centre of the template. This is rotated and a pen used to mark the indentations in the walls. The shapes required for the 2 bottom steps are marked on there. The cutter is then used on another piece of card to get the shape of the indent on the wall, which will be used as a cutting template..
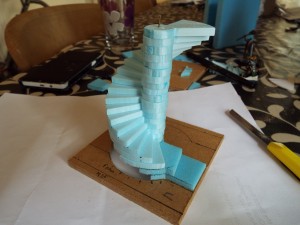
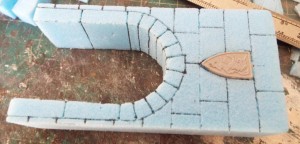
A slight change of plan at this point – I decided I wanted to show the staircase descending to the level below. I cut a piece of brass rod and threaded the 18 steps on there. At this stage I didn’t glue it so I could decide how big the steps should be. I started making them quite generous, but then realised that the angle of ascent had to be a bit steeper to create the headroom for the side passage and the descent to the level below. It was ok for hobbits, but no good for anything bigger. The steps had to be made narrower, so I reduce the steps by 7 or 8 mm on the outside diameter. Once I was happy with the look, I glued the spiral steps together, cut the slot out of the base where the steps down would be (if I ever made them to go down to another level,) and cut the 2 bottom steps to the required shapes. The steps are all glued on to the base, and the brass rod is left in to slot into the hole in the base and provide strength.
The side wall template is then used with the hot-wire cutter to cut the indent. A lesson learnt is that I should have made a duplicate template and pinned it to the bottom of the wall piece when cutting using the hot wire, as it isn’t easy to make the cut absolutely perpendicular and there is some distortion at the bottom of the cut. Top looks ok though.
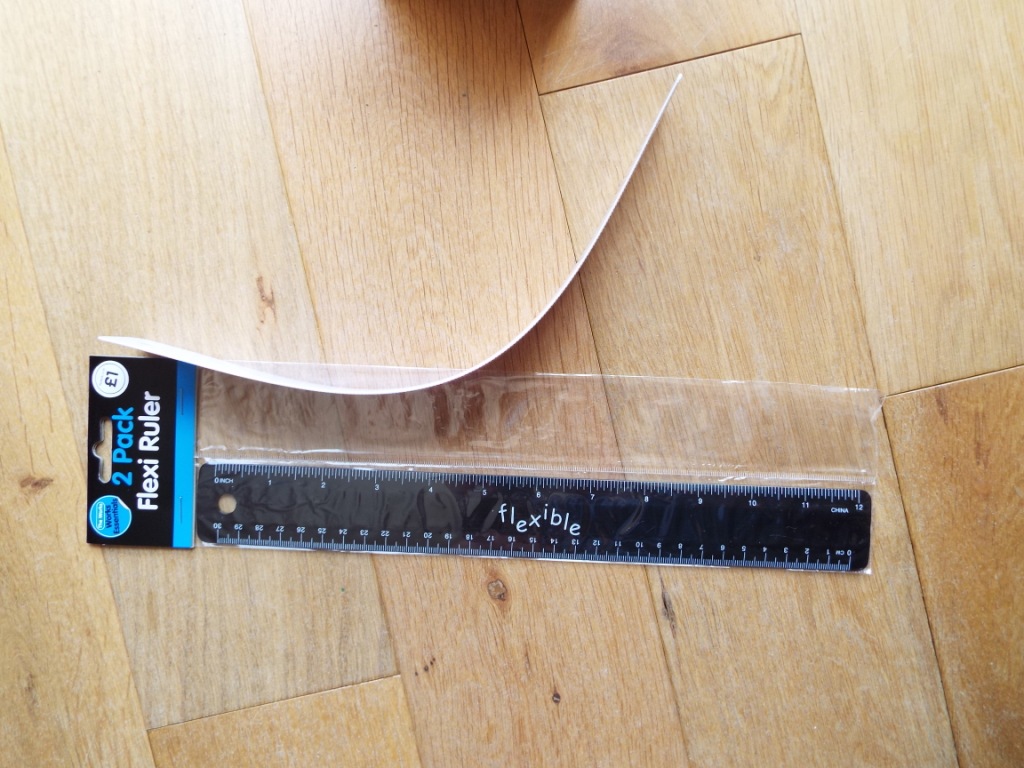
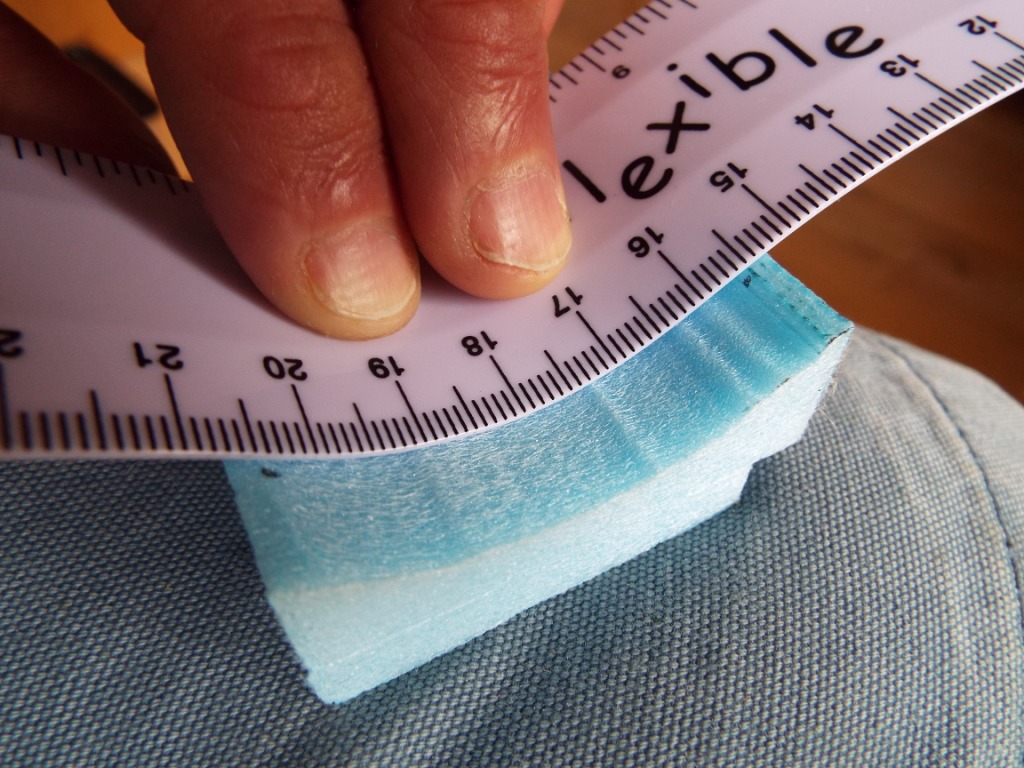
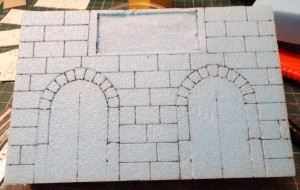
Next job is to mark the block pattern on the walls. The curves could have been tricky, but fortunately I found a pair of flexible rulers at The Works for £1. They flex in one direction while providing a straight edge – one of the following pics shows one being used.
With one wall glued in place, together with a piece of mdf to provide strength, I cut and glued the floor tiles for the passage, then glued in the opposite wall. 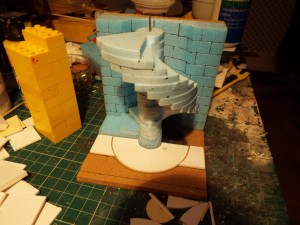
Then for the end sections, or end section because I decided I wanted to leave one side open. I needed to offset the door, otherwise anyone going through it would fall down the stairs. Elf n’ safety.
The required jig is pinned in the right position, the door marked and the blockwork marked. The hot wire cutter and the curve template provides the required indent on the rear of the wall, and the blockwork marked using the flexi ruler. It is then positioned and the cutouts marked so that the joins can be disguised with some single blocks. The missing blocks are then cut and glued in place.
 
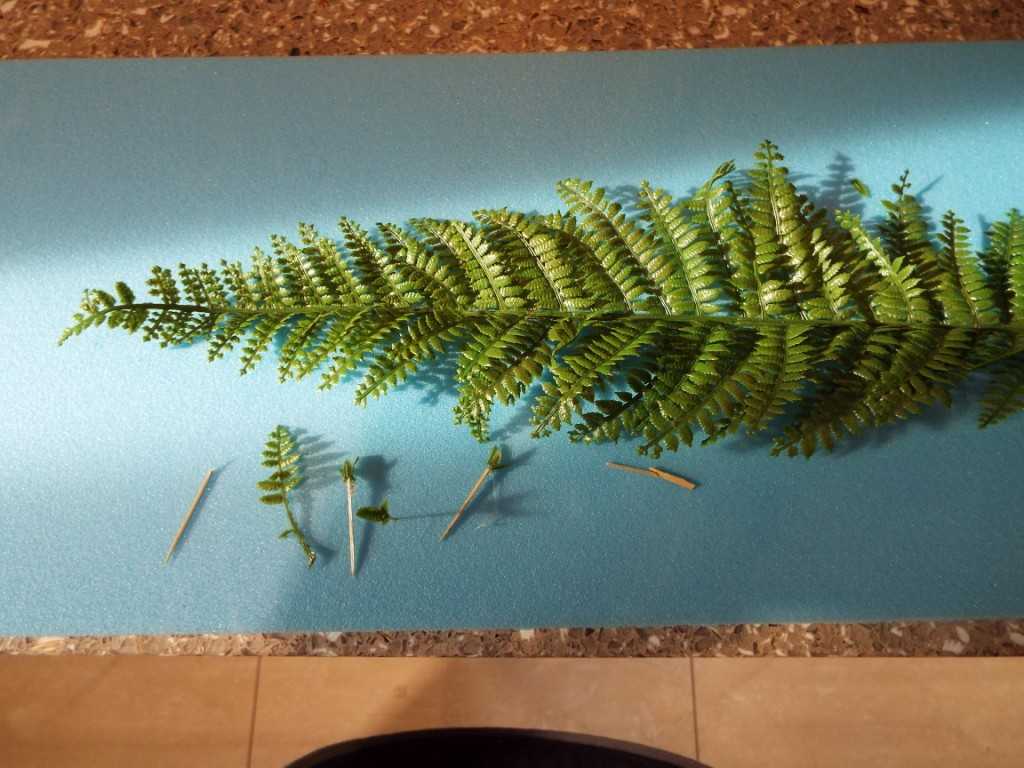
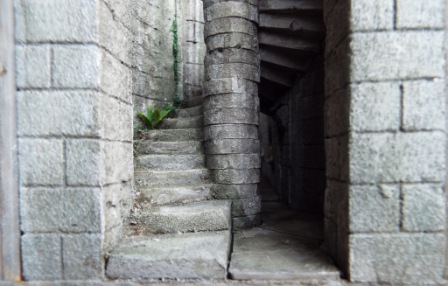
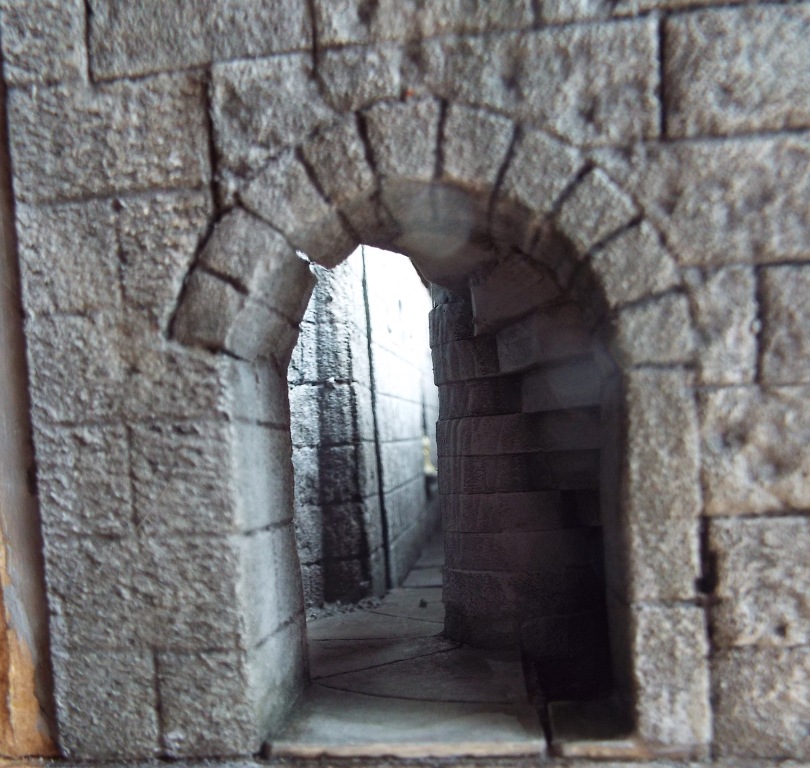
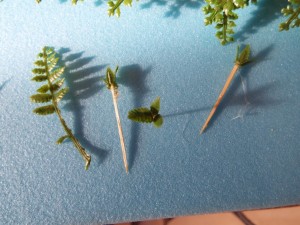
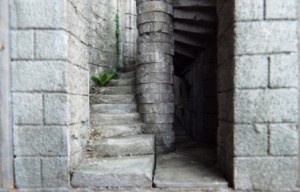
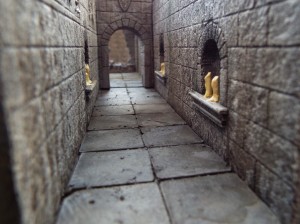
The same paint routine that was used on the corridor was applied to this. Following a suggestion on the Lead Adventure Forum, I figured that the top of the stairs would get more light and that moss and ferns might grow there. The moss is fine sand mixed with green acrylic, placed in strategic places and highlighted with a greeny yellow. The Ferns are made with some small pieces of plastic florist fern, fixed with a hot glue gun to some small sharp slivers of wood, and then the wood is coated in pva and pushed into the foam.
  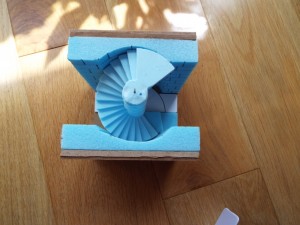
The completed item.
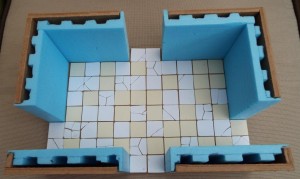
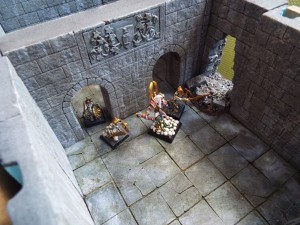
The temple floorplan is printed and stuck to boards. They have a few wrinkles because I stuck them down with very thinly spread PVA. Spray mount would have been much better, but it’s excruciatingly expensive. Still the end result is pretty good. Everything in the photo below is flat except for the three models.
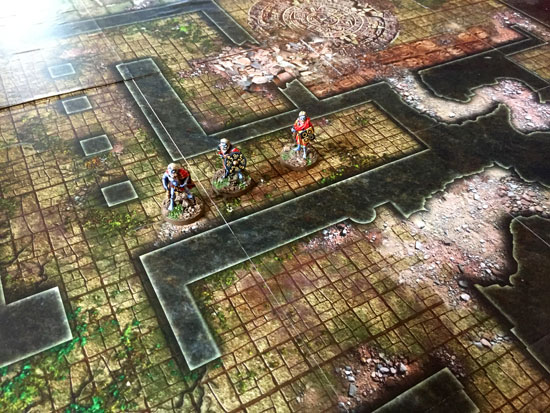 Temple Floorplan Following on from the success of this, I’m thinking about doing some for Frostgrave’s Breeding Pits expansion. Alan’s 3D dungeons (from previous posts) are fantastic, but this takes a tiny fraction of the time (and is easier to store too).
I’ve completed the floor plan for the temple in the Inquisitor Cynole game. It’s 2ft by 4ft. I collaged it up in Photoshop using textures mostly Googled up. The next step is to print it out and stick it to 30cm hardboard squares, as I did last year for the Chainsaw Warrior game. Here’s a sample.
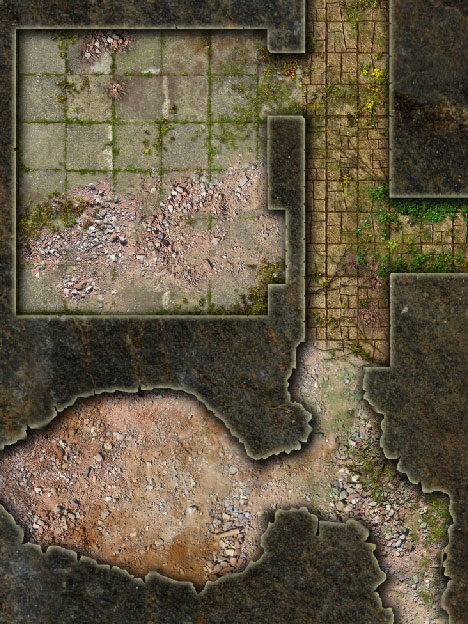 Temple floor plan sample I’ve used a Layer Mask and Layer Effects (Dropshadow, Inner Glow etc.) to form the walls. Effects such as moss are a continuous texture layer, which has been hidden, and then small areas are made visible by spraying white on to the Layer Mask with a scatter brush.
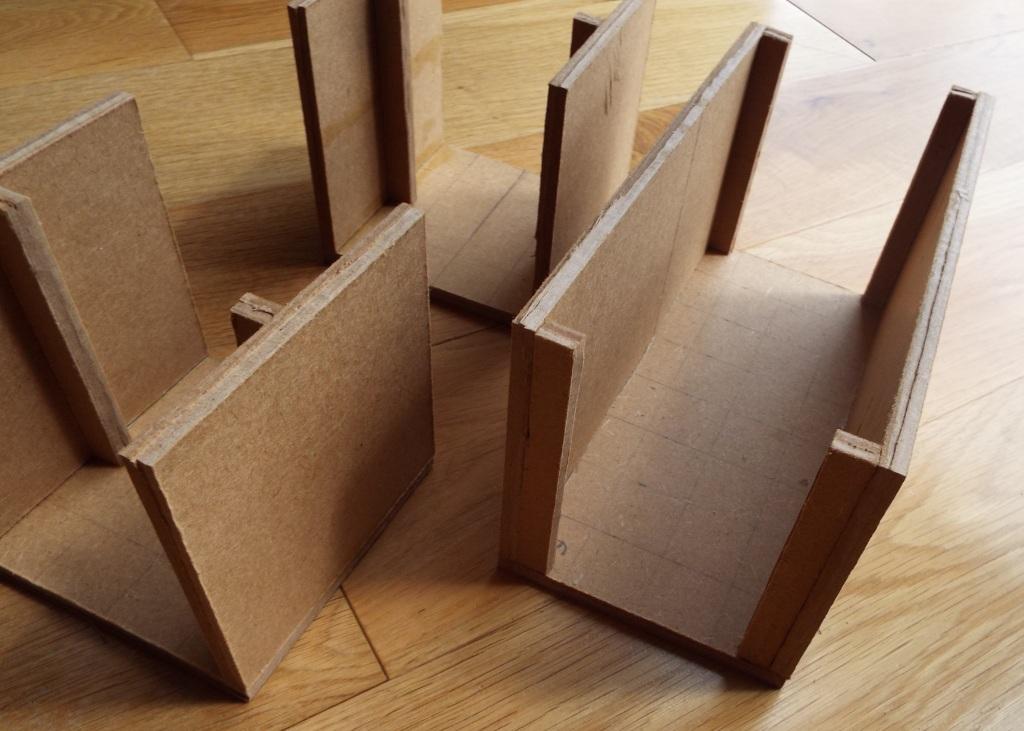
Started work on some corridors, so that when I get more than 1 room, I can link them. The more perceptive of you will see that I started making the corridors 10 cm high, to match with the rooms, but I then decided to make them 8cm high, so cut them back part way through. Although it would make a neater connection with the rooms, I felt that the narrow corridors didn’t look right at that height and it would make handling the figures a bit awkward. These are the 10cm high corridor section frames.
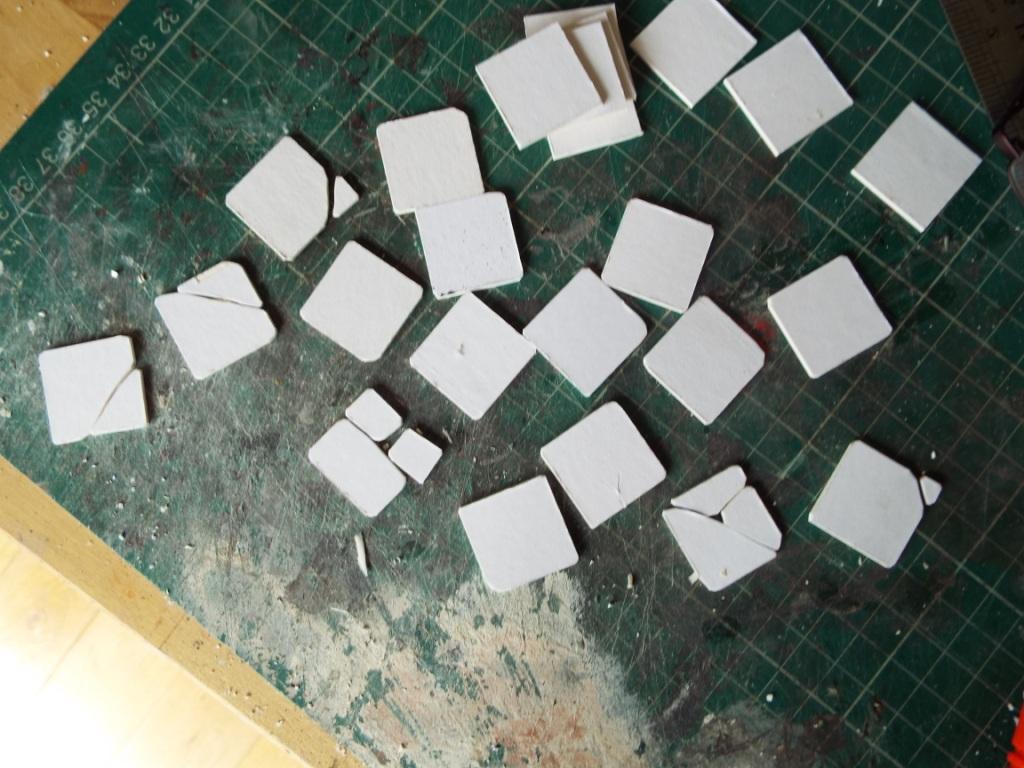
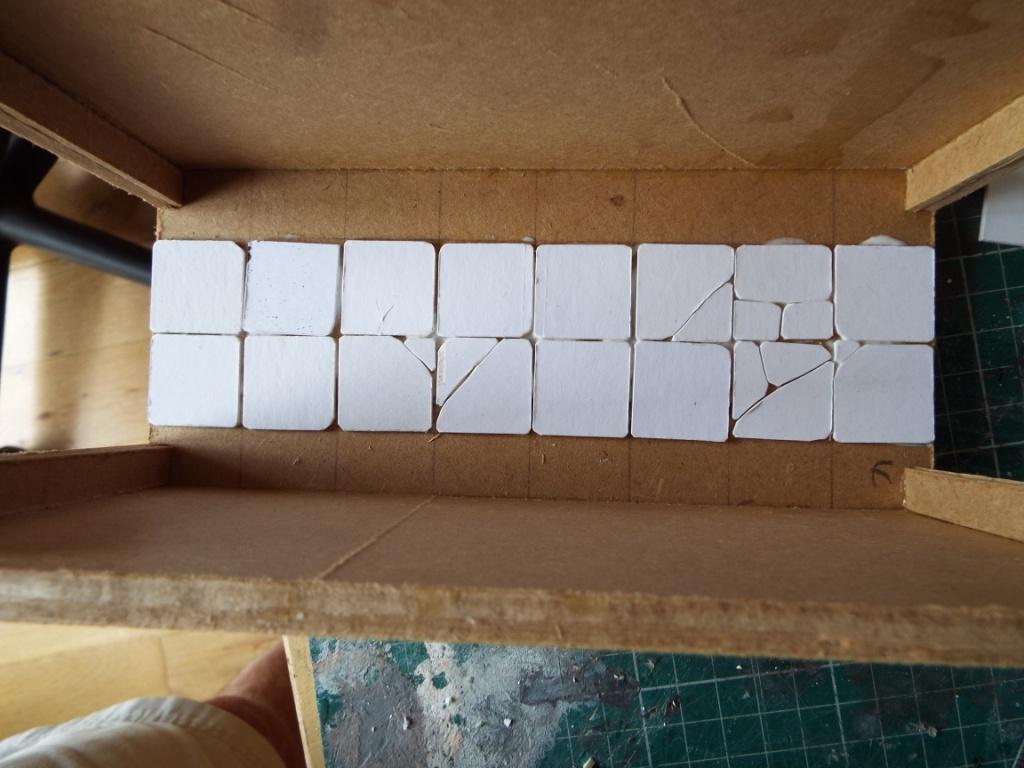
Next stage is the floor. I mark the floor into 1 inch squares, so to create the joins I cut mounting board into 24.5mm squares. I don’t want them looking pristine and new, so to make them look old and worn, I round the corners and cut some of them into pieces as if they were broken. Here are some examples as cut, and then applied to the corridor. The foam walls will fill in each side and so I only need the central 2 rows. To toughen the surface for painting, I mix some pva with acrylic paint and a tiny bit of fine grit and paint them, trying to get the grit in the crevices.
  
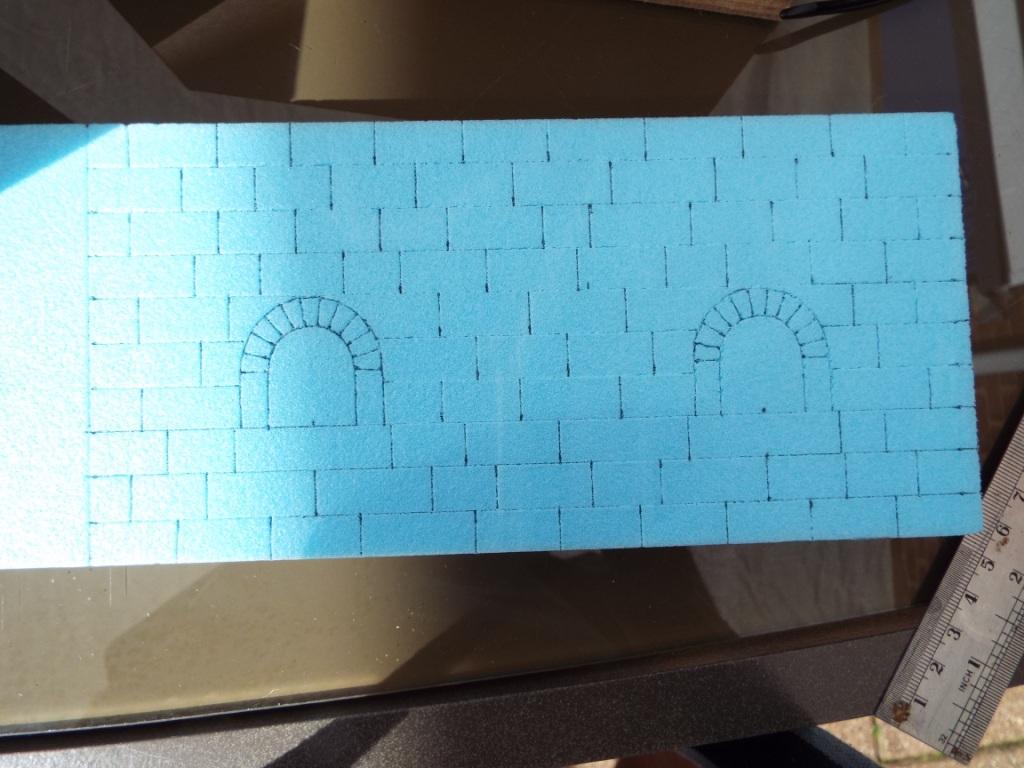
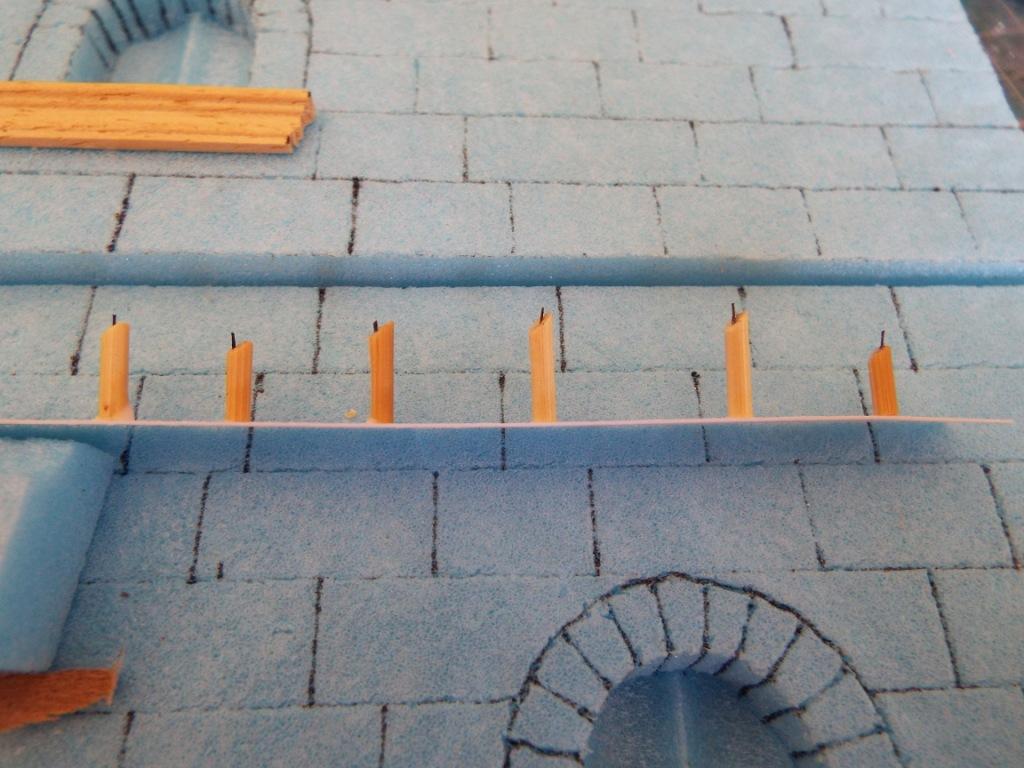
When that is dry, I try to work a similar mix, with a bit more grit, into the crevices. It is to make it look like rubble and junk has accumulated there. That is then ready for basecoating, so on to the walls. I am concentrating on the 8 inch section of corridor. The plan is to have 2 plaques and a candle alcove on one side, and 2 candle alcoves on the other. The alcoves are marked using one half of the jigs I use for doorways. When the alcoves are marked, along with the areas for the plaques, I then rule a series of horizontal lines 1 cm apart to represent the courses of blocks, using a steel rule and a cheap lining pen, then mark the vertical joints. I mark the 2 walls on opposite sides of the same block of foam, because I will cut the block in two using the hot wire table mentioned in the earlier article. Another reason for deciding on the layout of the alcoves on the 2 walls is that I want the foam to be thicker behind the alcoves, for reasons which will be clear later.
Next, cut out the alcoves with a sharp craft knife, and carefully cut out recesses into which the plaques will slot.

I could have simply put a flat back into the alcoves, but a discount store find and an idea to make pillar sections gave me a further idea.
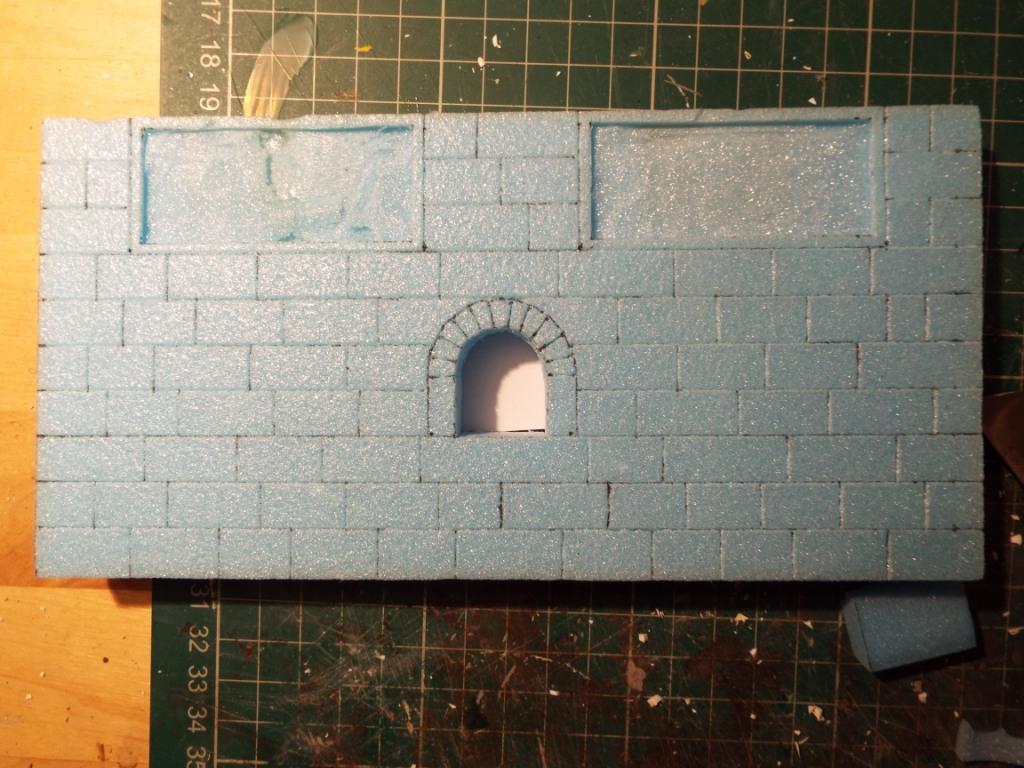
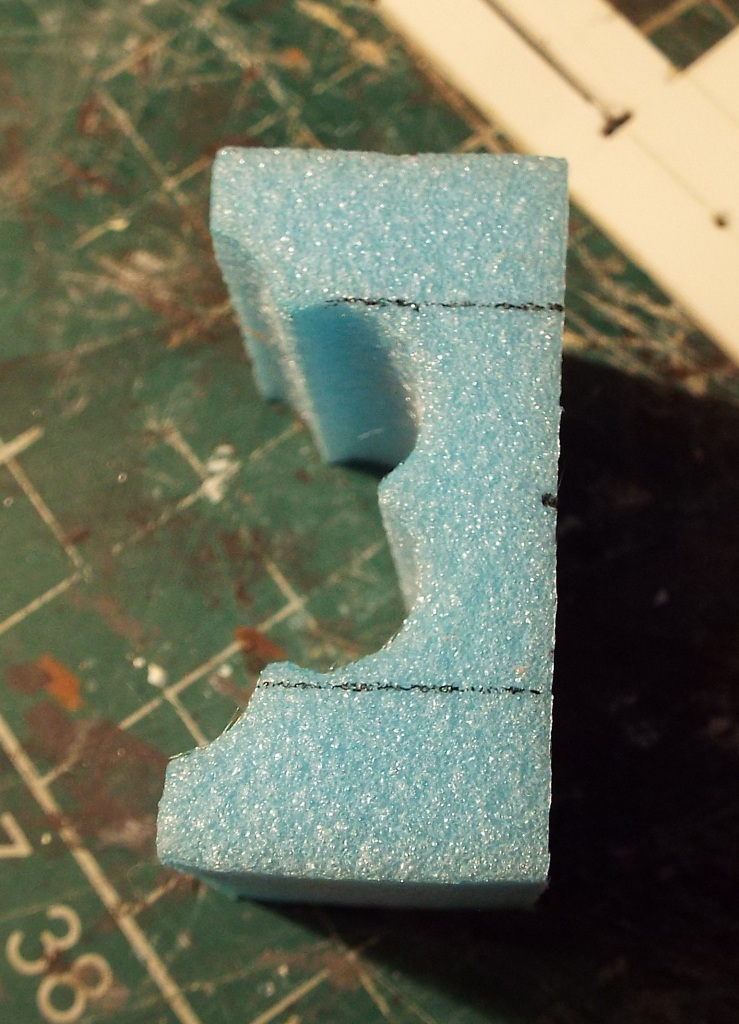
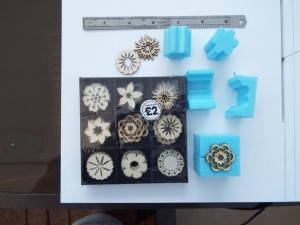
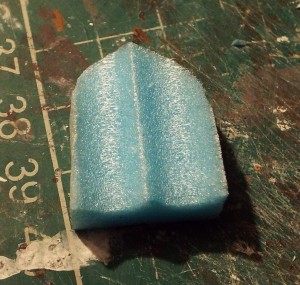
The following picture shows a box of laser-cut mdf shapes bought from The Works. There are 4 each of 9 shapes. I figured that if I pinned a shape to the surface of a 25mm sheet of foam, I could use it as a guide template and create sections of ornamental pillars. I used a pin vise to drill two holes in a suitable piece, inserted 2 pins to fix it to a square of foam, then cut round it with the hot wire. I was quite pleased with the sections of pillar I created, but I haven’t done anything with them yet. It struck me that the offcuts of the squares might come in useful. I trimmed it to the correct width for the alcove, used the jig to mark the curve of the arch on the back, then cut it out with a sharp craft knife. The picture shows the cut piece. It looks like a pointed arch, put that is a false impression given by the ridge in the middle – seen head on it would be a rounded top.
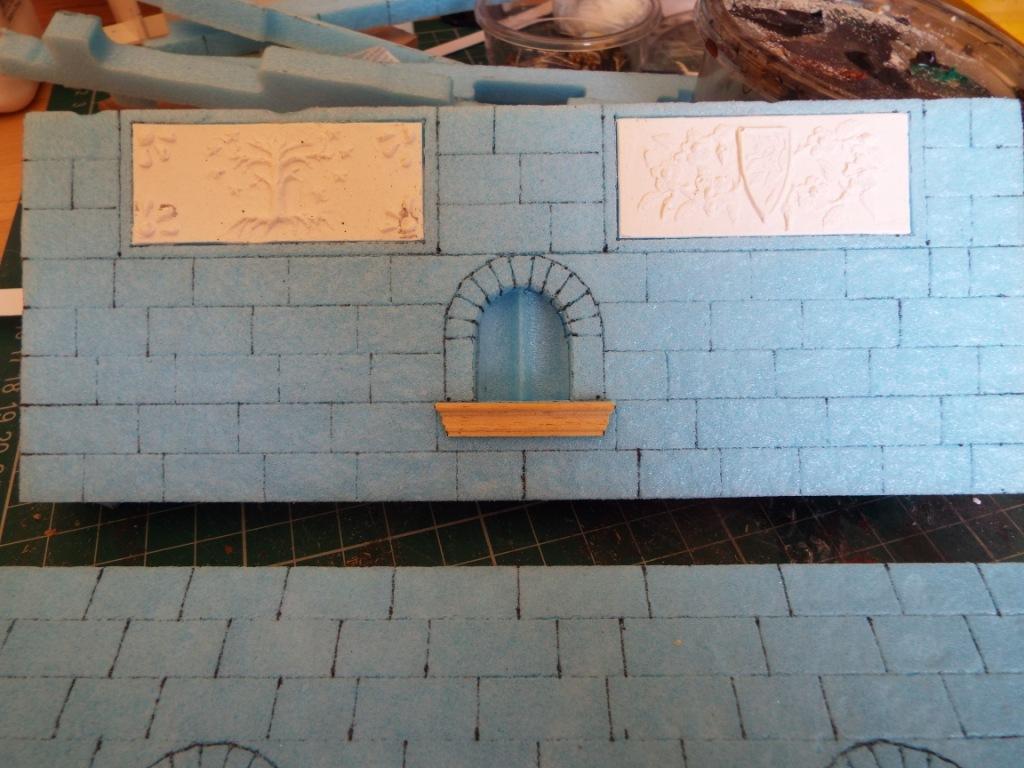
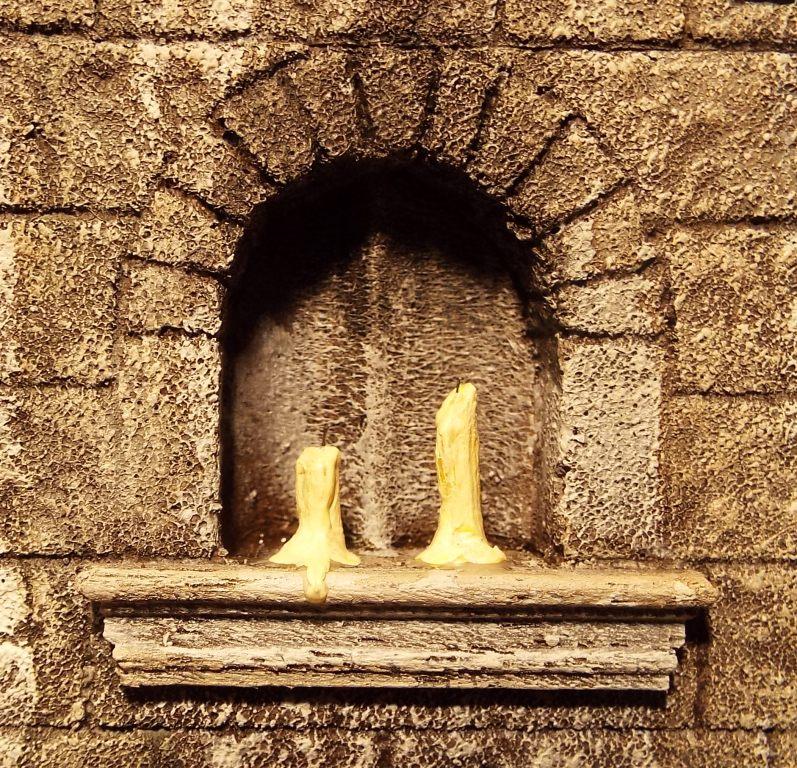
The piece is pushed into the alcove from the back of the wall. The plaques are plaster casts from moulds I have made, and are glued in place with pva. The alcove sill is a section from a piece of doll’s house dado rail, purchased from the 4D model shop in London, and trimmed to taper it in, in the same way that stone sills are shaped on historical buildings. Very useful stuff – can be used to add other details to model buildings.
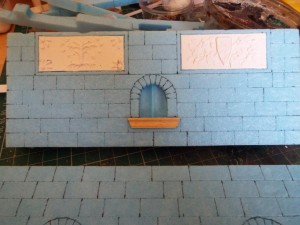
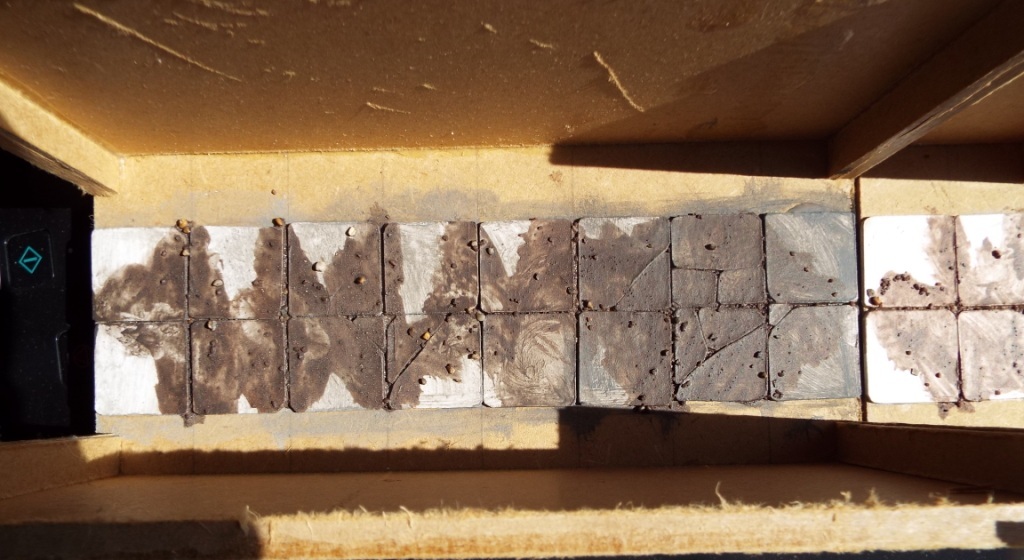
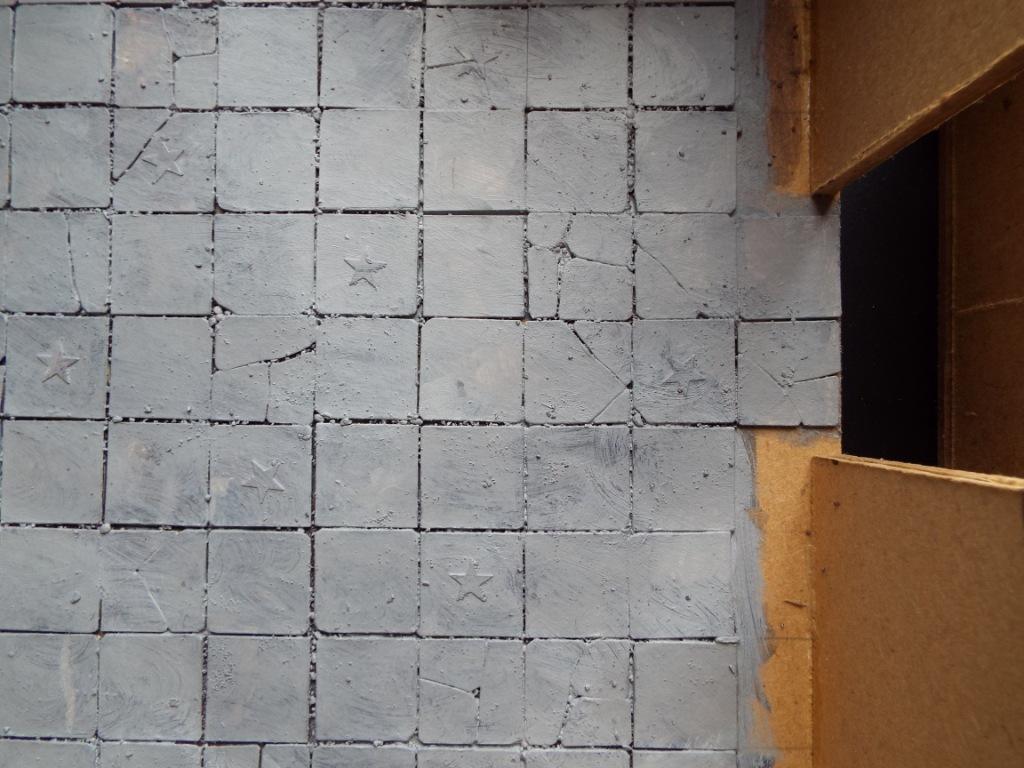
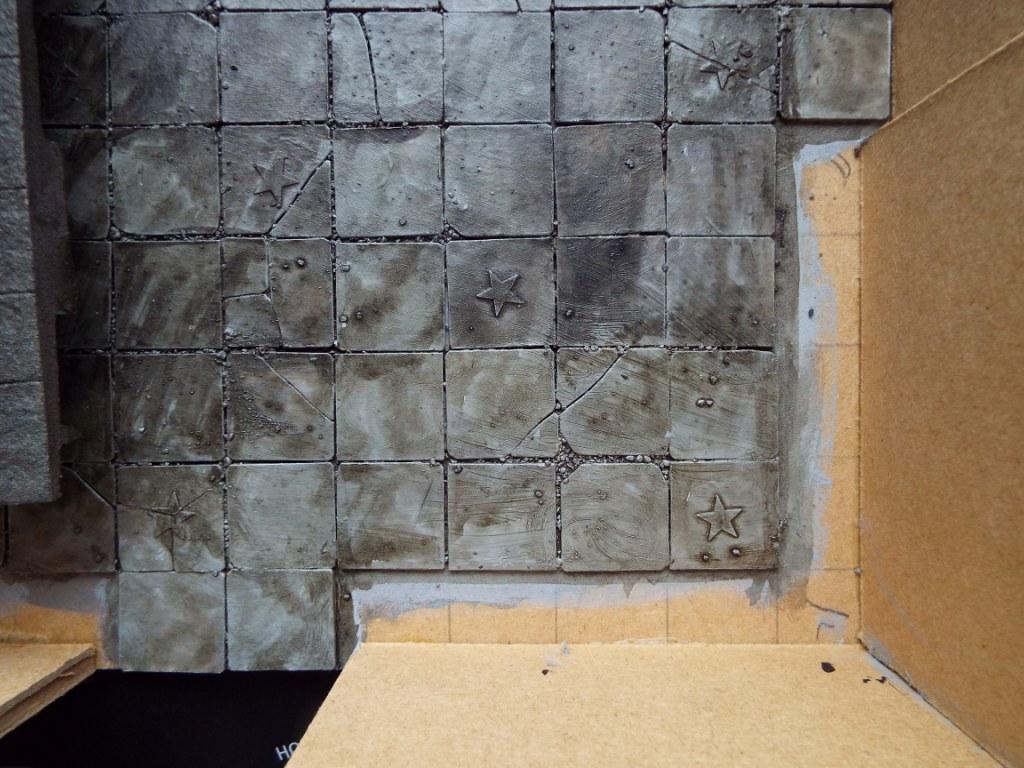
Next stage is to basecoat tiles and walls with a light grey paint to which a little brown is added. A couple of the pics show a larger room on which I have only done the floor so far. On some of the tiles in here I have glued plastic confetti stars, bought in a pack from The Works. (I am their leading advertiser.)
 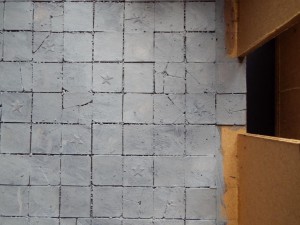 
A black/brown wash is then applied, followed by dry-brushing with a light grey.
 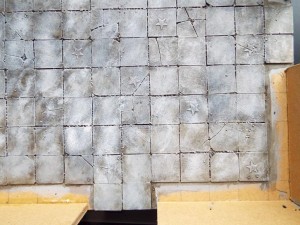 
After this, a number of washes involving different mixes of brow, black and green are applied to give the final finish. I try to streak it down the walls and puddle them on the tiles. The final detail involves candles for the alcoves. Because of the central bar, I want 2 in each alcove. To make them I take short sections of cocktail sticks, cut the top of each at an angle to represent the uneven melt that candles generally have, and then use a pin to make a small pilot hole for where I intend to insert the wick. the Pin Vise with a very fine bit is used to carefully drill a short hole. The pilot hole makes this easier than it sounds. A strand of sisal string is painted black, and once dry is dipped into pva and inserted into the hole. It is trimmed to length with a pair of sharp scissors. In preparation for painting, the candles are attached to a strip of thin card with pva, with the following result;

The candles are painted using a mix of white and yellow acrylic to which some pva is added. I am looking to give the effect of wax melted down the candle stem and pooling round the base.
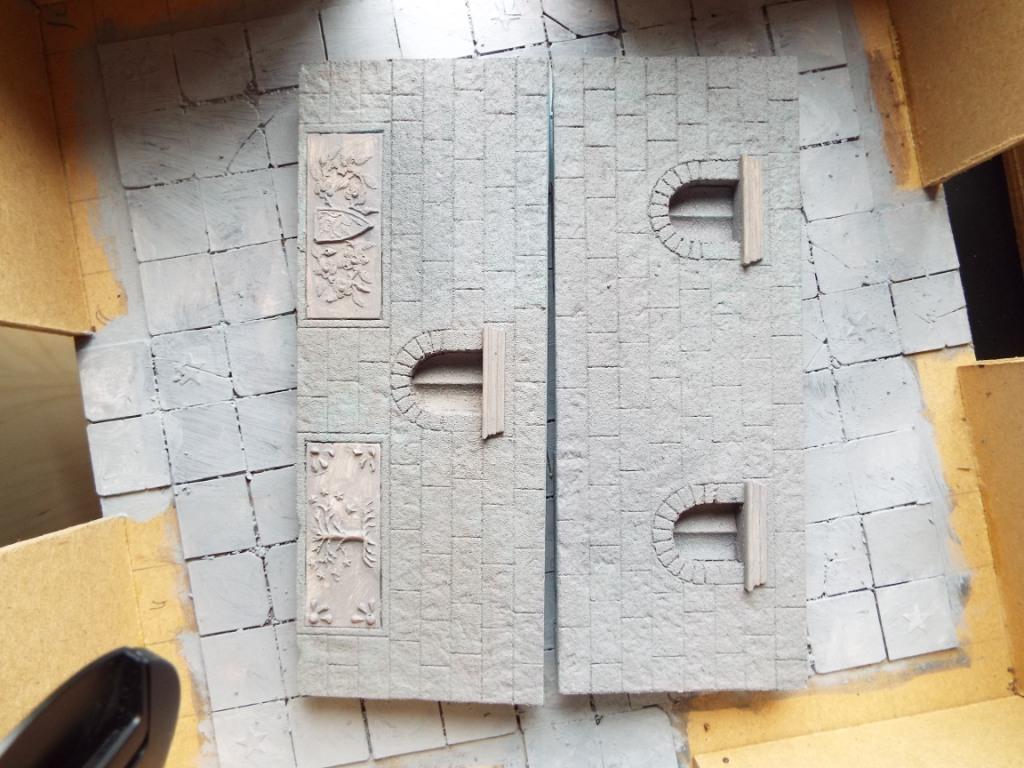
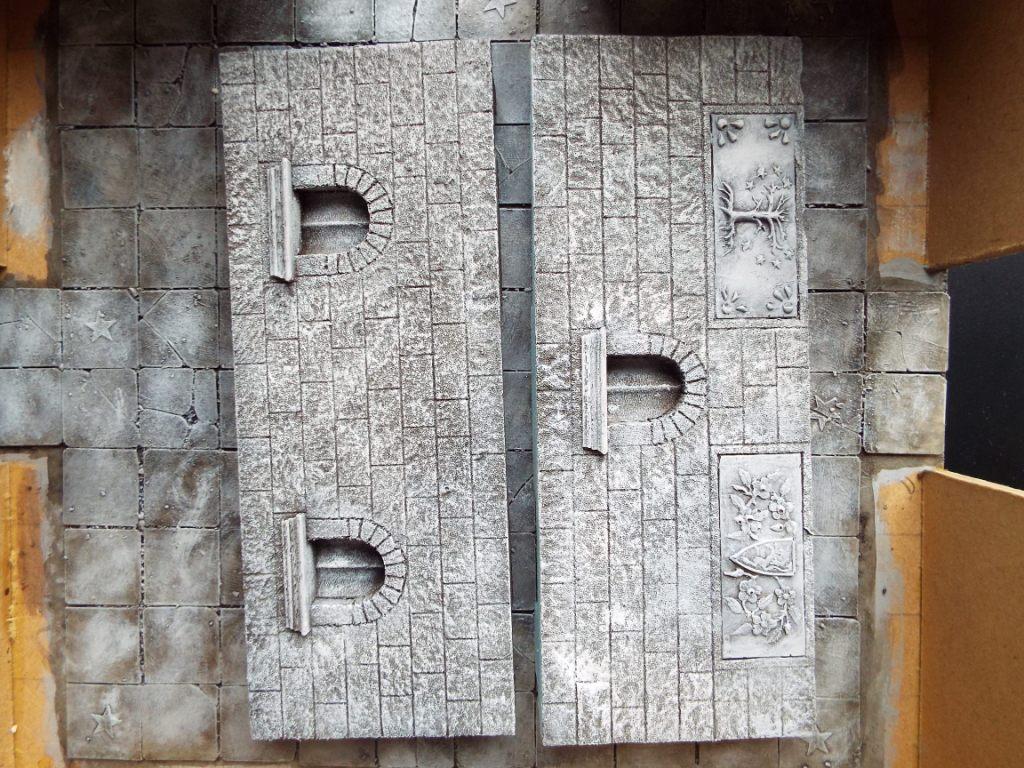
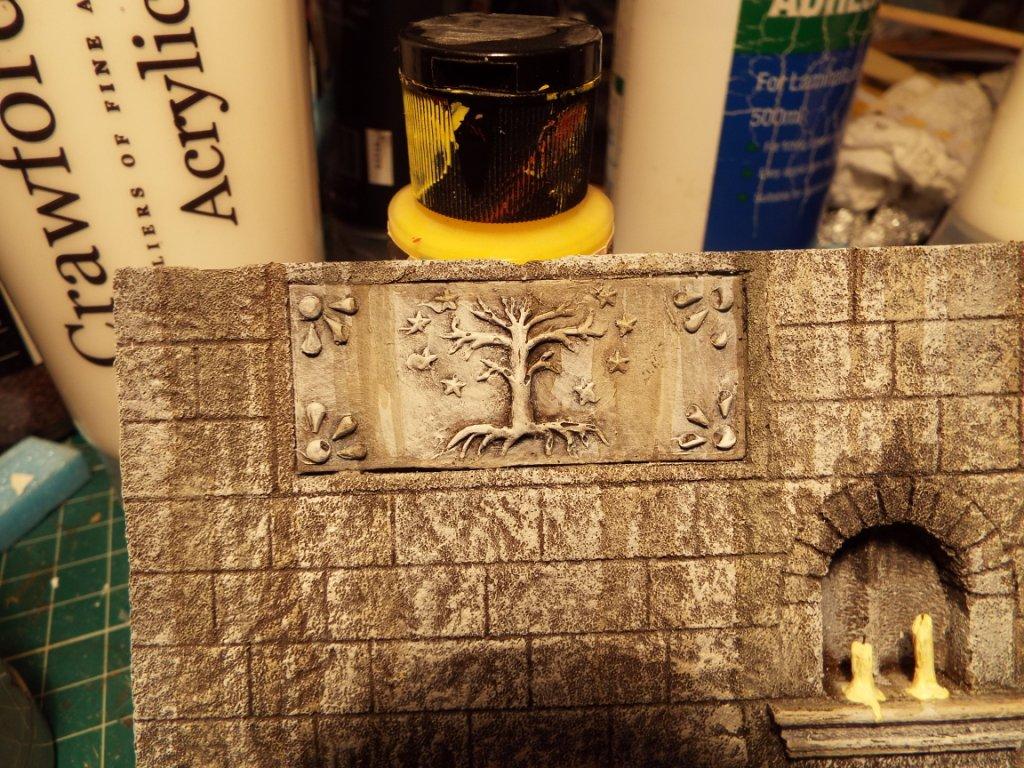
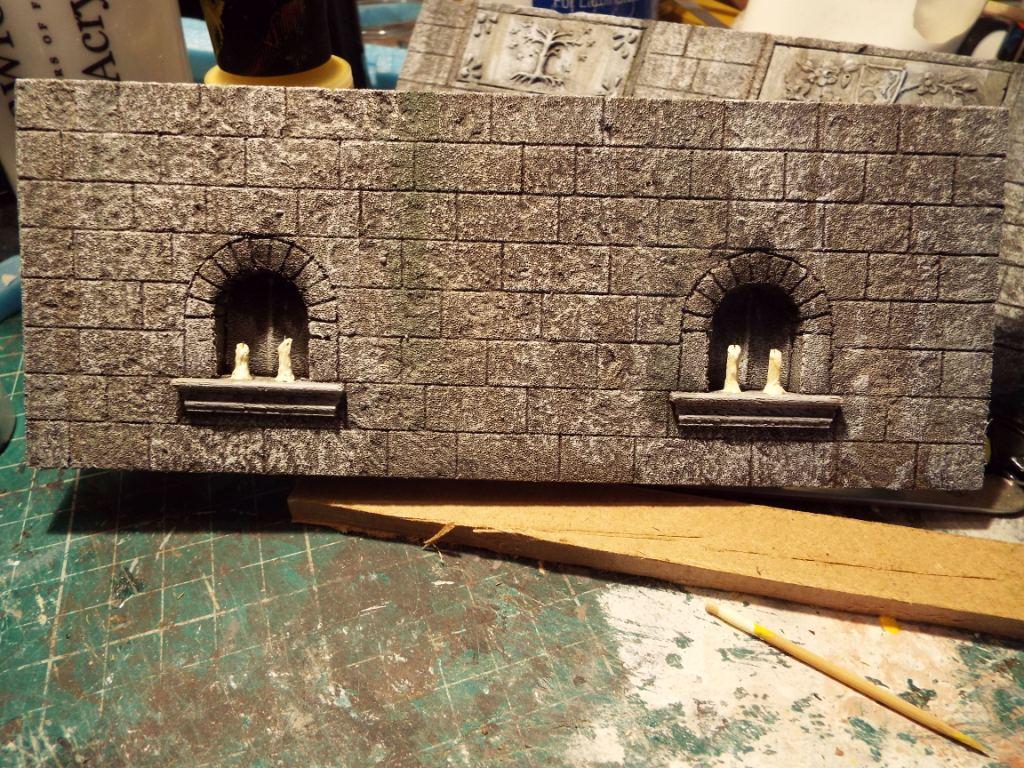
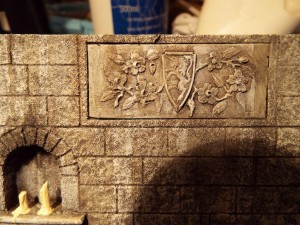
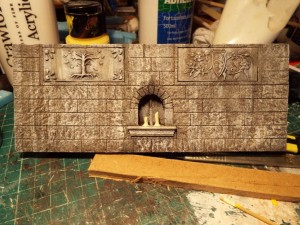
The following pictures show the results before and after the walls are glued into place. The brown effect is caused by photographing them in artificial light – they don’t look like that in reality. The 4th shot is in normal light but indoors, and the final 2 are shot outside. The first plaque is a Gondor-style tree motif, and the second attempts to portray a dog-rose surrounding a unicorn shield, which is an ancient GW piece.
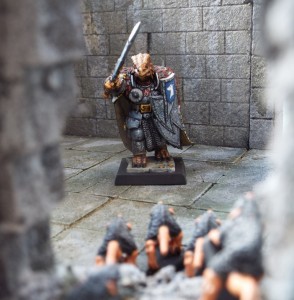
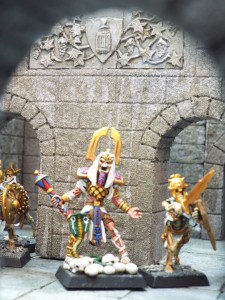
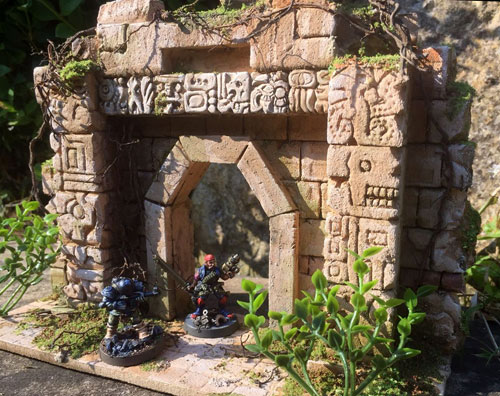
Most forces in the game are being supplied by the players themselves. The only major player controlled force I’m supplying are these feral world natives. I thought about these for a long time before buying the models. The temple itself has an Aztec vibe, so initially I thought along those lines, but it seemed a bit clichéd, so I looked further afield. It proved really difficult. I didn’t want anything too historically recognisable, I wanted them to look a bit barbaric/uncivilised, so definitely no armour, boots, or other sophisticated manufactured items. I looked through a lot of tribal ranges – e.g. Darkest Africa, but a lot of those were very African. Classical period stuff tends to be too recognisable (and too much armour), vikings look too much like vikings, etc. etc. In the end I went for these Black Tree Design picts. They have very anonymous tunics and cloaks, not much equipment and nothing particular recognisable.
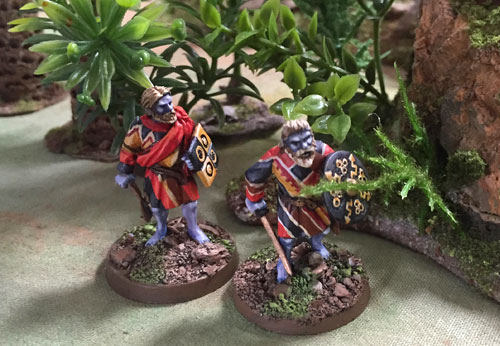 Feral world natives I wanted them to have a strong tribal feel, so I’ve used these random striped patterns in a limited palette of reds, black and a warm yellow. The shields are all in black and yellow with variations on circles, arrows and lightning. I’ve done their short swords in bronze, to highlight their lack of metals.
I struggled with the skin tone for some time. Initially when I was thinking along Aztec lines, I imagined a reddish brown colour, but I wanted something a bit more alien and imaginative. I tried lots of different colours: white, blue, purple, grey, red, but most looked either too ‘dead’ or too artificial or just a bit close to normal Earth humans. In the end I plumped for blue, which contrasts nicely with the clothing. Facial hair is a pale blonde. Rather pleasingly this is the exact skin and hair of Rogue Trooper, which is always a great old school reference.
These two are a bit rough and ready when viewed close up, but they look OK on the table. I’m aiming for this level on the first pass, and then if I have time I’ll tart them up a bit more.
For a future project, I’ve ordered up a copy of ‘Secrets of Shandisholm’ which has just been released by Oakbound as part of their “The Woods” range. I’ll be picking up a copy direct from Geoff at BOYL in a month’s time. It’s set in the world of Celtic myth – with plenty of really weird and interesting creatures of faerie. I’ve got some Black Tree Design Viking and medieval villagers to paint up which I’m hoping will fit in nicely. More information here: – http://www.propworkshop.co.uk/oakbound/the-woods/
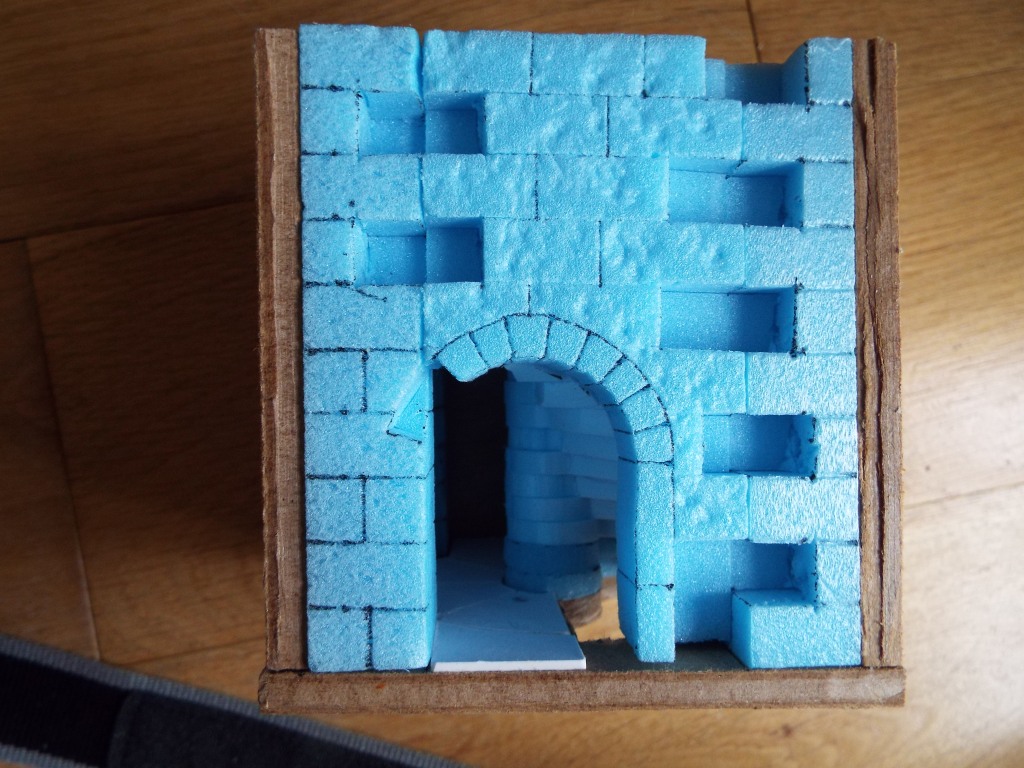
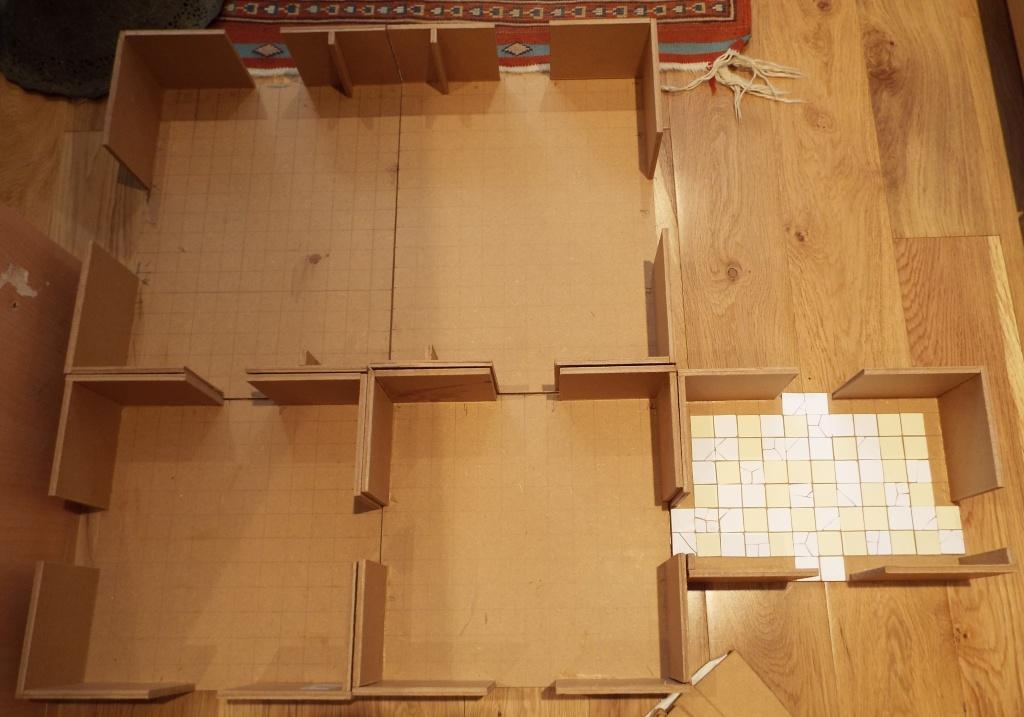
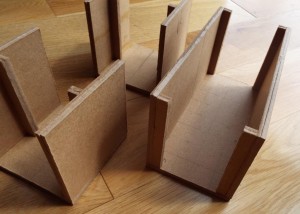
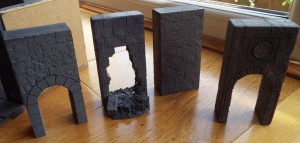
I’ve bought in to the Gnickstarter for Frostgrave, ‘Into the Breeding Pits’, so thought I’d start on some underground terrain. Decided on 1″ squares so they are also useable for D&D, and a set of rooms with 2″ apertures in teh walls , so that I could put blanks or entrances in to allow me to vary things. I’m going to make some passages as well. This is about the first room I have made, together with an arched partition that I can use to break the room up.
The floors are 4mm mdf (masonite), and the walls are made of the same thing, faced with styrofoam. I have started with 1 room 8″ by 12″, 2 which are 12″ square, and 2 sections which are 16″ by 12″ with one open side that will allow me to put them together to make a large open area, although it would be broken up with pillars and the like to reduce line of sight. The following pic shows them together;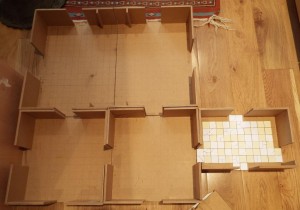 The walls are 10cm high to give me some height to play with. The walls are 10cm high to give me some height to play with.
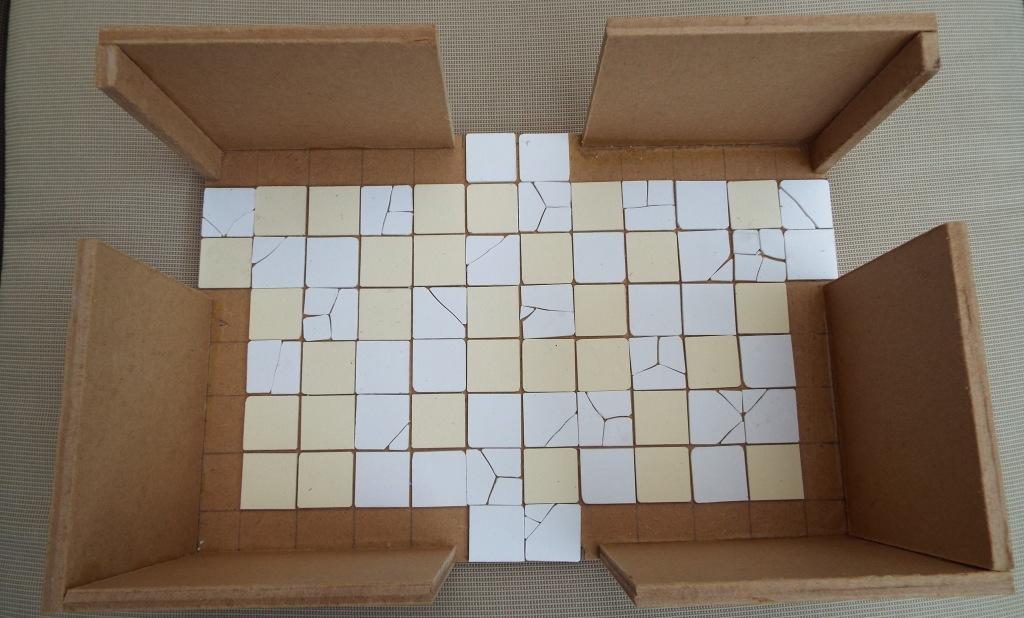
Next I tile the floors with artists mounting board, including some broken tiles. The bare areas will be filled in with styrofoam walls.
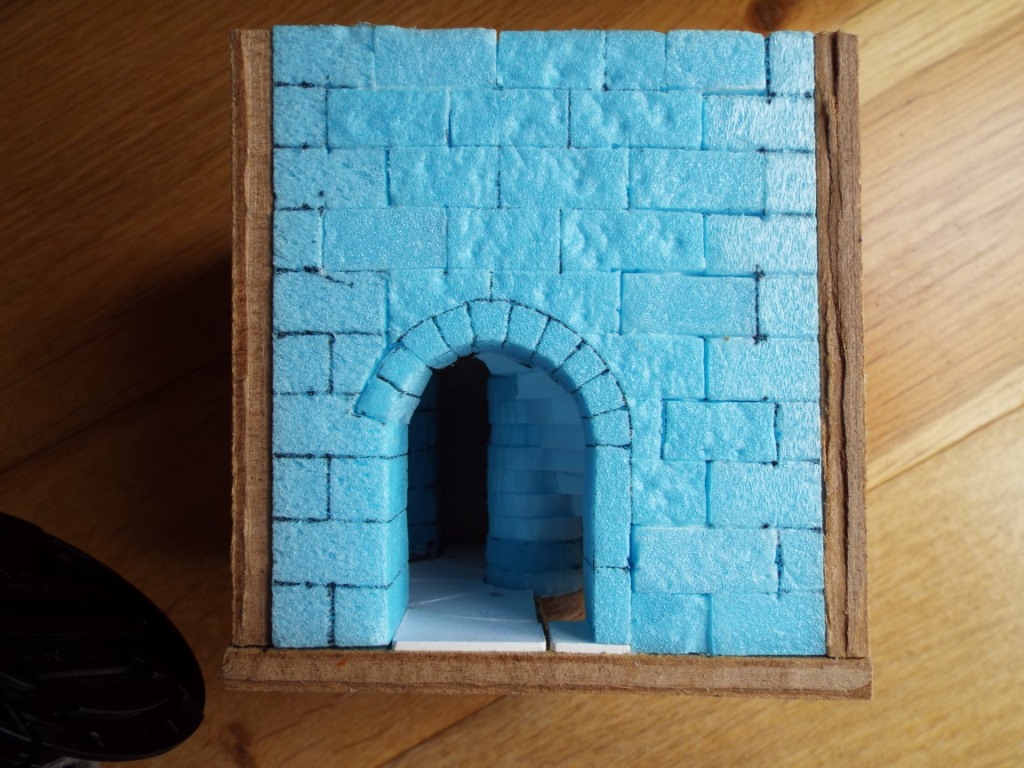
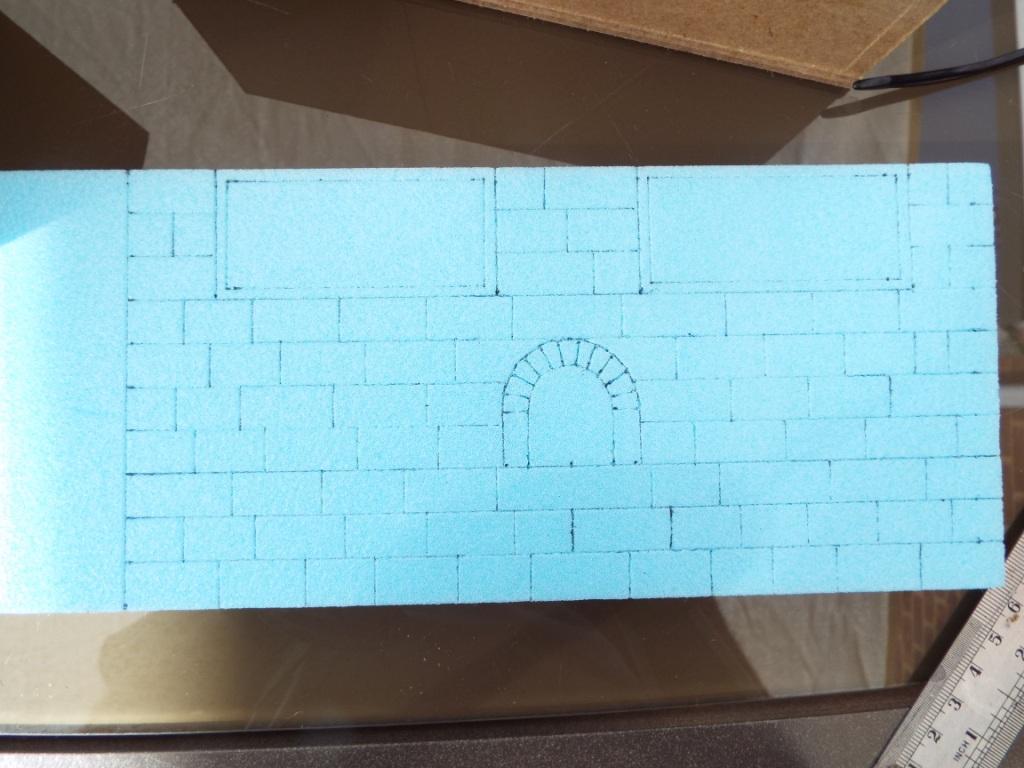
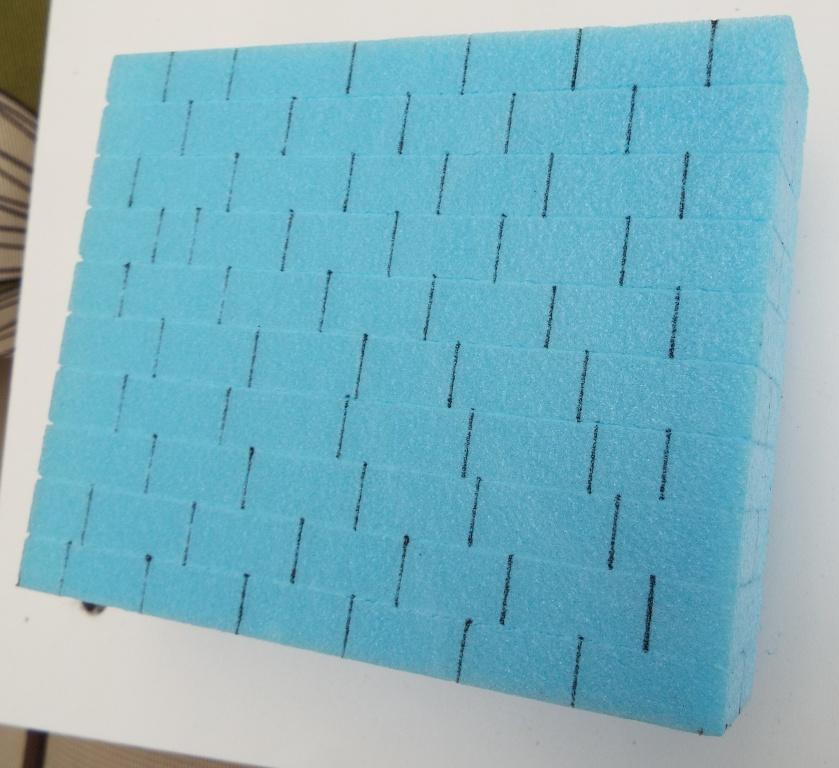
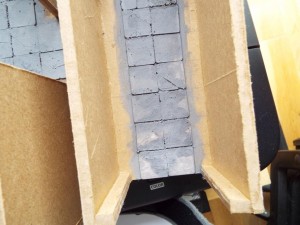
 Next, I cut a 10 cm strip of 25mm blue styrofoam using my trusty hot-wire table, and cut it to length to wrap round the mdf walls. To avoid waste, cut a section long enough so that when it is spilt it will cover 2 wall sections. This is hard to describe but I hope that the second of the following pictures, where I have cut the 2 halves with the hot wire table, will explain it. Before cutting I mark up the stonework using a ruler and a cheap lining pen obtained from The Works – 3 pens for £1. Each row is 1cm deep. The pen makes grooves in the foam. I then use the trick I picked up from Lead adventure whereby a ball of scrunched-up kitchen foil is pressed against the foam to texture the surface. Next, I cut a 10 cm strip of 25mm blue styrofoam using my trusty hot-wire table, and cut it to length to wrap round the mdf walls. To avoid waste, cut a section long enough so that when it is spilt it will cover 2 wall sections. This is hard to describe but I hope that the second of the following pictures, where I have cut the 2 halves with the hot wire table, will explain it. Before cutting I mark up the stonework using a ruler and a cheap lining pen obtained from The Works – 3 pens for £1. Each row is 1cm deep. The pen makes grooves in the foam. I then use the trick I picked up from Lead adventure whereby a ball of scrunched-up kitchen foil is pressed against the foam to texture the surface.
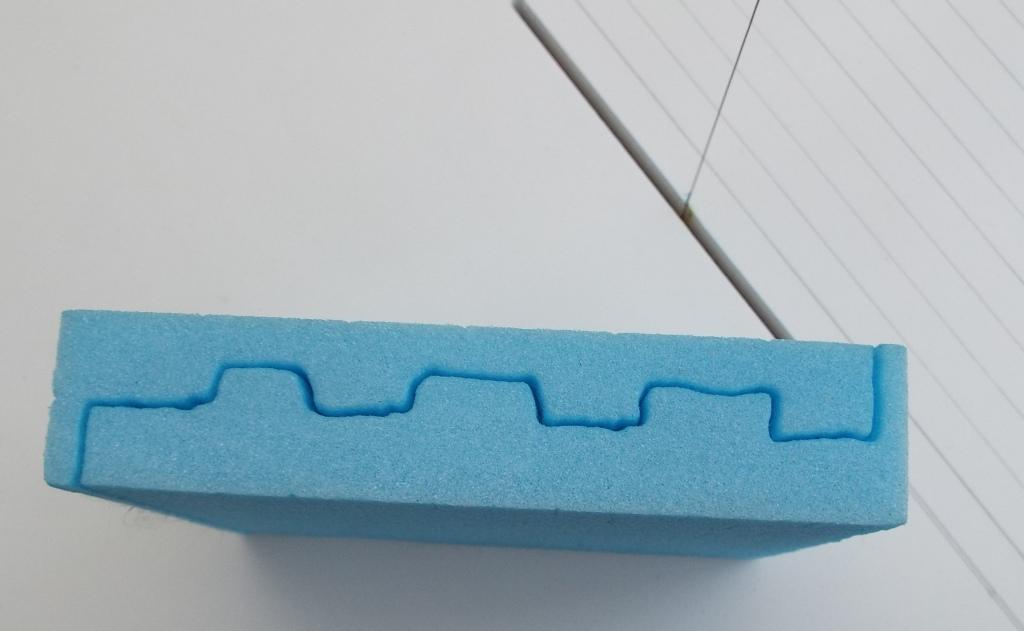
  The ridges are so that you don’t end up with a very thin section of wall with a complete gap between the foam and the MDF, as in the following picture. The ridges are so that you don’t end up with a very thin section of wall with a complete gap between the foam and the MDF, as in the following picture.
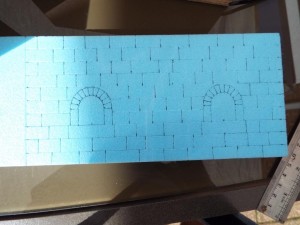
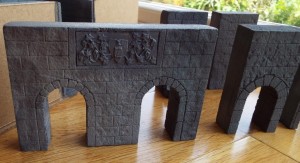
Next stage is to make the inserts for the entrances, and a partition section so that the room can be broken up if I want 2 smaller areas. The Inserts are 2″ wide, and the partition is 6″ wide. I decided to make 1 blank insert, 2 with an arched entrance, and one where someone or something has burrowed through the wall. These next 2 pictures show an arched section
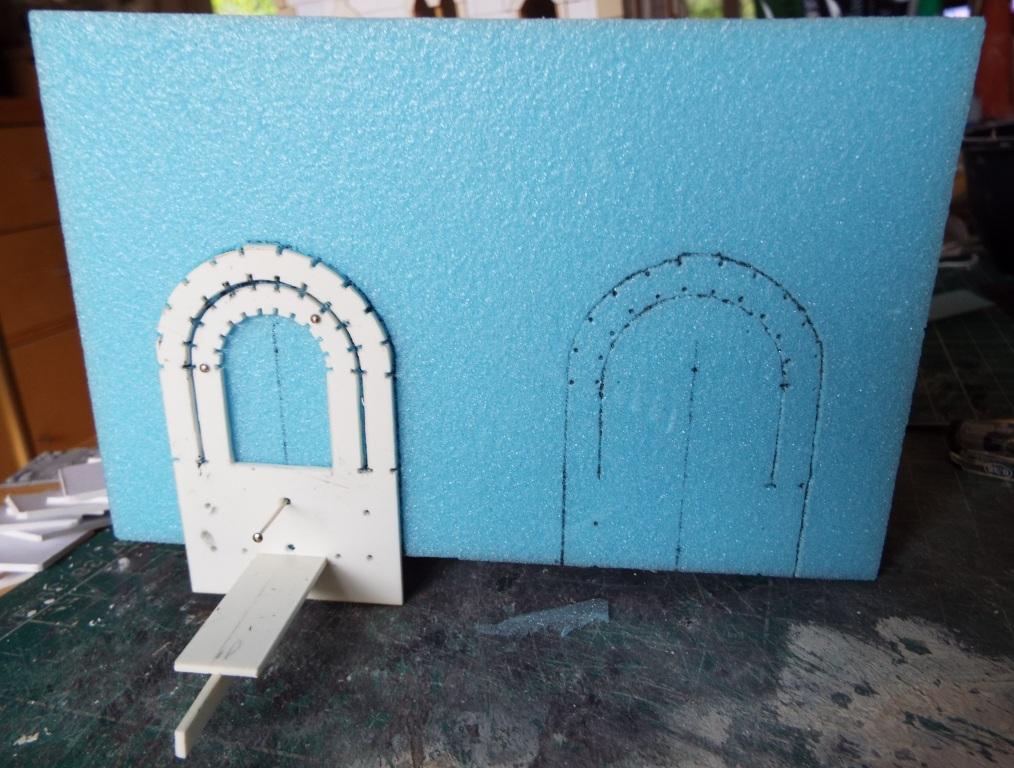
The arch is marked on the foam using the lining pen around a jig that I have constructed from plastic sheeting, which I’ll illustrate with the partition section below. The entrance is cut out using a cheap retractable craft knife. A shield has bee pressed into the foam and glued with pva to provide some decoration. For the burrowing section I wanted to have some blocks removed from the wall, with a more irregular hole behind it to represent digging through rock or earth behind the wall. I cut the section into 2 pieces along one the the block joint lines so that I could slide the craft knife in behind the back of the blocks. This picture shows the insert cut into 2 and the blocks cut out of the wall.
I then gave it a base made om mounting card which projects forward and glued some blocks and rubble (Oyster shell bird grit) to it.
For the partition I decided to have 2 arches in it, using the jig. Here is a pic of the 3 jigs I have, the one I used for this was the one on the left.
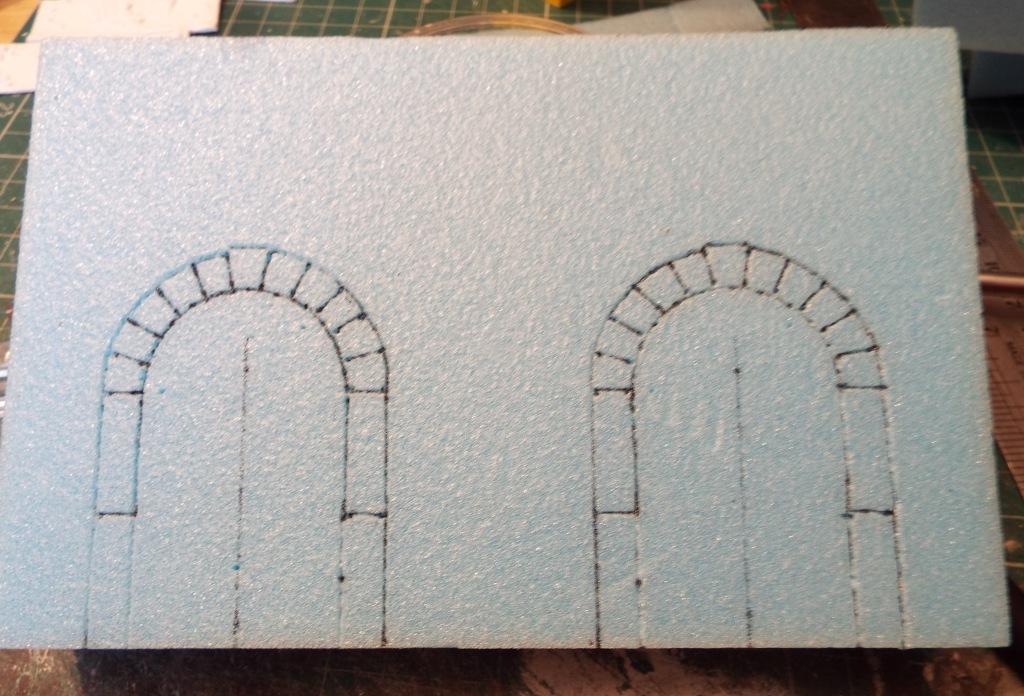
 The idea is that one side is fixed to a slider strip, and the other is free to slide along that strip so that both sides can sit snugly against both sides of styrofoam sheets of different thicknesses. There are some pinholes so that both side is pinned in place. The lining pen is used to mark up the stone joints and the joining points, so that when the jig is removed, the joints can be completed with a ruler and the lining pen. The next picture shows the jig in place in the partition, and the pattern of marks where it has already been used for the other arch. The second picture shows where the joints have been linked up to complete the outline of the blocks comprising the arch. The idea is that one side is fixed to a slider strip, and the other is free to slide along that strip so that both sides can sit snugly against both sides of styrofoam sheets of different thicknesses. There are some pinholes so that both side is pinned in place. The lining pen is used to mark up the stone joints and the joining points, so that when the jig is removed, the joints can be completed with a ruler and the lining pen. The next picture shows the jig in place in the partition, and the pattern of marks where it has already been used for the other arch. The second picture shows where the joints have been linked up to complete the outline of the blocks comprising the arch.
 
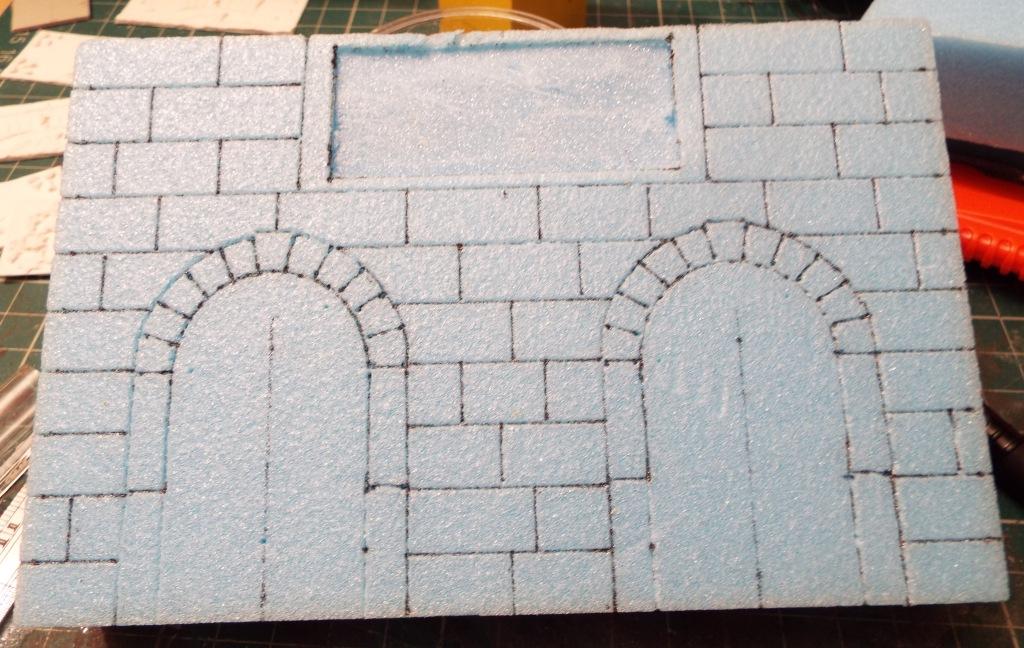
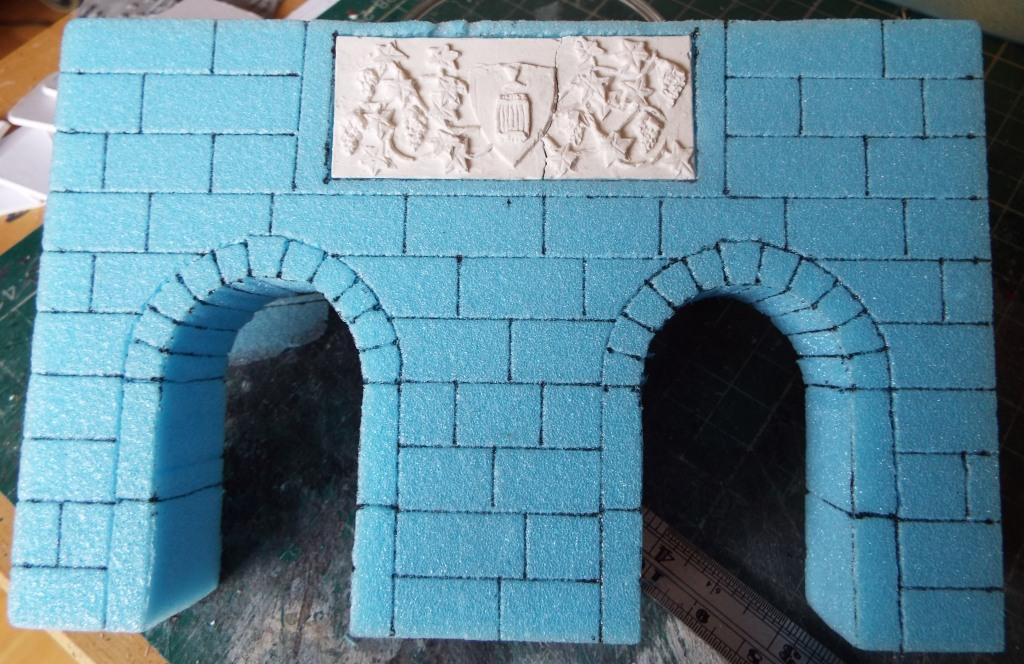
The next stage is to mark in the blocks, but I wanted to put in a piece of decorative stonework to represent the guild sign of the Vintners Guild. so I marked and cut out a section to match the size of the plaque I had produced.
The plaque uses the moulding compound that Aiden used for his well in his earlier article, called Oyumaru. Had to send to Japan for it, but pleased I did. Firstly I made a master. On a thin sheet of card glued to a piece of mdf, I constructed a design using Fimo heat-drying modelling clay – although the grapes are poppy seeds glued on using pva. This picture shows the master part-way through construction – I baked it at intervals so that sections of it were hard and didn’t get ruined when I added extra leaves.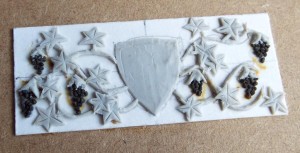
When the design was complete and baked, I took a mould using the compound. When that had cooled down – you make it pliable in hot water – I mix some plaster of paris and fill the mould. when it is dry I ease it out. Sometimes it breaks – next time my master will have a thicker base – but the crack in the plaque on this one looks better to me. I used pva to glue it in place.

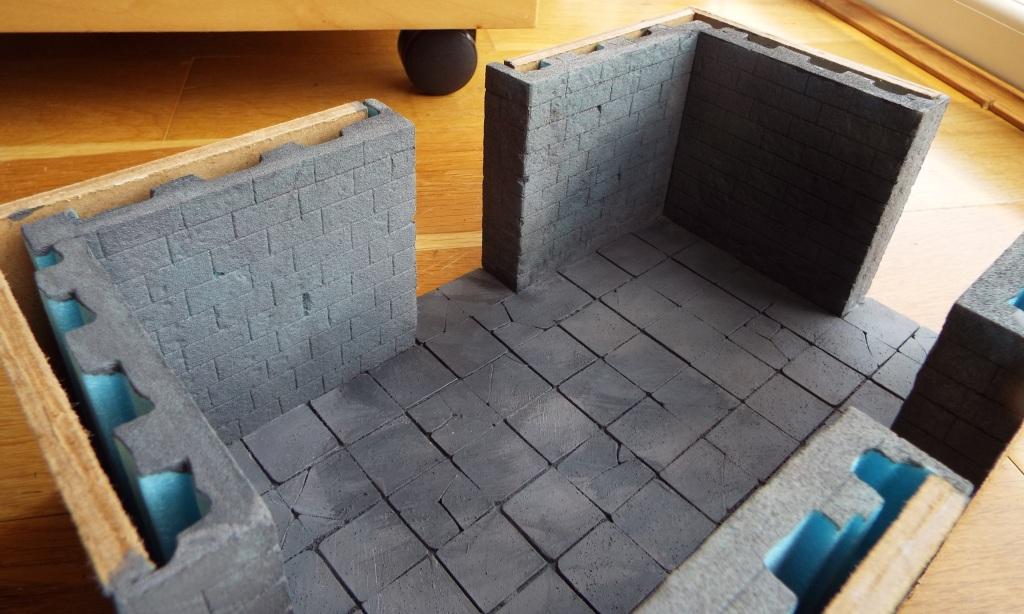
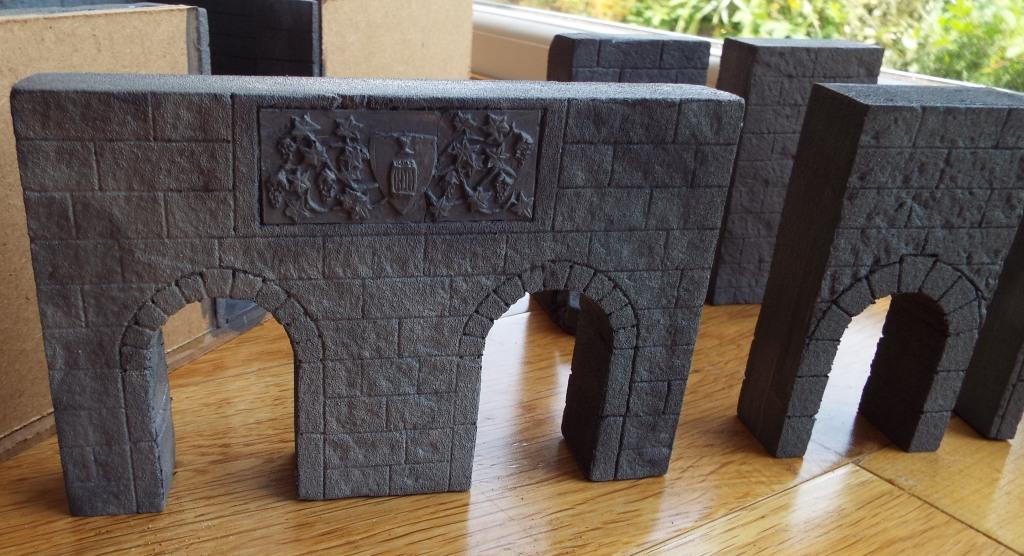
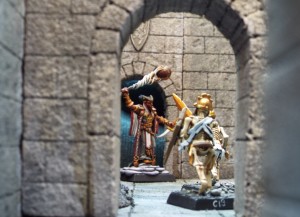
Everything was then ready for the first coat of paint, which was mixture of white, witha little black and brown mixed in. Here is the room, the partition and the inserts;
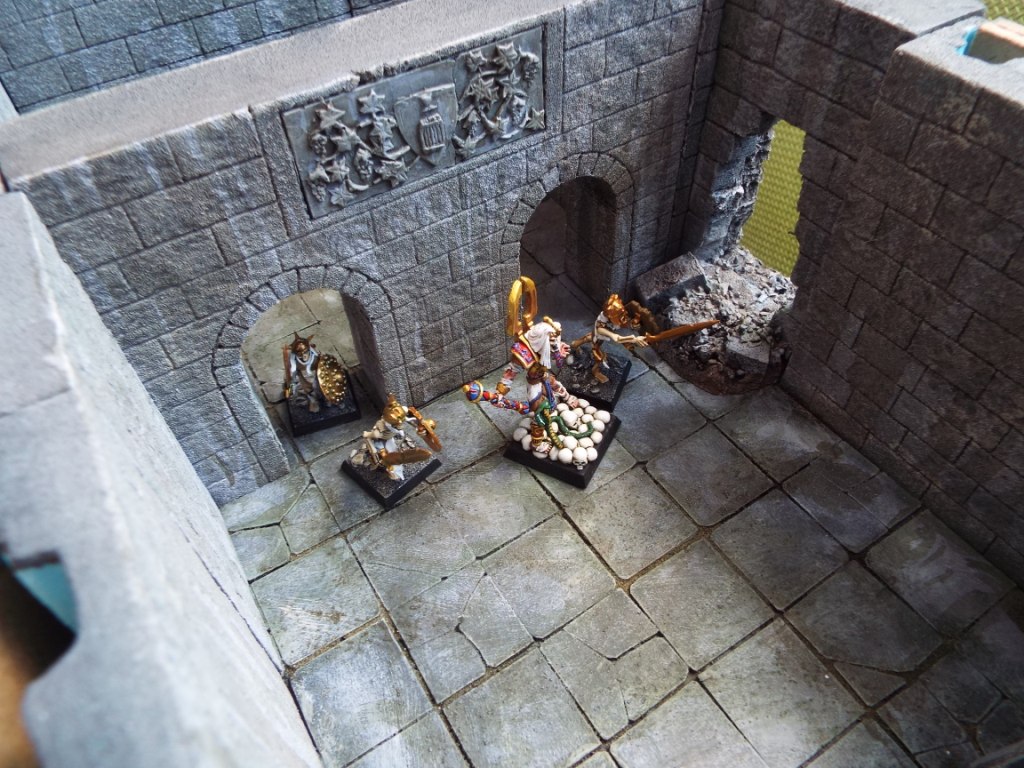
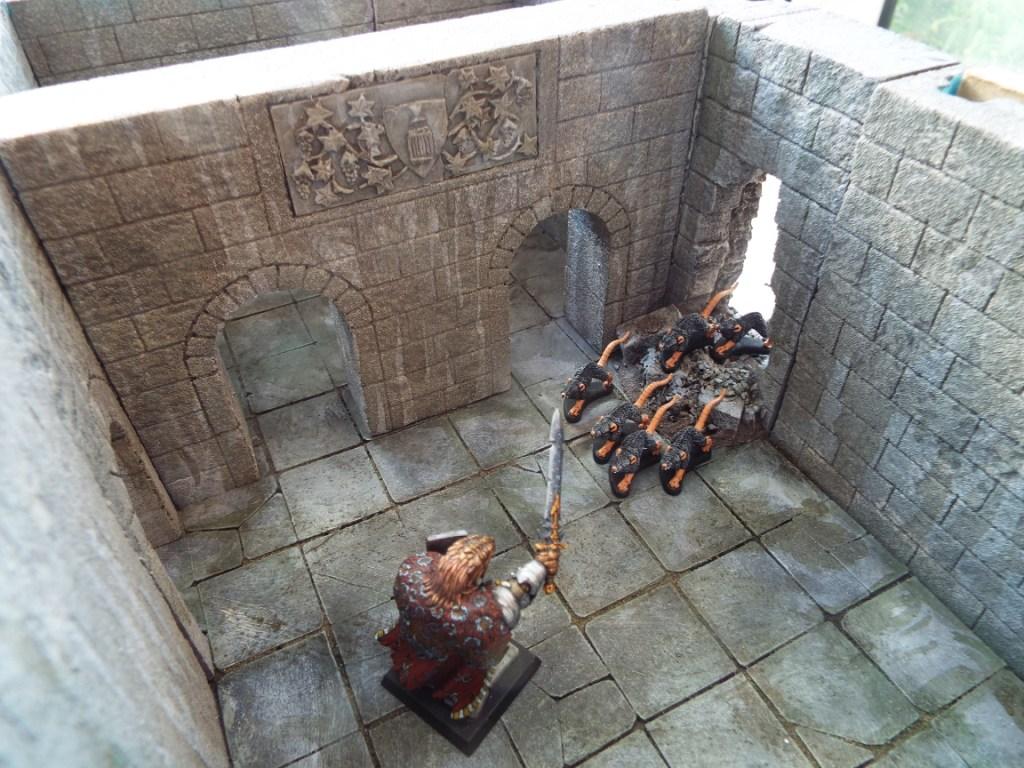
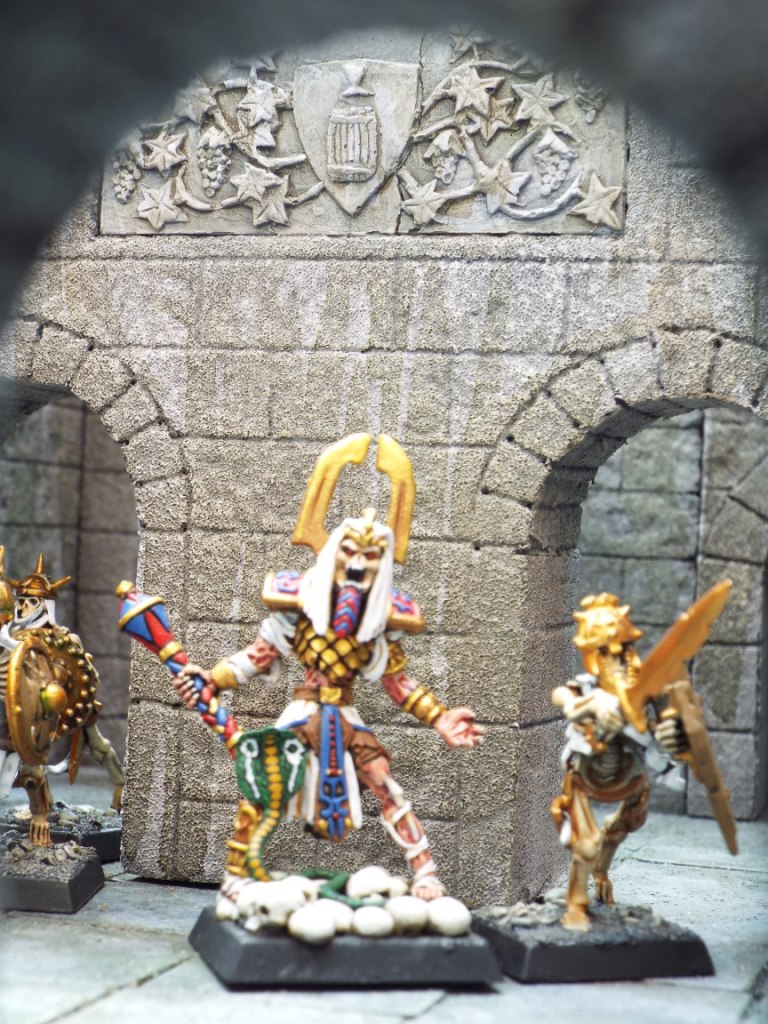
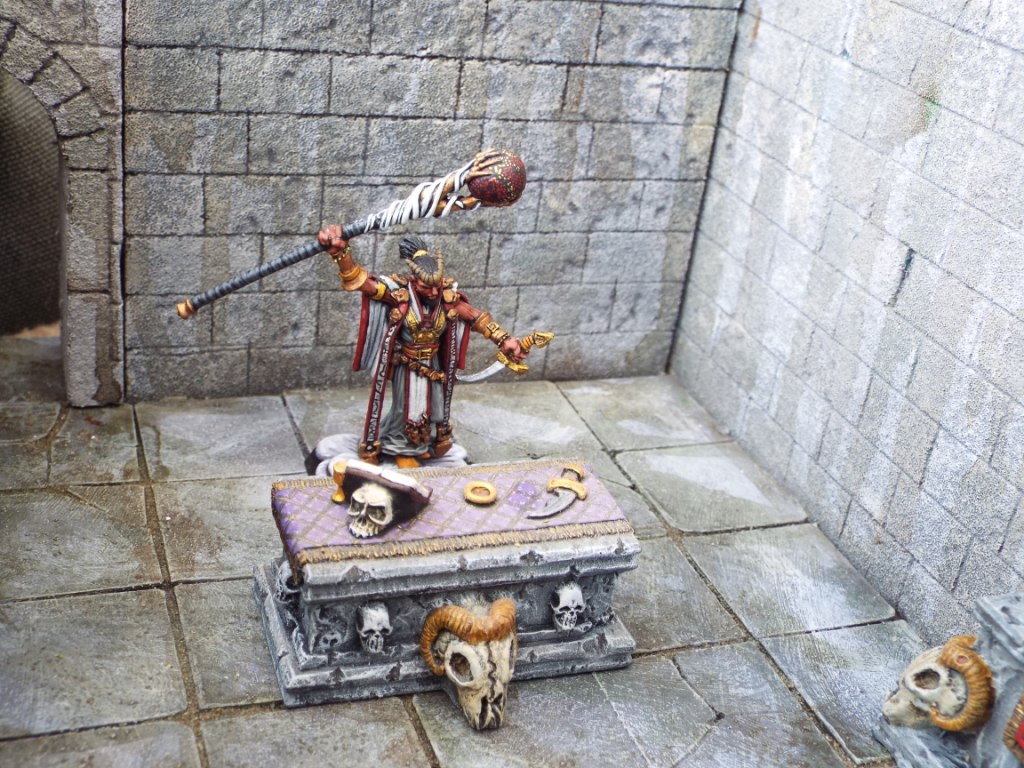
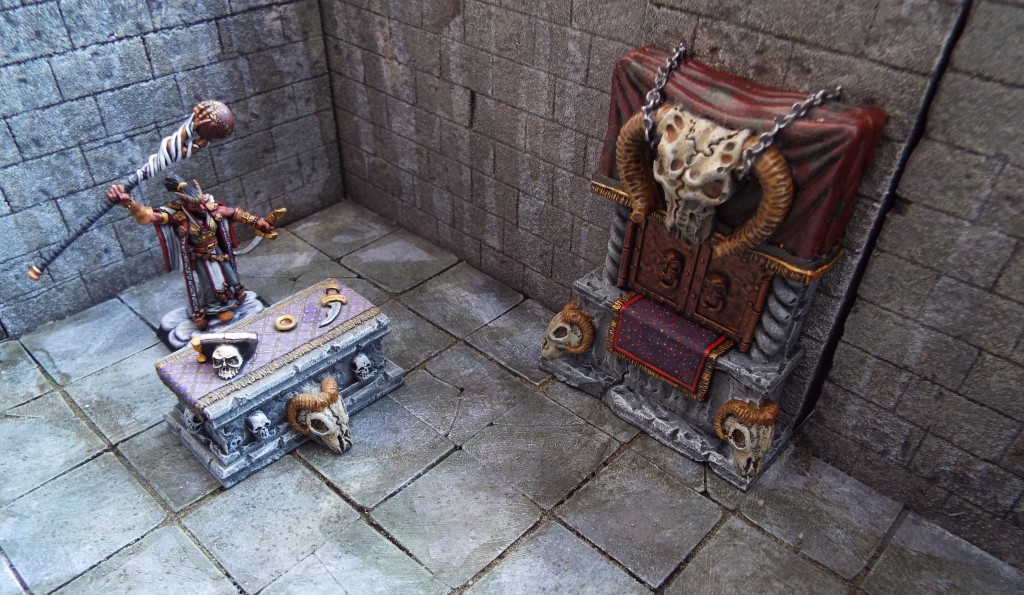
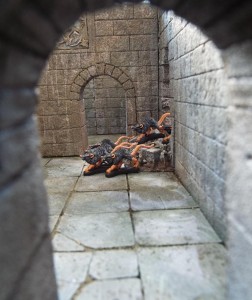
To stop the gaps in the tiles from being too stark, a mix of fine sand pva, and varying amounts of black and brown were mixed up and rubbed into the gaps. Once dry, I then dry brushed the walls with white to which much smaller amounts of black and grey were added, to lighten the surface. Finally thin washed with varying mixes of black, brown and green were applied to the walls and floors. I then put them together with a few figures and took some pics, as follows. Some of the photography is a bit rough – especially the blurry skeletal leader. The furniture is a couple of commercial resin pieces I have painted up.
A couple of weeks behind schedule, I’ve finally set up for the scenario playtest for the Inquisitor Cynole game. I was starting to worry a bit, but I’ve really pushed on in the last few weeks. Last weekend I printed out a draft set of the temple floorplans, finished the first draft of the briefings and forces and made another 3 feet of chainlink fencing. I thought I had masses, but it turned out when I laid it out, I didn’t have enough.
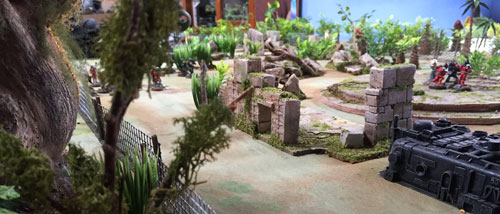
We’ve set the whole game out and played the first couple of turns. I can’t show you too much in case of spoilers, but here are some photos from the initial setup.
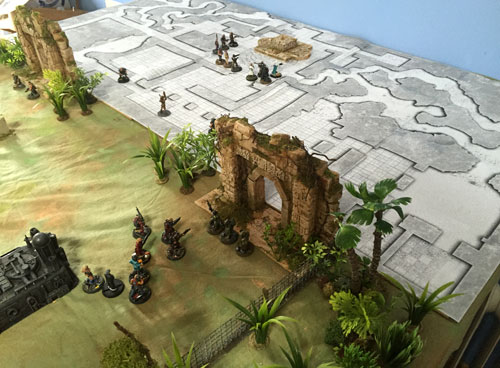 Temple floorplan This is a 4ft x 8ft table. On the day it’ll be a 6ft x 12ft, which will allow for a bit more jungle round the edge, and space for people to lay out their reference sheets etc. Up one end is the temple, then there’s a big compound full of ruins, surrounded by electrified fence, and beyond that… the jungle.
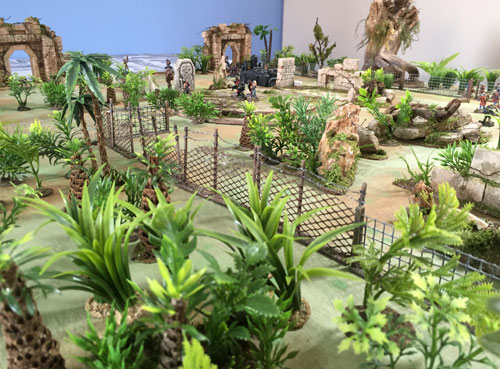
Luckily I already had all the jungle, so I didn’t have to make any of that, but all the ruins have been made specially.
 More ancient ruins. Generator in the foreground 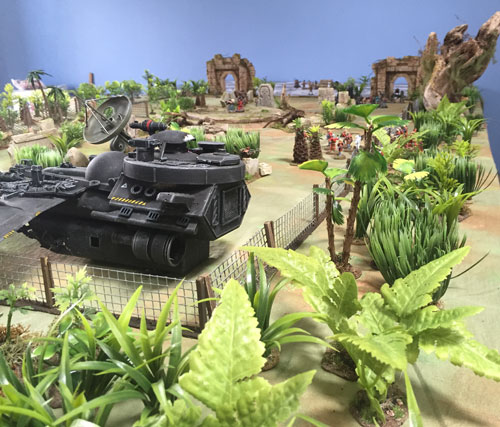 Shuttle on landing pad In the foreground here, you can see a shuttle. I’m hoping to have a couple of ornithopters ready for the day, but in the meantime this is standing in.
The ‘thopter was a local model, ancient and noisy, the dull beat of its engines drowning any attempt at conversation. Dr Moenkhaus gestured to the ground.
‘That’, he said ‘is the main logging zone. You can see the loggernauts if you look closely’.
Inquisitor Cynole peered from the cabin window. Far below he could make out the brown patches where the forest had been cleared. Pinpricks of black betrayed the presence of the giant machines.
‘How far are we from the place?’, he asked.
‘About twenty miles. It’s impassable overland of course, but only a few minutes in a ‘thopter’.
Impassable – Cynole thought – how ready this doctor was to dismiss possibilities. Moenkhaus was either a fool or trying to conceal something.
from Chapter Approved – Book of the Astronomicon
At Bring Out Your Lead 2016, I’ll be running a scenario based on this intriguing snippet from the 1st Edition 40K supplement Book of the Astronomicon. In the old traditions of Rogue Trader, it’ll be very much a scenario that requires a GM; The players, a motley collection of human factions, will face an alien mystery. Below is the background – players will also receive an individual briefing.
Background
The Planet Arden
Located on the outer reaches of the Imperium, the planet Arden’s land masses viewed from orbit are pure, lush green; ancient terraforming has run wild in what is now shore-to-shore jungle. The only signs of human life are a few major cities where what passes for civilisation in this remote place can be found, but the majority of the planet’s people still live in the jungles. These wild and warlike tribes date from the Dark Age of Technology when life on the planet degenerated to Stone Age subsistence, with many significantly diverged from ‘human standard’. Although the planet has been re-contacted, the process of civilising its inhabitants has barely begun.
The city dwellers and the jungle natives are suspicious of each other, and many city dwellers consider the natives to be little more than animals.
Civil War
Power resides in the hands of many factions and cults, each with their own private armies. Only a few years ago, the power struggles had developed into open warfare with these factions grouped into a few alliances, and several of the cities were severely damaged. This war only ended with the arrival of Imperial forces who intervened and imposed a peace deal on the rivals, who have been forced to form a collaborative government.
Imperial Involvement
Inquisitor Cynole is participating in a new Imperial drive to drag this anarchic and backward place into the 41st Millenium. While Army training teams are developing their forces, and Adeptus Mechanicus tutor their technicians in the litanies of maintenance, his own role is to root out some of the decadence and corruption in the ill-disciplined and superstitious ruling classes. The widespread tolerance on this planet for mutants, aliens and psykers is also a concern.
Logging Operation
The T rading Guild have been granted a licence to clear this area of the forest with their giant loggernauts. They have set up a base at a local landmark – a massive ruined temple built into a natural cave system. They are employing local native tribes to assist in the clearance, which has been broadly successful, although there are tensions and the occasional violent incident. rading Guild have been granted a licence to clear this area of the forest with their giant loggernauts. They have set up a base at a local landmark – a massive ruined temple built into a natural cave system. They are employing local native tribes to assist in the clearance, which has been broadly successful, although there are tensions and the occasional violent incident.
Discovery of the Artefact
Three days ago, accidental damage to a temple wall led to the discovery of a hidden chamber. Inside the chamber was an ancient and mysterious object, possibly of alien origin – an artefact of potentially great power and value. The Trading Guild declared the find, and brought in mercenaries to supplement the base security and secure the site. The government has dispatched a technical team from the Society of Mechanists (the planet’s equivalent of the Adeptus Mechanicus) to investigate the artefact further. Inquisitor Cynole has accompanied them, as this is potentially a find of importance at planetary level.
Also arriving at the temple is a noble’s hunting party, which has come to see what the excitement is about. He has no reason to be there, but his family rule this area and nobody has the authority to exclude him. Finally, word seems to have spread among the local tribes, and a large crowd of natives armed with primitive weapons has turned up in a state of some agitation.
|
|