|
|
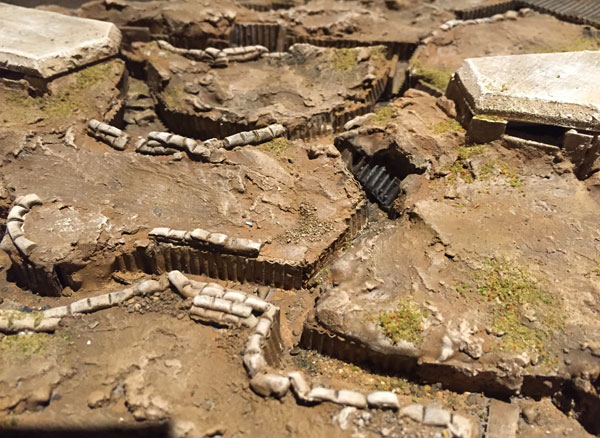
We’ve just finished building a large piece of 6mm trench fortification – something I thought about doing years ago, but never did. However, over the holidays Rowan had a school project to build a model of a WWI trench. This seemed like an ideal opportunity to kill two birds with one stone, so I helped him build something that would work for both. Here’s the finished model – it’s just under 2ft long.
 Model trenches The base for the model was hardboard, cut square on two edges and irregular along the ‘front’. The idea of the square edge on the right hand side is that it could be expanded by adding on another length at some point in the future. The area has been formed as a hill to give it interest, and also so that the rise in ground level required to dig the trenches into could be made to look more natural. The next step was glue a couple of thicknesses of heavy duty cardboard box onto the middle of it to form the hill. The board was weighted down with heavy objects to reduce warping while this dried.
After sketching out the layout on the base, we built the walls of the trenches, gluing them directly onto the base with PVA so they stuck up like walls. We used strips of a fine corrugated cardboard to give it a man made look – logs etc. combined with plain mounting board, strips of cork and balsa wood. These were all cut to different sizes to give a ragged and scruffy overall look. On the base layout we had drawn round some Epic scale bases, so that wherever possible, the trench could accommodate a standard 10x40mm Epic scale base, with the odd spot where a 20x20mm would fit. Once the trenches were done, we filled in some of the largest gaps, mainly with cardboard cut into thin strips so it stood up vertically. This is much less convenient than lying the cardboard flat, but it gives something for the plaster to key into. If you glue cardboard flat then cover with a thin layer of plaster, it will tend to flake off.
The bunkers were built from foamboard, carved to shape with a scalpel. They were painted with a textured emulsion.
The next step was to cover the ground in plaster. I used plasterboard adhesive because it dries much harder and tougher than any other building plaster (and I’ve got a big sack of it). This was smeared on with our fingers and pressed in to fill all the gaps between the trenches up to the top of the trench. As it starts to dry, you can roughen up the surface to get a realistic texture. The fence posts for the barbed wire were pushed into the wet plaster at this point. The posts were cut from wire from old sparklers. A few craters were formed by just shaping the wet plaster.
With the main areas complete, it was time to detail the trenches. The sandbags are made from milliput, rolled into sausages, pressed in place and then cut with a scalpel. Where they are stacked, the first layer was allowed to set before adding another layer in a later batch. I experimented with moulding them in Oyamaru, but it wasn’t any quicker and didn’t give such a good result. The other main detailing exercise was adding lots of thin strips of card and balsa down the trenches to represent duckboards. A few patches of PVA and sand were also added, mainly to hide joins or to protect areas round the edges where the plaster was very thin and starting to flake.
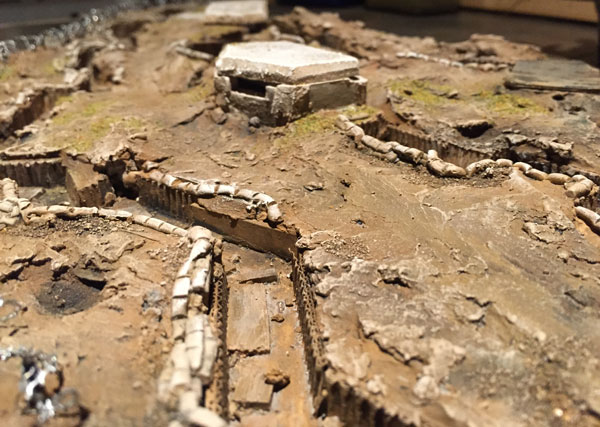 Trench model close up With the main detailing done, it was time to paint it. The bottoms of the trenches (including the duckboards) were painted with textured emulsion to give a grungy look. The whole thing was painted with an earthy brown colour (emulsion tester pot), and once dry this was washed with a mixture of black and a rusty orange. When the wash was dry the model was drybrushed with the original base colour mixed with increasing quantities of a pale cream colour. The sandbags and concrete were painted with a lighter base colour to make them stand out.
After painting the ground, the barbed wire was added. The wire was made by cutting aluminium mesh as detailed in this old post – http://www.warfactory.co.uk/scenery/barbedwirefence.php, and twisting it together with fine wire to strengthen it. Sticking it down was rather fiddly because it’s hard to do it strongly. In the end we wrapped lengths of fine wire about 2″ longround many of the posts, and superglued them in place. Then the free ends were threaded through the barbed wire and twisted tight before being snipped off. Some of the posts came loose during this and had to be superglued back in.
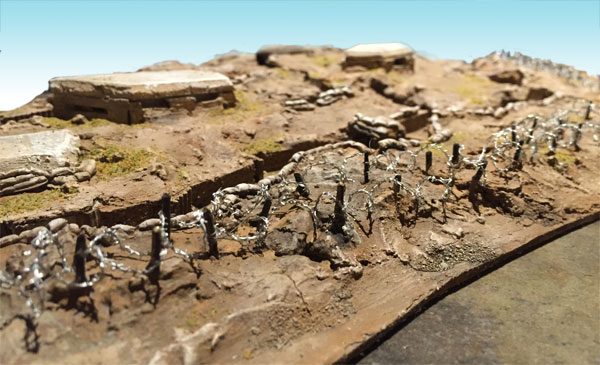 Close up of model trench barbed wire The final step was to dab on PVA in a few patches and add some brownish flock, especially in the corners where the ground was less likely to be disturbed.
Third post this year – I’m on a roll! Keep watching this space.
This is a drawer from the chest of 6 IKEA drawers in which I keep my ‘ready to hand’ stuff. My new rules for 2017 are as follows:
- Only models in the drawer can be painted.
- Models can’t leave the drawer until they are fully painted.
- Units stay until ALL members are finished.
- Exiting models get photographed for the blog.

I am hoping this will increase productivity by not wasting time half doing things, and will also mean I’m not littering the working area with half painted models. Ideally I will reduce the number in play to just the white card tray (half the drawer) because there are currently 70 odd models in there – and that’s more than enough to be getting on with (how many can you paint at once?).
As someone on Facebook correctly observed, this is miniature painting Kanban. In simple terms Kanban is where a process has a limited number of ‘slots’. New work isn’t started until a ‘slot’ comes free. This focuses effort on a smaller number of items, so each one typically progresses faster through the process, and time taken is more predictable – if there are 20 items in the tray and 5 get done a week, the expected delivery time for a new item going in would be 4 weeks. You can apply this to things like home DIY projects, not just an industrial production line. Slots can be monitored in a number of ways such as through card tickets, post-its on a white board, or an online system. In this case the physical space in the tray provides a limited number of ‘slots’.
For anyone who is interested, current work in progress (WIP) is a load of Citadel creepy crawlies (started about 10 years ago – you can see why I’m trying to implement this system), my mad monks from a couple of posts ago, a box of plastic Bloodletters, some bric-a-brac (treasure) for Frostgrave, two 15mm Pz38s, a big headed alien from BOYL 2016, a couple of hybrids, a bunch of robed techno-cultists from Ramshackle Games and a couple of other random Rogue Trader models.
Rowan has been collecting X-wing for about a year, so this has been one of the games I have been playing most of recently. Here’s a shot from our latest game in which I managed to close a Rebel victory in spite of a rather shaky end game for them.
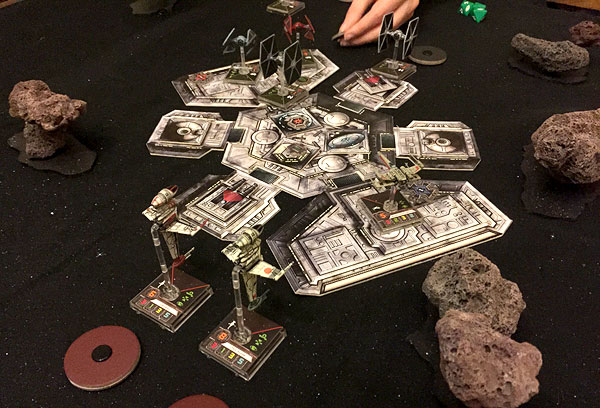 X-wing battle over space station The space station is scenery from the stunning fan-made campaign “Heroes of the Aturi Cluster”. We’ve only played one of the campaign games – mainly because they require a lot of ships we haven’t got, but it’s well worth downloading for the scenery alone. The players all play against an ‘AI’ controlled Imperial force – the way the AI works is very ingenious and produces a reasonable adversary. It doesn’t have the skill of a human player, but then you do get the pleasure of blasting away superior numbers of enemy fighters.
This was a straight 100pts a side game, with the addition of each side having some troops that they could land in the space station. I was lucky enough that my troops won the shoot-out in the corridors and thereby gained control of the turbo lasers. The turbo lasers aren’t that good – they turn slowly under the Aturi cluster rules (“they are evading our turbo lasers”), but I managed one good hit on an Interceptor which made them worthwhile. I was fielding two quality B-wings – Ten Numb with an autoblaster and Ibtisam with Push the Limit, and then Biggs in an X-wing with R2D2 to draw fire, soak up damage, and stop them pummelling the B-wings to pieces. Rowan had 3 interceptors, 2 with high quality pilots, supported by 2 standard TIEs, one with a low grade pilot and the other with Mauler Mithel. It was a hard fought game but I pulled ahead – I still had all 3 ships (albeit with almost no shields) facing 2 interceptors. There was then a period when Rowan, with some very perceptive manoeuvring and good dice landed a number of hits without me catching him and I lost a B-wing, but ultimately his luck ran out.
This is a random minor project that seems to have sprung up by itself. A set of mad monks / flagellants has been collecting on my painting table. Their goal is unknown, perhaps they intend to venture into the icy wastes of Frostgrave; although they don’t seem dressed for it, they may welcome the icy bite on their bare feet and the stinging winds in their faces. Possibly they will hunt mutants and witches in the blasted ruins of Mordheim, hunt the spawn of Chaos in the wilderness, or just back up a more conventional force on the field of battle.
On the left, Brother Dubonnet was given away by Ramshackle Miniatures at BOYL, and it all started with him. He bears the thrice blessed Hammer of Old, which may be used to batter down the Nails of Righteousness, or to pry out the Tacks of Damnation. Their two tone robes combine the purity of undyed wool with the red of faithful sacrifice.
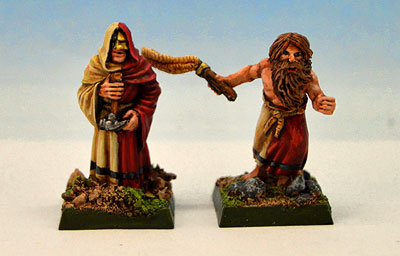 The one on the right is from Casting Room miniatures http://www.castingroomminiatures.com/products/flagellants range. A couple of models from his blister pack had become cultists (see earlier post), but he just looked too medieval. I didn’t fancy his beard, so I sculpted a new one from green putty – then he knocked around without a purpose until he joined the first Brother as an initiate of the order. A new movement had been born… more coming soon. The one on the right is from Casting Room miniatures http://www.castingroomminiatures.com/products/flagellants range. A couple of models from his blister pack had become cultists (see earlier post), but he just looked too medieval. I didn’t fancy his beard, so I sculpted a new one from green putty – then he knocked around without a purpose until he joined the first Brother as an initiate of the order. A new movement had been born… more coming soon.
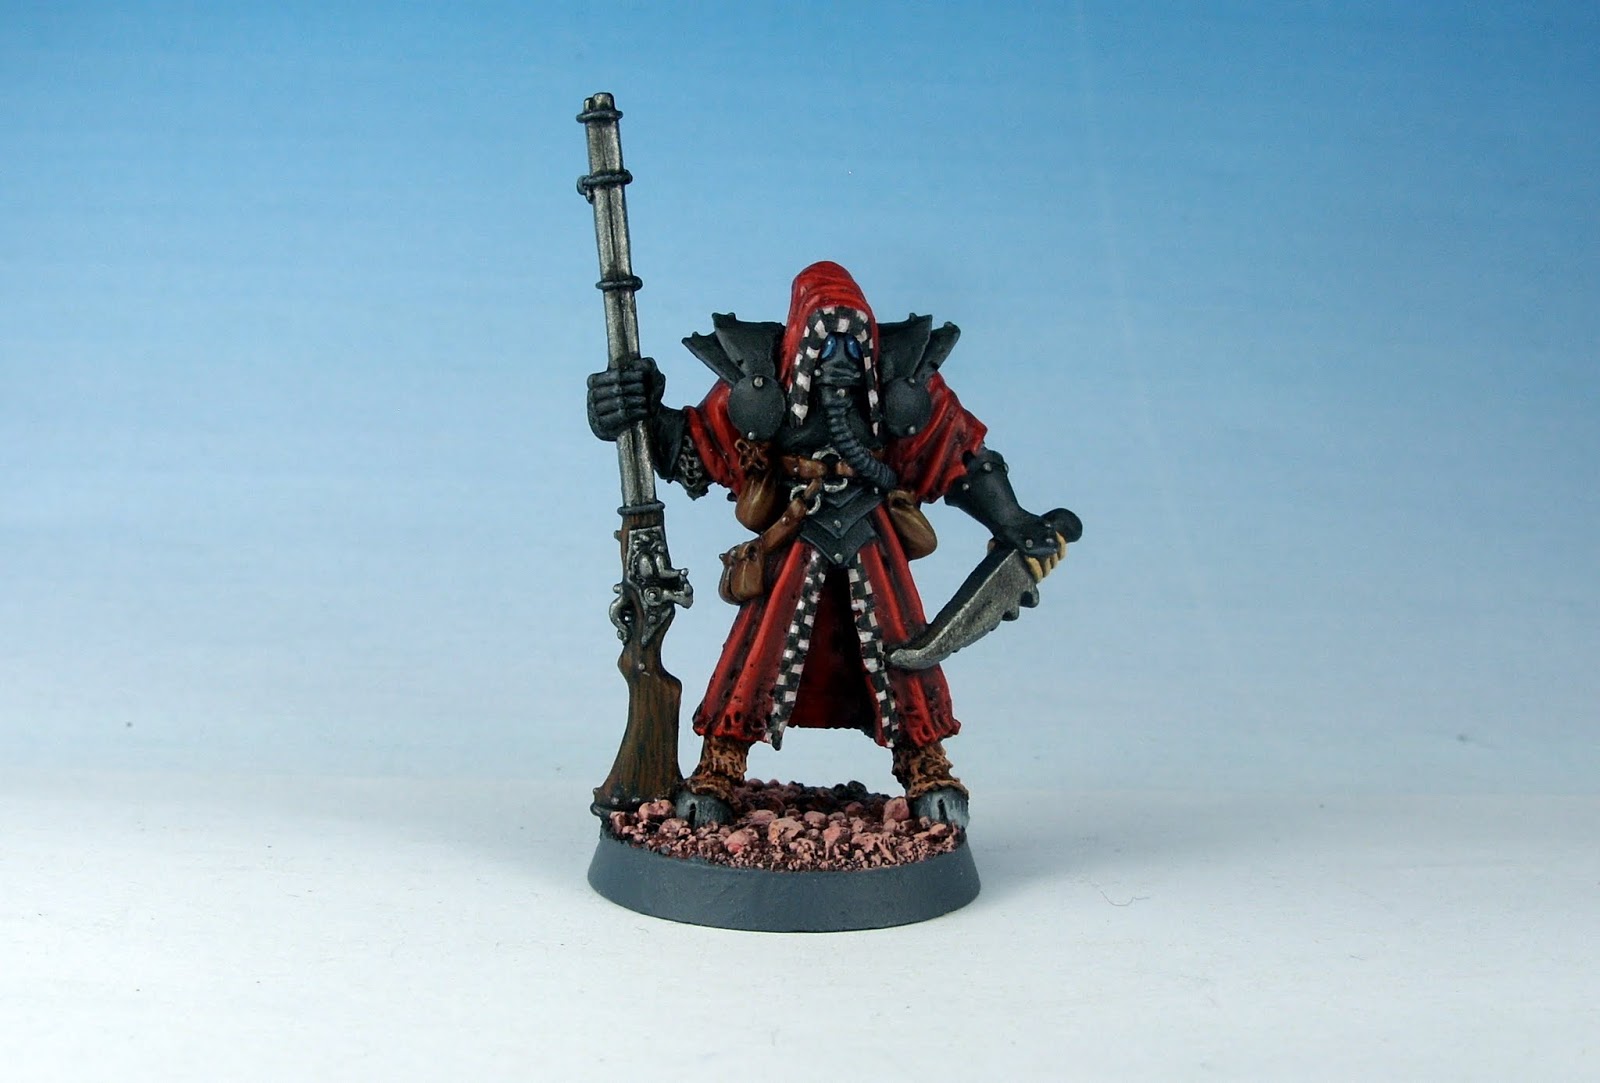
Alan gave me this classic model on the condition that I painted him (rather than incarcerating him in a drawer), so for the record – here he is.
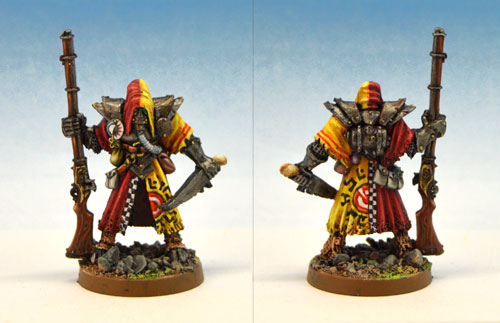 Classic Jes Goodwin Chaos Champion For anyone that doesn’t recognise him, he is one of the 1988-1989 range of Chaos Champions designed by Jes Goodwin. These are a fantastic range, brimming with character, detail, and beautifully sculpted too (don’t you just hate him).
http://www.solegends.com/citcat89/c890219chaosbeastmen-02.htm
Most are fairly obviously followers of specific Chaos powers. This one is probably Nurgle, but other than the ragged robe and rather fly-like gas mask, he’s fairly generic. I just went with the colours that came to mind and did him a non-specific renegade. Later I realised that I must have had this one by JB at the back of my mind – as his was done two years earlier, the influence can only have run in one direction.
http://leadplague.blogspot.co.uk/2014/06/redeemed-chaos-champion-how-emperor.html
The next addition to our Frostgrave collection are these six cultists – which are needed for one of the Lich Lord scenarios.
 Frostgrave cultists Last time Rowan and I visited Alan, he gave Rowan a sprue of cultists, and Rowan built these. In the usual division of labour, he made the models up, and I did most of the painting. They are pretty basic – they started off being just done all over in Wargames Foundry Rawhide with a wash and drybrush. Then some areas were repainted for the final colour scheme. We stuck to a very restricted palette of shades of brown and grey with a few details in purple. Originally the ‘feature’ colour was going to be green, but it didn’t look as good.
Eagle eyed readers will remark that there are only 5 on a sprue, but 6 in the picture. The one in the centre at the bottom is from the soldier sprue with a cultist head and cultist accessories in the form of some bones (!?) hanging from his belt. Presumably they come in handy for some unpleasant ritual.
Whoops – two whole blank months. Time to get a post in.
As the weather has turned colder, it seemed appropriate to be getting back into Frostgrave. One of the scenarios in the basic rule book requires 6 ‘living statues’, and I am trying to collect up the appropriate bits for all of these games.
These came from a discount bag at Wargames Foundry. Mostly they are gladiators, with a couple of others thrown in. From what little is mentioned of Felstad, the idea of cruel, powerful wizards having unfortunates fight for sport seemed to fit right in. Perhaps the winners are ‘rewarded’ by being transformed into living metal to protect their masters’ treasure.
 Frostgrave living statues I thought about doing them as mossy stone, but in the end went for bronze. Perhaps it’s an effect of watching Jason and the Argonauts at an early age, but i can more easily imagine the metal coming to life than stone. The middle one here looks like a beastman, but if you inspect it more closely, it seems as though the bull’s head is some kind of minotaur costume.
 Frostgrave Living Statues These were painted in Tamiya copper mixed with a little black and gold, and then drybrushed with lighter tones of the same. After a wash of brown ink, I mixed up a bluey-green verdigris colour – mostly GW Hawk Turquoise and put a dryish wash into the crevices. When it was just about dry, I burnished them by rubbing with a bit of kitchen roll.
The bases were done by supergluing them to standard Frostgrave bases. These were finished with some patches of PVA and sand, followed by some brownish foam flock and then a couple of birch seed ‘leaves’. I did think about making the bases as raised plinths, but I think I will make those separately so that the statues can come down from their plinths to chase the players. The round bases will look like part of the plinth detail when they are standing on them.
I thought I’d better get a post in before September became a completely blank month. Luckily I’ve just finished these bikers. The two bikes were put together about ten years ago and then kept in a box, as is standard practice for things that don’t quite get done before interest wanes and you move on to a fresh project. I started painting them for BOYL 2016 when a Helsreach game was mooted. Although it never happened, I did manage to finish them at last.
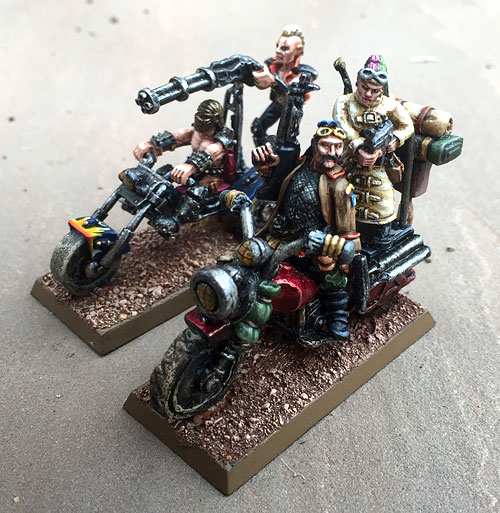 Helsreach biker gang 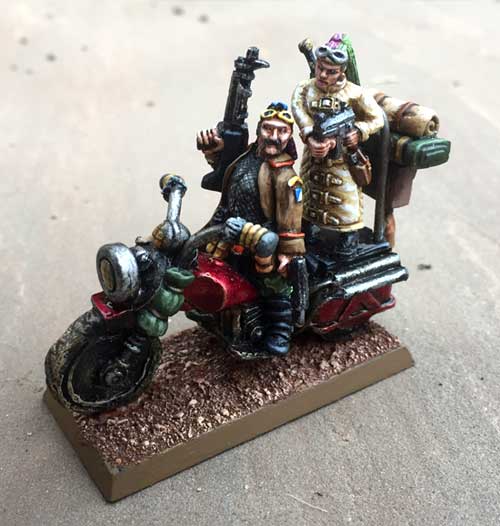
First up were these two. The riders are from the Wargames Foundry Street Violence range. The bike is from the Citadel LE Sleazy Rider – an orc on a Harley. I never owned the rider or I would have left it as is – converting such a rare and classic model would have felt like vandalism, but as I didn’t have the full set, I modified the front wheel (wooden in the original) into a more conventional bike and added a big headlight to cover the demonic face.
The riders are a particularly characterful pair – although not meant for a bike, they fit on well. I like the way the man appears to be leaning back to catch something his passenger is saying.
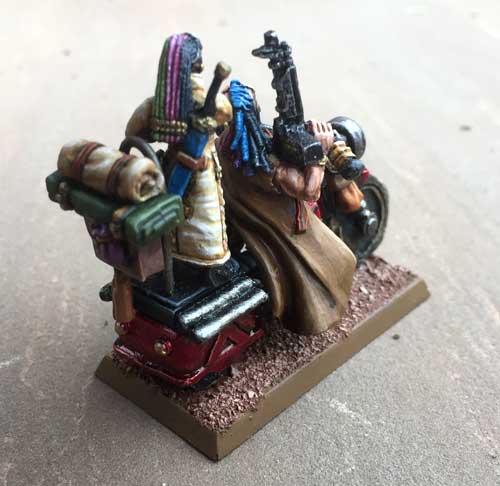
The luggage on the back is a plastic Warzone backpack, with a green putty bedding roll on top. I put off finishing this bike for ages because I couldn’t be bothered to make the bedding roll, but in the end it only took about ten minutes. You can see from the back that the Sleazy Rider bike is clearly modelled on one of the Judge Dredd Lawmasters – which only increases its appeal as far as I’m concerned. A simple loop of wire was added to hold the luggage and give the passenger something to lean against.
The second of the pair is a trike. This sculpt is currently sold by Fenryll (in resin), but this one is metal and I’m 99% sure I bought it from em4 but they don’t list it now.
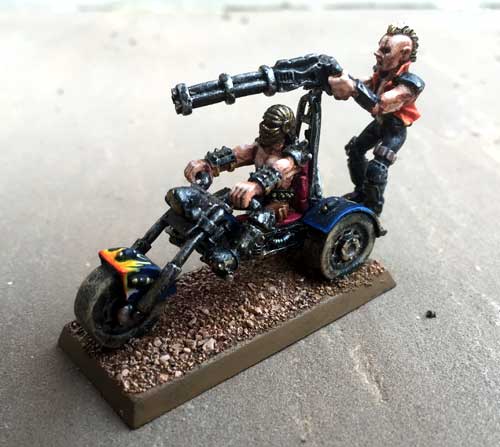 Trike with minigun I like everything about this vehicle from the way the punk on the back is casually hanging off, to the over-the-top spiked wrist bands and weird helmet of the driver. I wondered whether the trike would just tip over if he fired the minigun. By my calculation, assuming he is firing about 2,000 10g bullets per minute, it would generate the equivalent of 26kg of weight (sideways). So, seriously de-stabilising, but provided that he fired it parallel to the bike, they could just about cope with it.
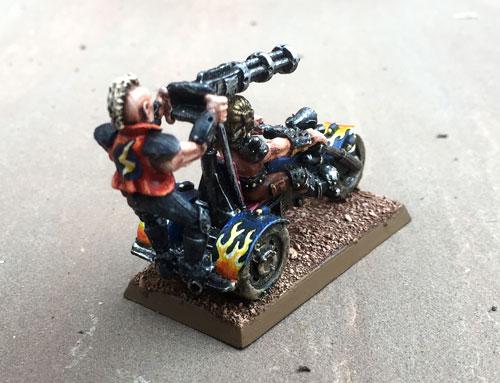
To take the punk biker from hell image to its logical conclusion, I went for flames on the mudguards, a lightning flash on the jacket. Rock on.
Was thinking about some of the features I could recreate in my dungeon setup. Started to consider whether I could model some bioluminescent plants. Came up with some initial ideas but before I invest in proper stuff I figured I would use some cheap battery operated leds from a discount store and see how I could use them. The first idea with some seed heads didn’t really work – I’m going to persevere but need some heat-shrink plastic to try the idea out.
While I sort that, I thought I would try using the lights with a couple of small pieces I was making for the dungeon. If you’ve seen the earlier breeding pits posts, you might remember that I leave 2″ sections out of the room walls, then make different inserts to go in them. Blank walls and doorways and suchlike. The additional room I made required some more inserts, and the approach I took was to make a couple of inserts with one side plain and the other with a feature, and those features would give me the chance to see how they might look with lighting.
It wasn’t as successful as I would have liked, but it has encouraged me to try and get it right.
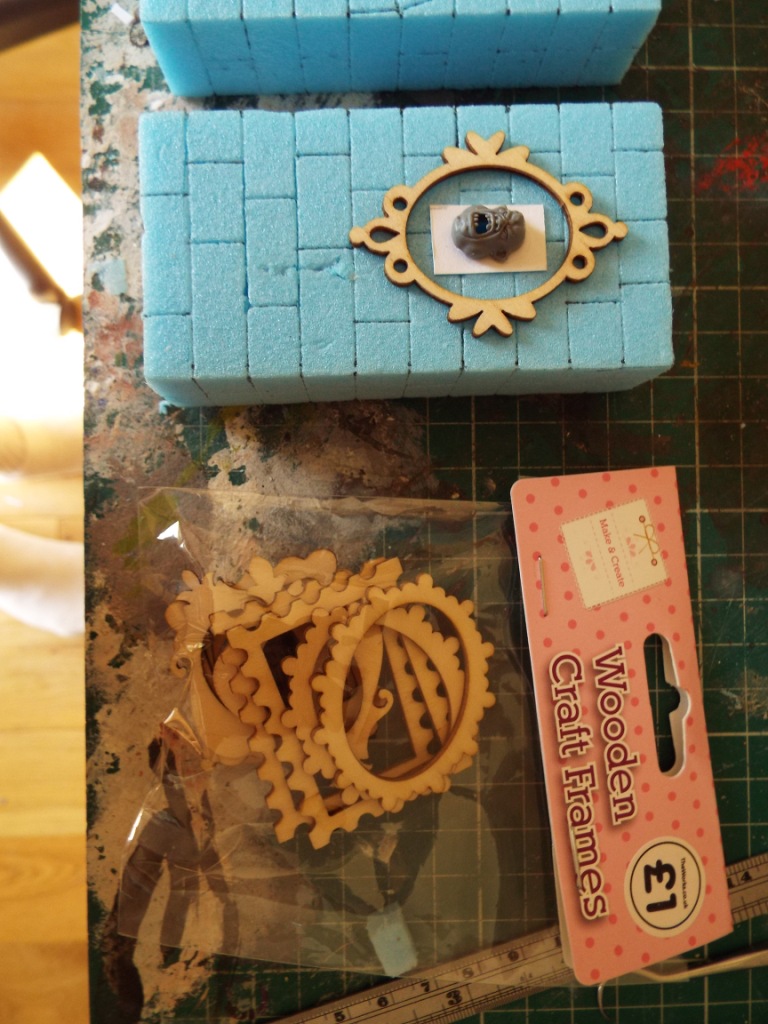
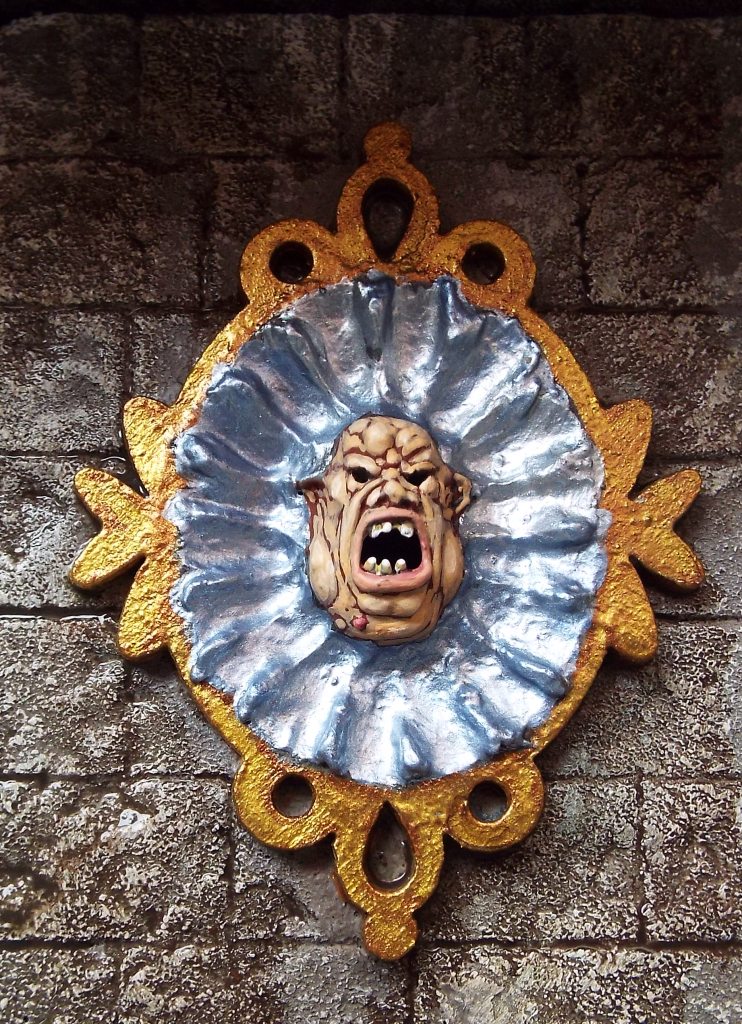
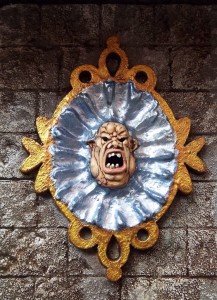
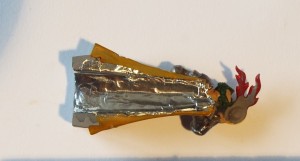
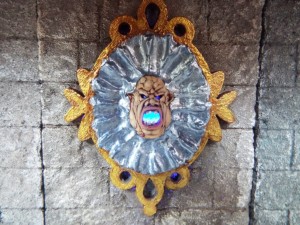
The concept behind the first piece was a magic mirror in which an ogre had been trapped. His face, set in a permanent scream, is embedded in the mirror, the surface of which has been distorted by the spell. The frame is one of a set of laser-cut mdf frames from a discount Craft store. The face is a spare head from the GW plastic ogres set. The mouth is wide open and there is no back to it. The eyes are solid, so I drilled them out with a pin-vise.

I cut a channel from the base up through the middle of the foam, and cut a hole from the mirror side through to that channel behind where the ogre head would be. With the frame and head in place some filler is used to fill the space between them and shaped into a series of ridges to have the mirror surface distorted.
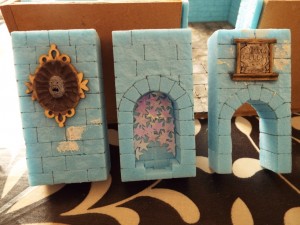 
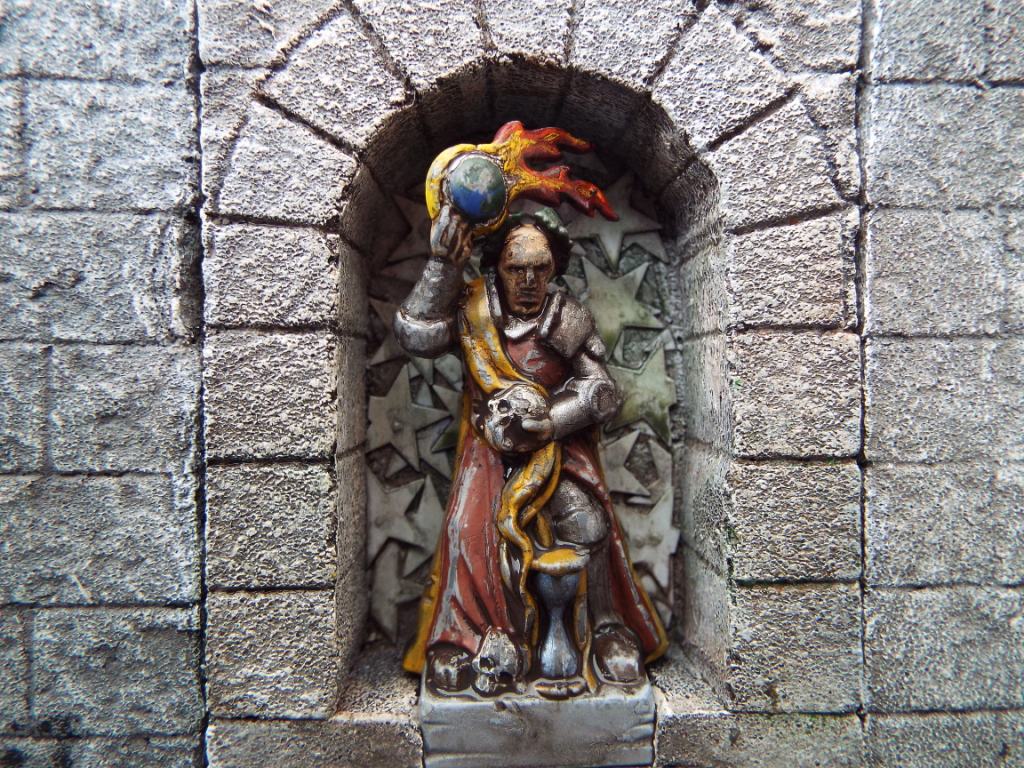
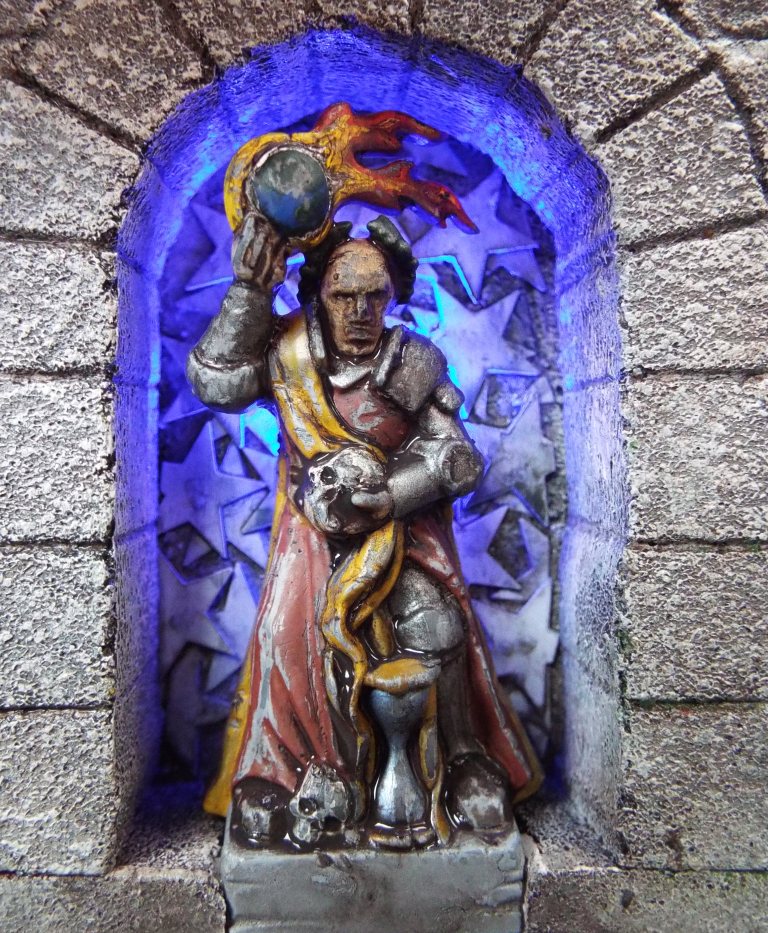
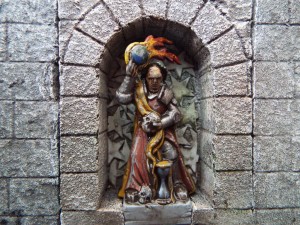
The second one is an alcove with a statue in it. The statue is a piece from the discontinued GW Manor House set. Shame they don’t still do it, it has a host of extras that come in useful for modelling. It has a groove in the back where it is designed to fit onto a wall – seeing that groove was what prompted me to put a light behind it. I have some plastic stars which are slightly reflective, and glued these to the back of the alcove. The statue was then painted (very sloppily) and when it was dry I attacked the paint with some scrunched-up foil and the side of a blade, in an attempt to show where the paint had been eroded away. I’m not really sure whether painting it was the right thing to do – it might have looked better if I’d have left it a stone colour. Ancient statues were often painted, but the passage of time has seen the paint fade and erode so we tend to see them unpainted nowadays. To maximise the light reflection, I lined the groove in the back of the statue with foil.
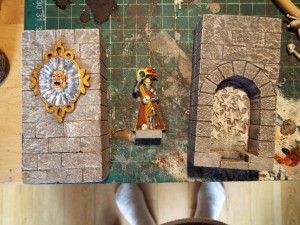 
After painting the stonework of the insert I glued the statue in place with pva, then gave it a heavy black brown wash in the hope it would disguise the rubbish paintwork. It didn’t really, but it’s not quite bad enough for me to repaint it as stone. I might change my mind.
I then slid one of the LED lights up the holes in the base, and set the pieces in the gap in the wall of the room. Here are the final pieces lit up
. 
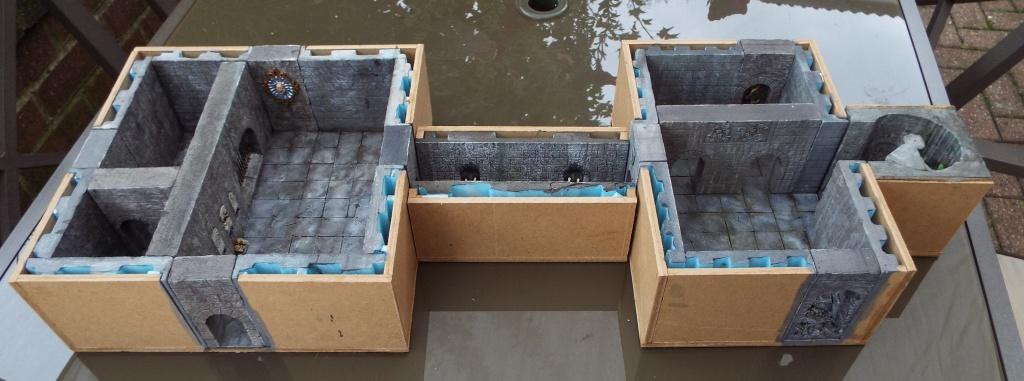
Finally, here is the setup so far. I think I need 2 or 3 additional rooms to have a playable layout, although I need to figure out how to simulate a larger cavern area – the breeding pits suggests a way round the dungeon solution by using the normal scenery as if it’s in a huge underground cavern

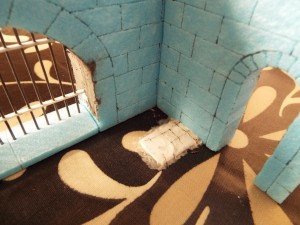
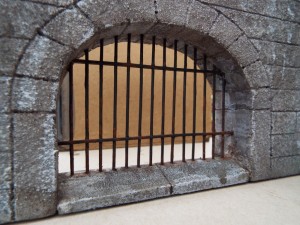
Got my Breeding Pits kickstarter for Frostgrave, so decided that the insert for my next room would involve a cell with a set of bars. Figured the breeding programme would have resulted in some things better kept secure. I’ve included detail on the basics for the room and walls in previous posts, so won’t repeat those, and rather than go into every stage there are only a couple of wip shots nd I’ll describe new stuff.
The basic room is 12″ by 12″ externally, 10″ by 10″ internally. Only slight difference in the construction is that certain tiles have a plastic star glued to them before painting. To make the cell, I wanted to do it as an insert which could be lifted out if I wanted to used the room for another purpose.
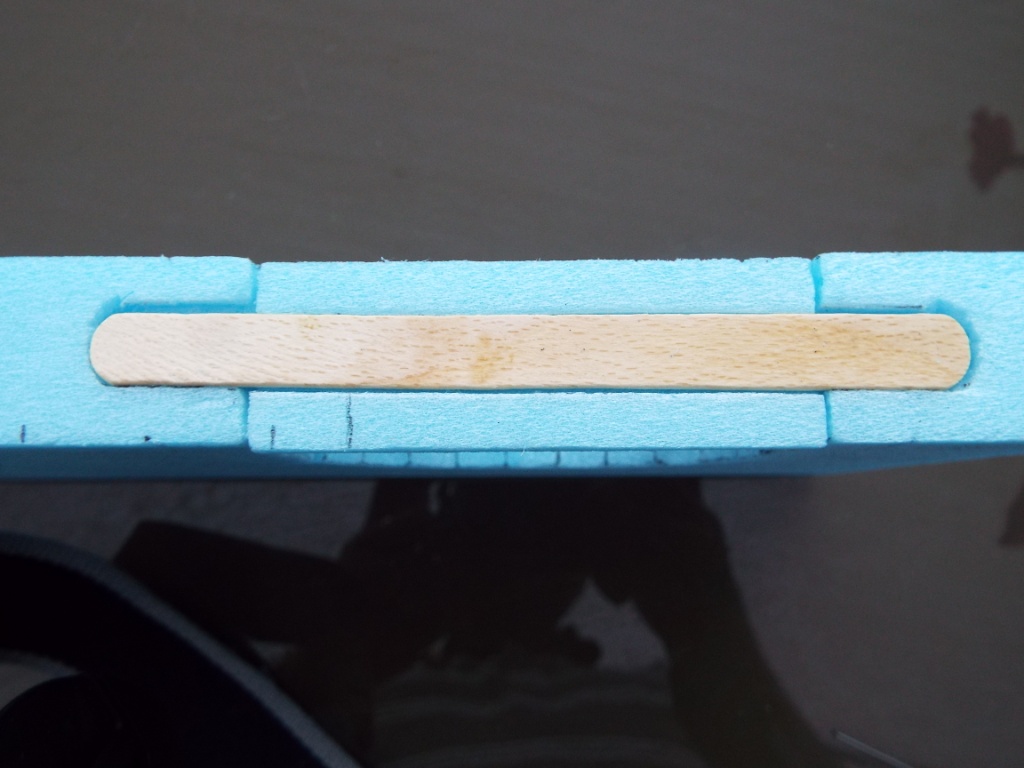
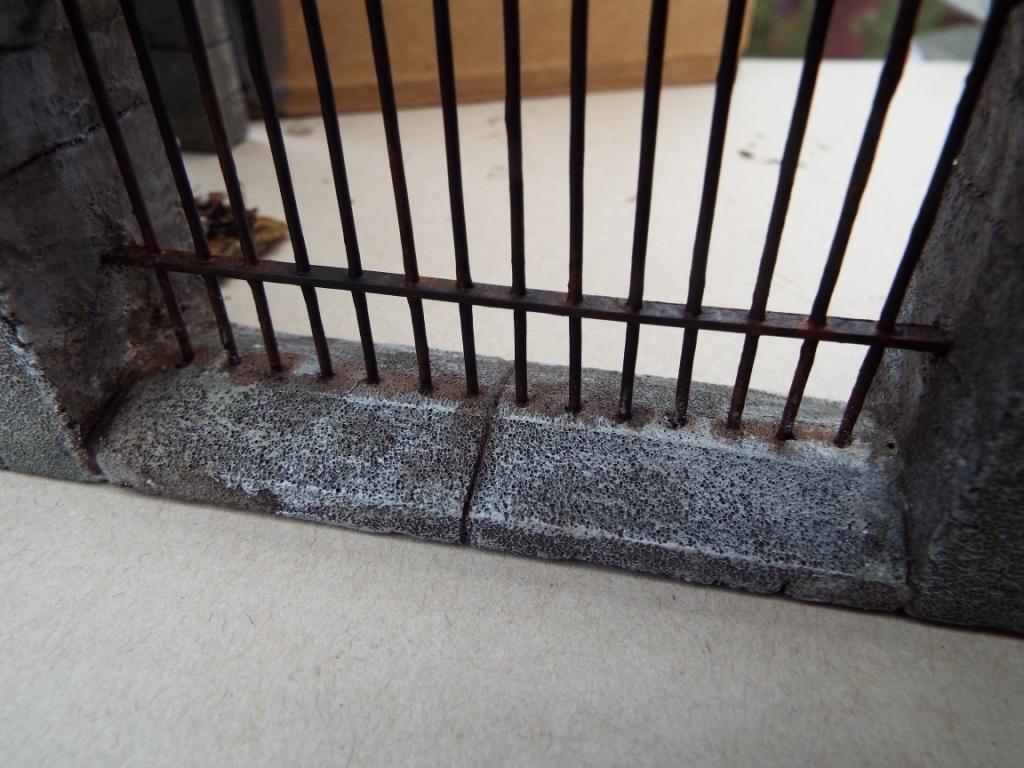
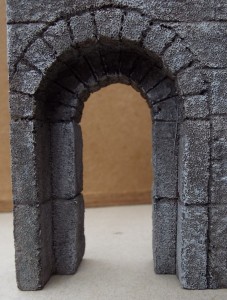
The cell/cage insert spans the full 10″, with a 3″ wall section at right angles, so that when it is inserted into the room it makes 2 rooms on one side of it. I decided to have a small guardroom 3″ square and a 6″ by 3″ cell. The barred opening was made using my largest jig. I cut a 1cm strip from the bottom of the piece I cut out, then cut a chamfer on each side leaving a flat central strip into which the bottom of the bars would fit. I then offered it up to the gap and positioned a wooden lolly stick along the centre of the bottom of it. The stick overlapped each endonto the bottom of the wall each side of the arch. I marked the outline with a lining pen and carefully cut out a slot into which it would fit. The aim is to provide a good support – the 1cm strip of foam alone would get easily damaged.

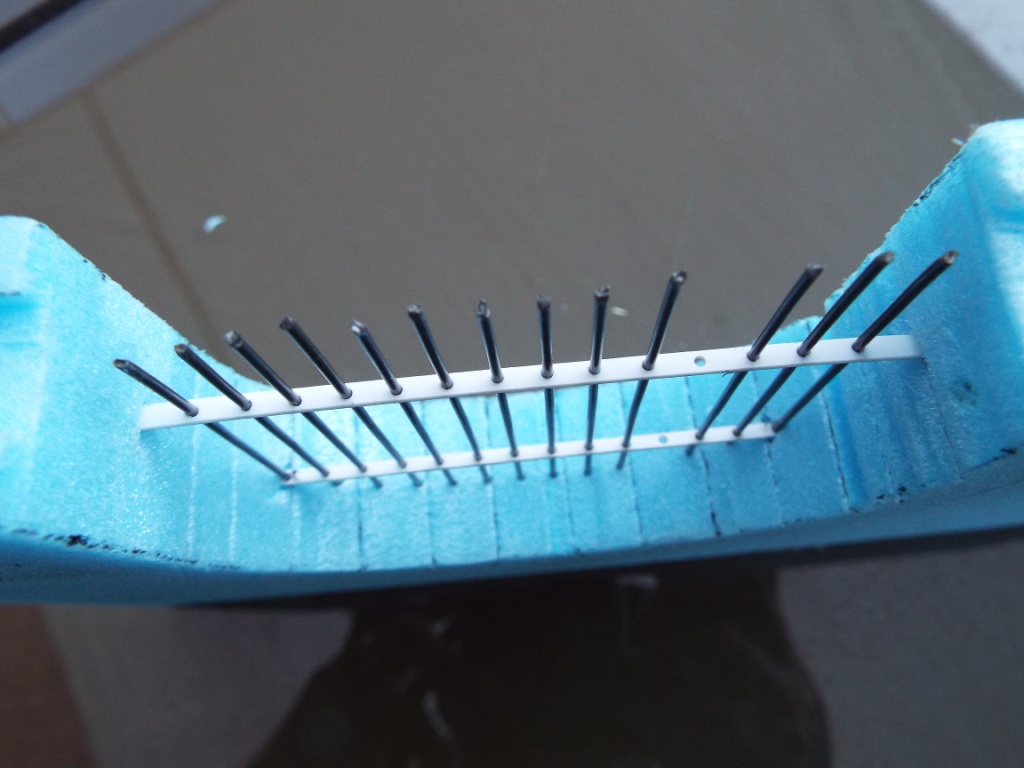
Took me a while to figure out how to make the bars. Thought about straight florists’ wire, but that bends too easily – I’d have used it if I wanted to show where something had burst through the bars, but I settled on steel wire which is less likely to get bent. The cross-struts were another puzzle, but I decided on 2mm wide strips of 1mm plasticard. Using a lining pen I marked the centre of the 2 strips at 5mm intervals, and then used a pin-vise to drill holes the right size for the wire. Could have gone horribly wrong but it was easier than I expected and there were no horrible mistakes. I also marked the position of the holes on the foam strip for the bottom of the arch and made holes so that the wires would slot into them.
I made slots in the arch at the required height and slotted the strips into place. Before gluing them I slide the bars into the holes to get them properly lined up, and when the wires were in the right position, pushed them into the underside of the arch. As a tip, this is much easier if you twist the wire as you do it. Push the wires in so that the bottom of each wire is around 5mm from level of the bottom of the arch walls. As the bottom foam strip is 1cm deep, this means the bottom 5 mm of the wires will be embedded in that bottom strip.

Offer the foam strip to the bottom, then glue the ends to the walls using pva and glue the supporting lolly stick in place.
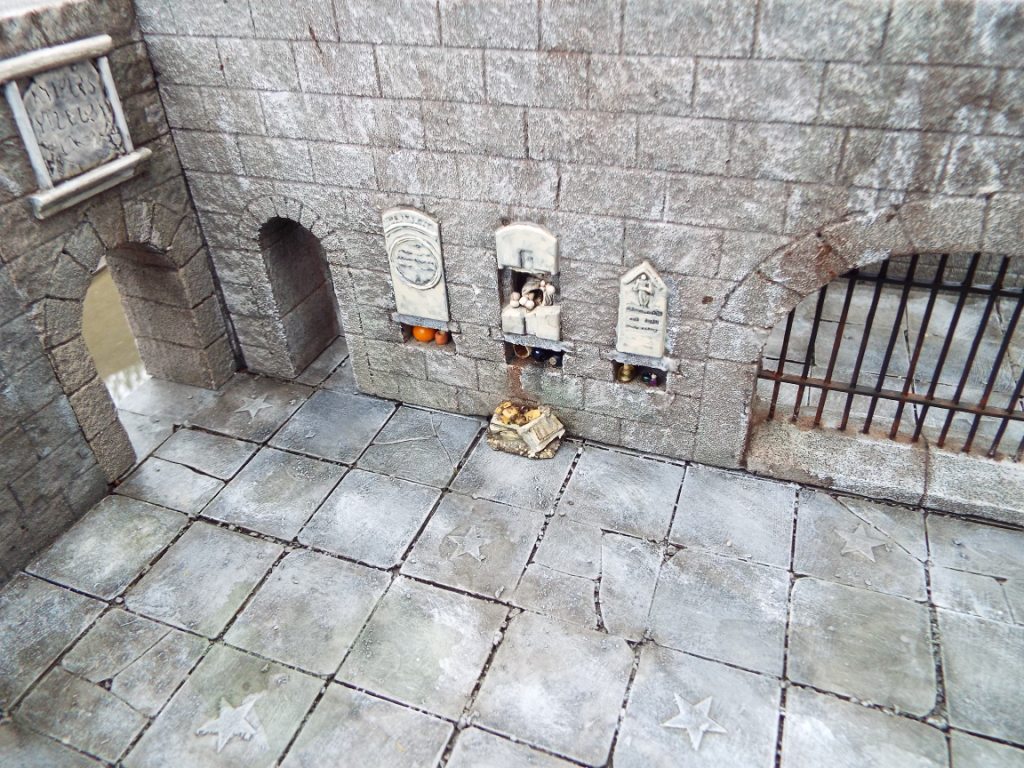
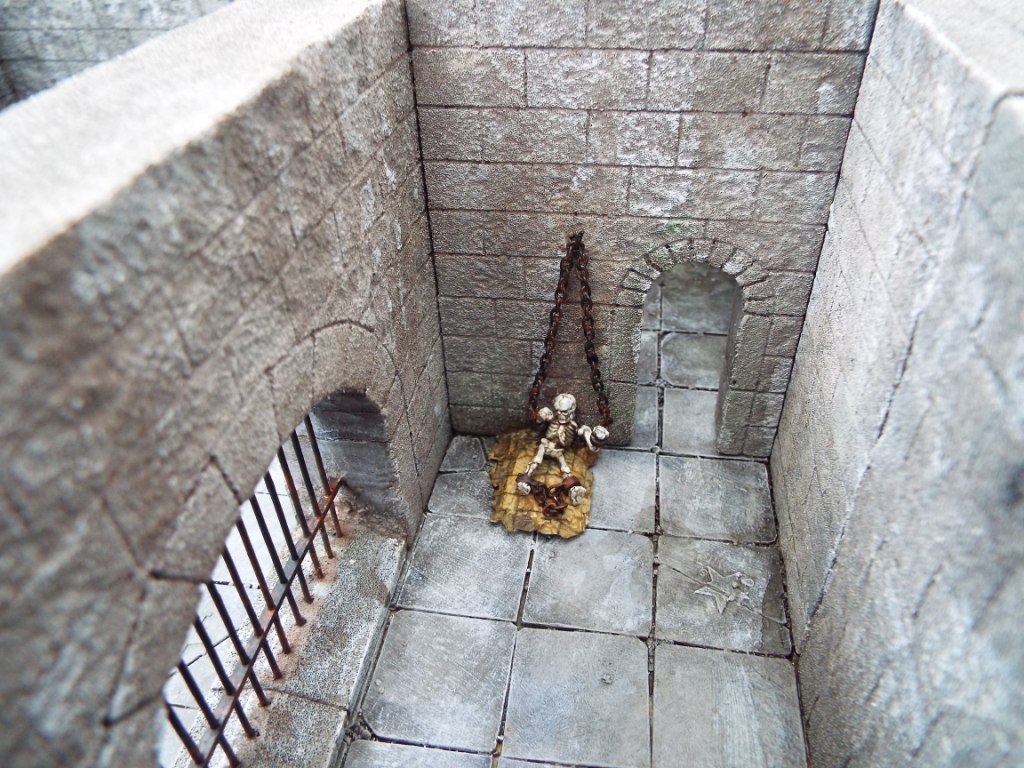
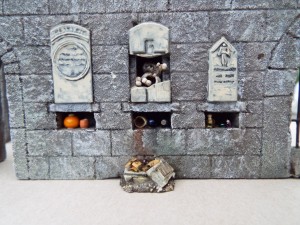
Wanted to add a couple of bits of detail. The first was a set of tombs, where the bones of celebrated or notorious former inhabitants of the dungeon were laid to rest. The idea is that the bones are behind a gravestone, with a shelf underneath where offerings might be placed. One of them has been broken open in the hope of finding treasure, with the rubble at the foot of the wall below. The gravestones are from the Renedra gravestone set. To support the rubble. I glued a piece of plasticard to the bottom of the wall and used pva to fix some chunks of gravestone and rubble to it. I dug out some skeletal bits to represent the bones remaining in the grave.
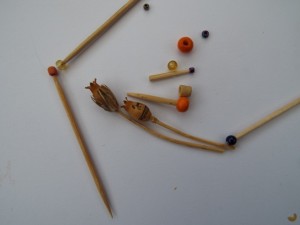
To create the pots which are the offerings, I used some beads picked up from a craft store, with stoppers made from cocktail sticks. I also wanted to represent a smashed pot, so I took a seed capsule from the garden, drew a few marks on it to represent decoration, then broke it into pieces. The plant is called Lychnis Coronaria, and the seed pods are useful for pots and storage jars, or can be painted as exotic alien flowers. There are a couple of beakers made from Fimo clay. I have just left the beads as they are, but they could be painted.
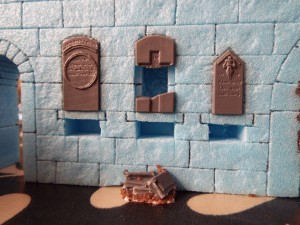 
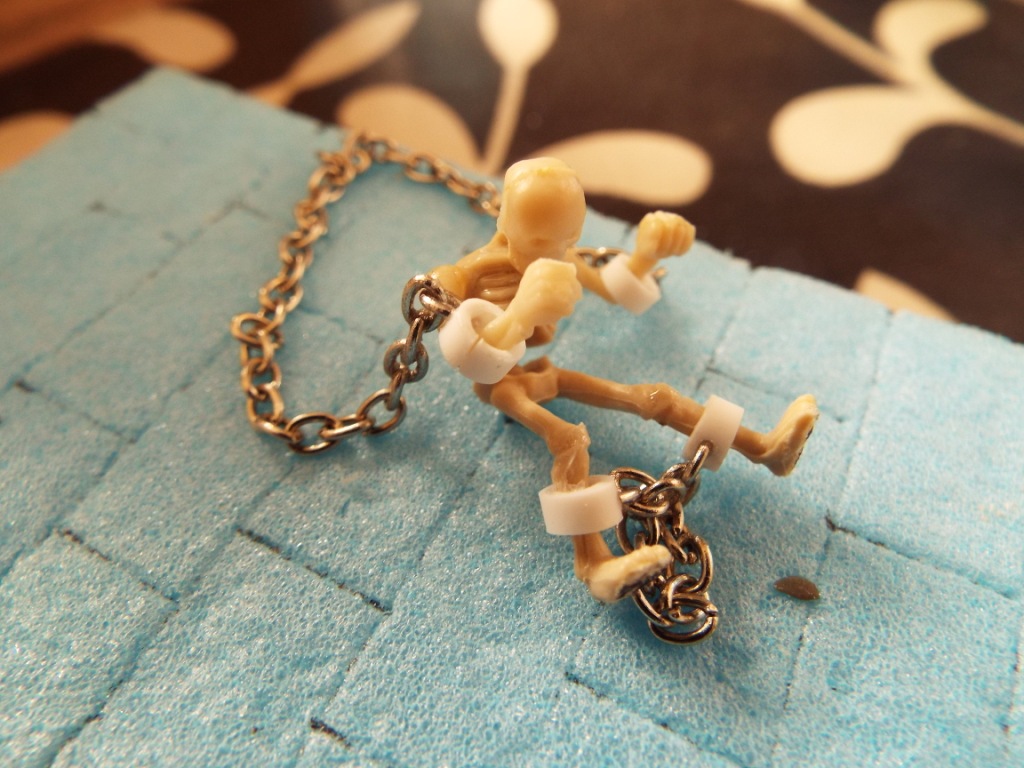
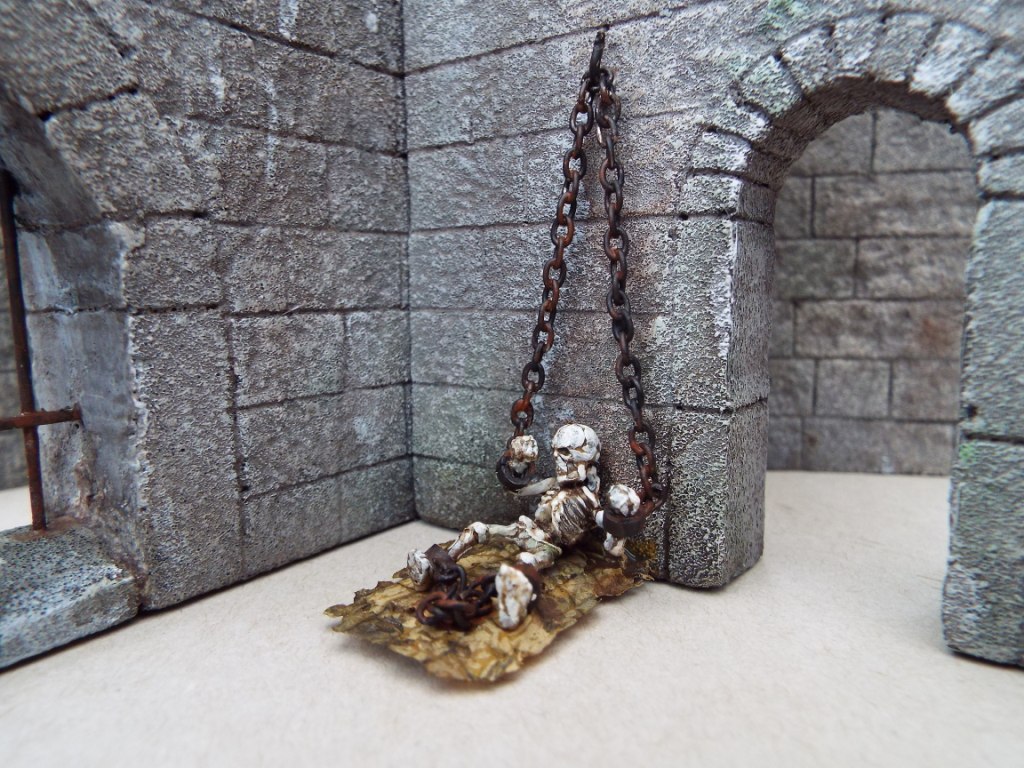
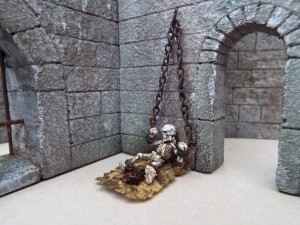
The other bit of detail is the remains of one of the inmates. Another bit of plasticard to act as a support, a bit of tissue doused in watered down pva to represent a decaying bedroll.
I wanted to have the skeletal remains chained to the wall, so it was off to poundland to buy a couple of cheap necklaces. Not exactly the most macho thing I’ve ever done, but I took it as a sacrifice to my art. I cut some sections of plastic tubing to represent manacles, drilled a couple of holes with a pin vise in each to take a link of the chain, and superglued them in place. A bit overscale, but they do the job. A GW plastic skeleton from a long time ago provided the lucky victim.
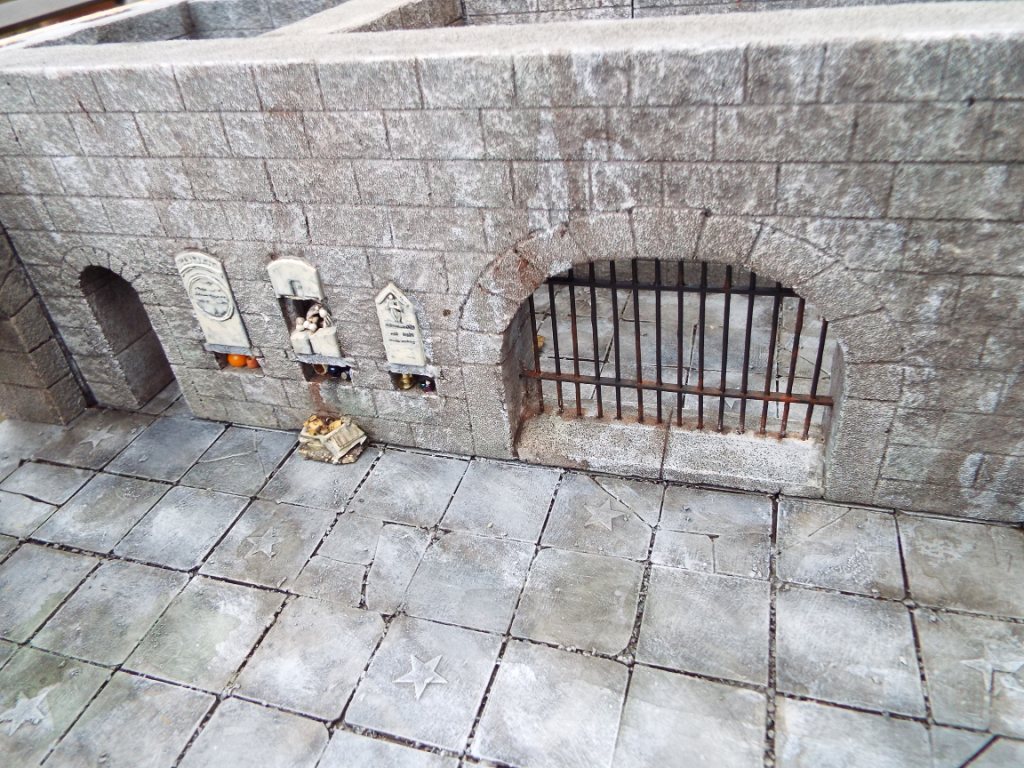
On to painting. Same old same old for the walls. The iron bars and manacles were painted black, to which a bit of bronze was added to give me the effect I wanted. Dark brown and orange were used to try and create a rust effect. I should have made a door or two, but I’m a bit lazy so haven’t done that yet. I’ll probably do a few as a batch – Tony Hardwood’s book has some good ideas, as does the GW terrain book. The cell doorway is larger on one side of the wall than it is on the other. The idea is that the door – if it ever appears – would fit in the larger aperture on the outside of the cell and be more secure than a standard opening. Just in case the inhabitant ever felt that they would like to leave.
The remaining shots show the finished piece. Hope you like it – I should finish another couple of small pieces this weekend so I’ll post that up when it’s done.
|
|