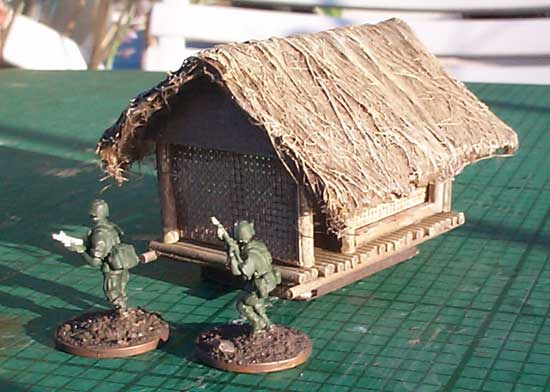
A Delta Hut

Materials

  • Plumber's Hemp, Broom head fibres or Sisal String for thatching
  • Plastic sprue from a model kit (round section)
  • Mounting Board or Heavy Card for base
  • Flock or Sand for base texture
  • Piece of window blind material or similar woven texture
  • Spaghetti (standard or easy cook - you're not going to eat it).
  • PVA
  • Polystyrene Cement
  • Scalpel
  • The platform

    Card Base
    Cut a square of heavy card 3.5 x 5.5cm(1.5" x 2.25") to form the platform which the hut is built on. Chamfer the edges off with a scalpel (cut so they slope), so that the thickness of the card is not visible at the edges.

    Now cut a smaller square of foamcard 2.5 x 4cm (1" x 1.5") and glue it to the card with PVA, on the same side as the chamfered edges. This will support the hut so that it is lifted off the ground.

    Bamboo
    Now you have a sturdy base for the platform, cut lots of pieces of spaghetti to form the 'bamboo'. These should vary slightly in length to give an irregular edge. Stick them to the top of the platform with PVA.

    Then cut two longer pieces and stick them to the underside on each side of the platform. They should fit snugly below the other spaghetti, because the edges of the card have been chamfered off.

    The frame

    Plastic Sprue
    I made the frame of this hut out of plastic sprue (left over from a Huey kit). You could use balsa wood or cocktail sticks, but the plastic is probably stronger. The frame is an irregular shape, to give the hut more of a shambolic appearance.

    The roof

    Basic shape
    Cut two pieces of card to make a pitched roof slightly larger than the frame. I've made the eaves a bit too big on this one (5mm or 0.25") They would be better at 2mm or so, because the thatch will overhang the card.

    Cut a triangle of card to fill in the gap between the roof and the frame at each end. These also help to strengthen the roof.

    Thatch
    The best material is probably plumber's hemp, but you could also use sisal string (see these huts) or coconut fibres from the head of a broom. I've found a cunning new technique to get the stuff on with the minimum of fuss....

    Coat the roof with a layer of PVA, reasonably thick but not so much that it's running off. Lay out the hemp in a strip as wide as the roof on a flat surface. Turn the roof upside down and press one face of it firmly down onto the hemp. Then tilt the roof and press down the other side. Pull the hemp tight so that it isn't baggy around the roof ridge, then turn it the right way up and neaten it up if necessary, so that the card is covered in an even layer of hemp. Now let it dry for an hour or so.

    Haircut
    Once the glue if fully dry, the roof can be trimmed. Just use a decent pair of scissors and trim it off in a fairly irregular line.

    (Note: the hut and the platform are not actually stuck together at this point - the platform needs to be painted first)

    Painting the hut

    All the parts of the hut were painted with roughly the same technique.

    Wash with medium dark brown (eg Citadel Bestial Brown), with a little bit of black in it.

    Drybrush with a mid tone

    Drybrush with cream colour.

      If the hut is coming out a bit dark and greyish, there are a few ways to correct this:
    • Use a lighter brown for the first coat.
    • Drybrush with more colours of paint, so you aren't going so quickly from the dark to the light tones.
    • Drybrush heavily with the mid tones and more lightly with the light tones.
    • Add a really saturated orangey-yellow to the brown, it will tone down in the dry-brushing process

    Finishing off


    Woven screens

    The screens are made from a scrap of material made for window blinds. These are plastic coated fibres woven into a mesh. If you can't get this then you could try embroidery canvas or similar. Paint them brown using a thin coat of watery paint so you don't block up the holes. If the holes are blocked then blow on the material while the paint is still wet.

    Then stick them in position with superglue. Once in position you can wash them with dark brown and drybrush with a light colour to really bring out the woven texture.

    Now the upper part of the hut and the platform are both painted and assembled, they can be stuck together with superglue or epoxy resin.

    Legs
    The final step is to get a matchstick, cut it into 6 very short pieces and glue little legs to the corners of the platform. Paint these in the same way as the rest of the hut.

    -
    ©2003. All rights reserved.
    -