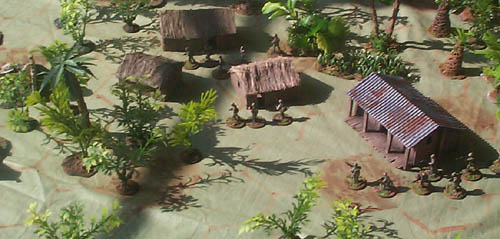
| Huts |

 |
Materials
|
|
|
Basic Structure
|
|
All the huts were made with an underlying structure of mounting board
stuck together with PVA. This gave a strong basic shape that was then
clad with a variety of materials. The walls are glued to the outside
of the rectangle which forms the base. I don't like to make buildings
with a little bit of ground around the edge because: 1) In my opinion it looks more natural without it. 2) It's more work. 3) It looks very strange if you put the building on a non-matching baseboard. It is worth having a floor though, because it makes it a lot stronger.
|
Hut 1 - Sisal Thatch & Balsa Walls
|
|
Balsa Wood walls Next use the wrong end of a scalpel blade to score the planks into the balsa. If you want some joints in the other direction you will need to score across the grain with the sharp end of the blade or it will splinter. Sisal Thatch |
Hut 2 - Plumbers Hemp Roof & Walls
|
|
Plumber's Hemp Thatch It is best to paint the hemp with watered down PVA at the end, to make sure it is really secure. Painting Thatch |
Hut 3 - Corrugated roof & balsa walls
|
|
Corrugated Iron Roof First peel off one face of the cardboard. The best way I have found to do this is to poke a pointed metal thing I have into each corrugation to split off the top. A few tufts of cardboard will remain which can be rubbed off the ridges with fine sandpaper. Once the cardboard has lost a face it will be very weak, so stick it to mounting board backing. Patches can be added to it by peeling both faces off a piece of cardboard and then gluing it on top of the main piece. You can also intermingle panels of corrugated cardboard with panels of balsa for ramshackle walls. The posts for the verandah are solid bits of 4 or 5mm balsa. Underneath the balsa verandah is mounting board to strengthen it. Painting |
![]()
©2001. All rights reserved.
![]()