Arid Terrain Bases
![]()

 |
|
This section deals with creating a variety of arid terrain. The core technique can be used with a variety of main features. There are also some suggestions for sci-fi features, a few of which can be used to give the basic set of terrain a distinctly alien feel.
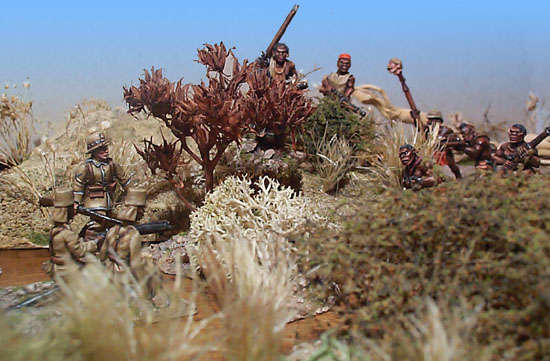
The figures shown here are Schutztruppe from HLBSCo, facing assorted natives from Wargames Foundry. |
Materials
|
|
|
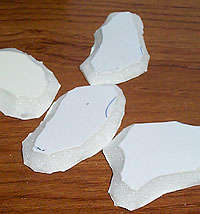
1) Base Shape
|
|
Choosing Base Material Foam Board At this stage you can also fine tune the shape. I like to use an irregular rounded shape. Large round bases are best avoided because they have a large area compared to their overall dimension. This means that you will have to do a lot of work to get a reasonable number. It is also difficult to position miniatures on top of the terrain. With this in mind it is best to go for reasonably long thin pieces. (However if you have hundreds of very small pieces they will take a long time to set up on the table, so a little moderation is necessary). Mounting Board |
 Cut
the foamboard roughly to shape. Now using a scalpel, chamfer off the
upper edge, making quick slashing moments with the blade away from your
hand and body as though you were whittling a stick to a point. A sharp
blade is needed or it will tear the foam.
Cut
the foamboard roughly to shape. Now using a scalpel, chamfer off the
upper edge, making quick slashing moments with the blade away from your
hand and body as though you were whittling a stick to a point. A sharp
blade is needed or it will tear the foam.
2) Core Features
|
|
The next stage is to stick down large features, which go on before the base is textured. These include stones/rocks and trees. Stones'Acacia' TreesPalm TreesPine Cone Palm TreesFallen TreesCrab SkeletonOasisPaint the whole base with a thick coat of slightly watered down PVA and put in a tray. Then pour coarse sand with small stones in it (cat litter makes good angular rocks) over the top. Leave this for half an hour or so to set. |
3) Desert/Arid Base Texture and Painting
|
|
1) Texture. Paint the whole base with a thick coat of slightly watered down PVA and put in a tray. Then pour coarse sand with small stones in it (cat litter makes good angular rocks) over the top. Leave this for half an hour or so to set. 2) Base Coat. 3) Blotchy Wash. 4) Drybrush. 5) Patches. |
4) Secondary Features
|
|
Now the base has been textured, you can stick the smaller bits on top. Stalky PlantsBushy PlantsSci-fi Plants |
5) Flock
|
|
The final touch is to add irregular areas of flock. It is best to use at least two different colours of flock for a more realistic effect. Dab on small blobs of PVA with an old brush and then sprinkle it on. Tap the base over a box lid to collect up the bits that don't stick down. Make sure you use a 'foam' flock rather than chippings (if you don't understand what this means then here is an explanation). |
![]()
©2001. All rights reserved.
![]()