Painting Example - Blending

1) Basecoat 2) Highlights 3) Shadows 4) Final Touches

Blending is at the heart of quality painting of larger scale miniatures. This example works through shading the main khaki uniform colour, but the same principles apply whatever the colour. You may find that mixing the acrylic paint with retarder in order to increase the drying time helps you achieve a smoother gradient of colour.


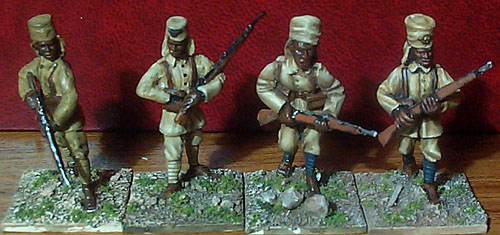
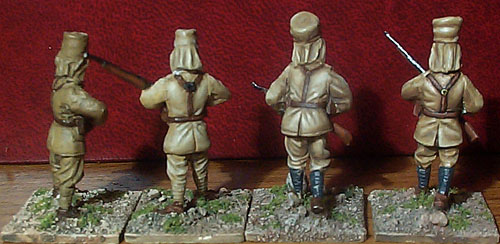
The figures are German Askari from HLBSCo. They were used in the African German colonies from about 1870 to the end of World War One. The figures have been based on mounting board, to which has been applied my standard 'Arid' basing technique.

The other areas on the example figures are mostly base coated and don't necessarilyy progress through the four stages.

Stage 1 - Basecoat
 

Initially the models had been undercoated white. All the areas were then basecoated with the appropriate colour.

The khaki used by the Schutztruppe appears to have been more yellow than the British khaki. This colour was created by mixing Humbrol Dark Earth with a little chestnut and yellow ochre .

As you can see the coat is not absolutely even, but this will be covered up by the shading process.


Mixing base coats
Because I was going to use it for a large number of figures, I mixed up a reasonable quantity by pouring paint into an old film container. If it was only for a couple of figures then I would have just mixed it on the palette prior to use.

However, generally it is best to avoid using a basecoat that has to be mixed rather than a single colour straight from the paintpot. It adds a lot more work to the painting process, so if you are doing it a lot then consider buying more paints to give you a wider choice of base colours.

Stage 2 - Highlights
 

The next stage is to blend on the highlights, unless the basecoat colour is very pale. (If this is the case then simply swap stages 2 and 3 of this example around, so you apply the shadows first and then the highlights).

Shown above is the full tonal range from highlights to shadows. This first stage involves applying the left hand side of this range as shown below. The next stage will fill in the right hand half.

They meet in the middle at the base colour. This base colour is about mid way between in black and white, so each 'half' is about the same size. If the base colour was paler then the shadow half would be larger than the highlight half and if it was darker the reverse would be true.

Palette Preparation
First you need to get a range of colour on your palette. Put on two large blobs of the base colour next to each other. Mix one of these with white, using roughly twice as much white as the base colour. This will be one end of your tonal range. The other end of the range is the unadulterated base coat. Now mix about half of each blob together in the middle. On your palette should now be the spectrum of shades that you will use in the highlighting.

Applying to the figure
Highlights should be applied to raised areas and particularly the edges of areas. On the right these are indicated in blue. Take the mid-shade of the highlight range and paint on the areas without blending (imagine pale khaki instead of blue). This will give you something to work to. Otherwise you may find yourself painting far too large or too small an area with the highlights.

Blending
Now for the actual blending. Apply patches of paint which are the right colour for the area they are on (these should be a little smaller than one of the blue blobs). Then apply paint next to it at the other end of the range and blend them together by stippling the brush in the wet paint. (This bit is very hard to describe I'm afraid). When you have finished there should be no visible boundaries between different paint colours.

Stage 3 - Shadows
 

Mixing the shadow tone
The tonal range for the shadows should be mixed in the same way as the highlight range. Start with to blobs of the base colour again. This time mix one with some black about 50/50. This will decrease the saturation (making it more grey), so you may need to add another colour to increase it again, particularly in the case of base colours with yellow in them, as these will tend to go green. In this case I added some chestnut (which is a reddish brown) to balance this out.

Highlight/Shadow Boundary
The unadulterated base coat should form the boundary between the shadowing and the highlighting. This way you can avoid a tidemark between the two sets of blending.

Shadowed areas
Shadows should be added to all lowered areas, cracks and crevices. Also add more shading to the underside of objects.

Stage 4 - Final Touches
 

This one looks very yellow compared to the one above, but in reality they are more or less the same colour.

The last stage is adding a few really dark shadows and really light highlights. Sometimes this stage will involve a lot of work and other times almost none. This depends on the colour you are shading, the texture of the area and your own preference as to what looks right.

As the areas you are painting are so small, you shouldn't need to blend them, although you can use a little water to make the edge less distinct.

Highlights
Highlights should be almost white but not quite. Unless shading grey or white, add a little touch of the base colour to the white, otherwise it will appear the wrong hue. Don't apply large areas of these highlights but save them for little touches, generally along the edges of objects.

Shadows
Shadowing can be more widely used. Add a very dark shade of the base colour (almost black, but again not quite) to joints between materials such as along the edges of this askari's webbing, or between his hat and neckcloth. This becomes a sort of 'black lining', but use a dark tone of the base colour not black as this would look a little harsh.


-
©2001. All rights reserved.
-