|
Making small pieces of glass/perspex
The first stage is to get your glass or perspex the right size to
be a paddy field. Perspex can be cut with a hacksaw but glass is more
tricky. I had a big piece of glass which I wrapped in newspaper, I balanced
it across an inch square piece of wood, trapped one edge under my foot,
and then hit the other edge with a shoe. This broke it into much smaller
pieces, but unfortunately the majority became useless shards. A better
alternative would be to use a tool for scoring glass from a DIY shop
or large craft shop. (If anyone has any other ideas then mail me).
Paint the back of the glass
To give the glass a watery effect, paint the back with a brown or
greeny/brown. To give more of an impression of depth, mix a darker shade
into the centre and lighten it and make it more brown at the edges.
Remember that you will be seeing it from the other side so to get this
fade you will have to keep all the paint wet until you have blended
the fade. Retarder might be useful for this, but you can do it without,
just use dilute paint.
Stick the glass to some thin card
Not cereal packet thin, but 'back of pad of paper thin'. Alternatively
use mounting board. DON'T put glue all over the back of the glass as
it will tear off patches of paint. Use a strong glue like epoxy resin
around the edges of the glass only. You can put more than one piece
of glass on the same card as in this example.
Make raised edges
Paddy fields are separated by dikes, often with a path along the
top of them. To make these glue two strips of 5mm foamcard with PVA
on top of each other all round the edges of the glass. Once the glue
has dried, take a scalpel and hack the corners off to create rounded
mounds. You will need to use a sharp blade or it will tear the foamcard.
Where there is a path, leave the top flat. If you are doing this on
the cheap and are using cardboard then do the same, but you may need
three layers.
Cover the banks with filler
If you have used foamcard and sculpted it neatly then you will just
need to use filler on the paths and the junctions between foamcard.
Mix up a stiff mixture of filler and water, and add a little sand for
texture. Prime the foamcard with a watery coat of PVA to help the filler
stick and then smear the filler over it. If you are using corrugated
cardboard then this will cover the holes.
Texture and paint the banks
When the filler has dried paint the grassy area of the banks with
slightly diluted PVA and cover this in sand.
Give the sandy areas a watered down coat of dark green  . .
Paint the paths with a chestnut brown  Drybrush the paths with a cream
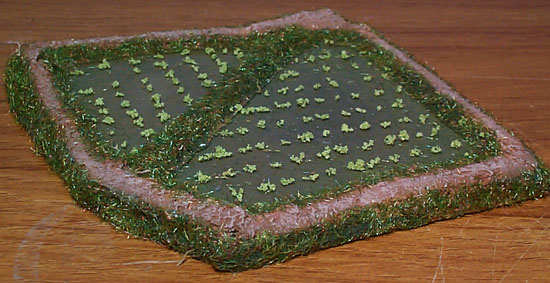
Flock the banks and field
Paint the banks with PVA and sprinkle static grass flock on them This
will give a lush, thick grass look. (You need the sand underneath
however because the static grass doesn't form a very complete covering).
Now add the rice shoots. Use a matchstick to dab tiny blobs of PVA
in rows and sprinkle on a pale green foam flock, which doesn't take
as long as you might think.
|


![]()
![]()