Gothic Ruin
![]()

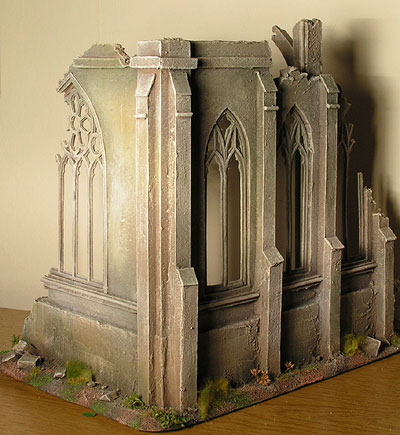 |
| A scratchbuilt cathedral ruin, made principally from foamboard. The window tracery was printed onto card with an inkjet and then cut out with a scalpel. |
Materials
|
Printing Card Templates
|
 As you might guess, the windows are the most laborious element to make, but for the effect they create, they are well worth the effort. First, download the template on the right. (This is in pdf format). It should be printed at A4 onto thin card.
Although it is possible to use a paper template and cut through it onto card, this is slow and inaccurate compared to having the pattern already printed on card. The best way to print onto card is to use an inkjet printer such as an Epson, which feeds the paper through without bending it much. (Some inkjets loop the paper round a small roller, so this type obviously isn't suitable). My old Epson 500 will print onto fairly substantial card (think at least twice as thick as a Christmas card), without problems. If the rollers aren't taking the card in, you could try pressing on the card to gently push it into them. Start off with some thin card, and work your way up to thicker card to find out what your printer can cope with.
WARNING: Putting card through a printer designed for paper obviously carries a risk of doing permanent damage to the printer. Following these instructions is at your risk, and it is up to you to decide if the card you are using is acceptable for your printer. Don't come crying to me if you wreck it.
If your printer isn't suitable, then you could try printing the template onto paper and then photocopying it onto card (feeding the card into the photocopier's manual feed). Reprographics shops may also be able to copy a print onto card for you. |
 If the card is a bit thick you may get the effect shown here, where the print heads don't align on each pass, making straight lines 'jitter' from side-to-side. This is pretty alarming, but didn't do permanent damage to the printer when it happened to me.
Constructing Windows
|
 The rose window |
|
First, cut out all the window templates along the black lines. The grey inner lines on some sections show where the other window section will be positioned. Use a sharp scalpel, and you will probably need at least one fresh blade.
Once you have cut out all the templates, you can stick them together with PVA. If you want semi-ruined windows, as shown in the example, then don't cut the ruined sections away until they are stuck together, or you may not get the cut ends lined up. The layering up of the card makes it considerably stronger, so you will definitely need three thicknesses on the larger rose window. The fatter set of tracery obviously goes in the middle of the three pieces. With the smaller windows, you can get away with only applying one outer tracery to the inner tracery, which saves a lot of cutting time. On my building I put this on the outside, because it's more prominent (although on a real gothic church, if one side is plainer than the other, it is more likely to be the outside). |
 Always cut away from a corner to avoid the blade overshooting, as shown on the right.
Main construction
|
|
The main walls are two big slabs of 5mm foamboard. To get the ruined edge, sketch out the line with a pencil. Then use a scalpel to stab through at random angles along the line, till the cuts are almost continuous. Turn the board over and do the same on the other side, and then you should be able to break it in half leaving a jagged edge.
Put the windows on the board and draw round them, then cut out (getting them in a straight line with a ruler first, obviously). This will give a good snug fit into their apertures. The base of the wall is thicker than the upper levels. Mine is made with a piece of polystyrene that I had lying around, but it was so much effort to cover the texture of the beads with filler, that I would recommend just sticking an extra thickness of foamboard each side of the main piece. |
Buttresses and Detailing
|
|
The buttresses are 10mm wide strips of foamboard. The sloped tops are created by sawing it off at an angle with a scalpel, and then capping the buttress with a piece of card once it has been glued to the wall. Towards the bottom the outer buttresses are thickened with another layer of buttressing. The corner has also been thickened up with two rectangular pieces of foamboard.
|
 The various copings and mouldings are formed from 2 or 3mm slivers of foamboard, glued on with the foam facing outwards. To make them look more complex and realistic, most of them have
  The coping round the top of the outside wall was mitred at the corners to get nice neat junctions. The strips were cut slightly longer than they needed to be, and then were cut off at an angle of 45 degrees with a scalpel. This is a bit of a pain, so you could always cut them square and then cover the joints with filler at the end.
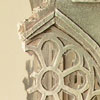 A thin piece of card (2mm ish) was cut to form a raised moulding around the arch of the rose window. If card is cut in very thin strips like this, it can be bent in its larger dimension to form the curve without too much buckling.
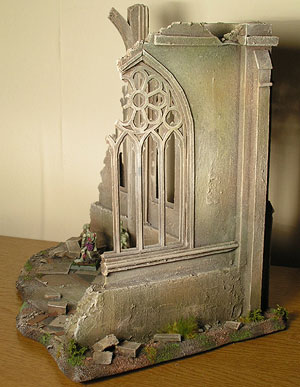
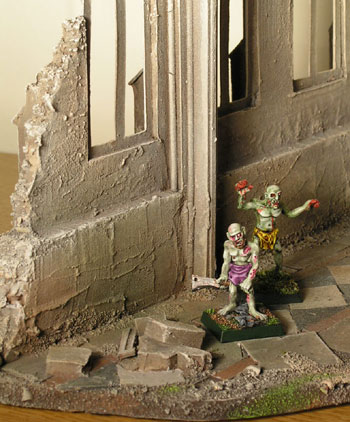 Undead prowl the ruined cathedral |
Internal Column
|
|
|
 The column shown above, that the zombies are wandering in front of, has a detailed look, which is actually built up relatively simply. Start by sticking a 13mm wide strip of foamboard flat to the wall. This will only extend as far as the top of the thicker section of the main wall. Then cut another piece 8mm wide which starts to branch off into an arch at the top. Stick this to the first strip. Finally stick lengths of spaghetti to the exposed ends of the 13mm strip, and in the corners where the two strips meet. Finally to add detail to the inside of the arch, stick a thin (2.5mm) strip of thin card to the inner face. (You can't use spaghetti because it won't bend round the curve of the arch).
The Floor
|
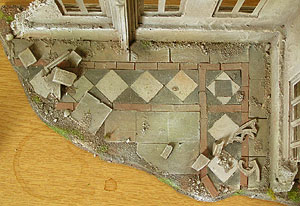 |
| The floor is made of card pieces cut from the template. Use a scalpel to add notches or to clip off corners for a more weathered look. To lay the floor, start in the corner where the two walls meet, and work your way outwards in rows. The diamond pattern is a bit fiddly, especially in the corner, but well worth the effort. You could place a few out of position, to make it look as though the floor is disintegrating. |
Rubble and Texture
|
 |
|
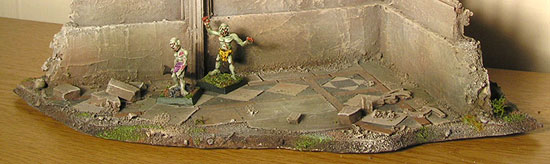
To build up the ruined atmosphere, I stuck a few bits of rubble here and there. These were cut from left-over scraps of foam card. I also used some of the scraps of window tracery, that had been cut off to create the ruined windows.
The polystyrene section at the base of the wall needed texturing. To do this, I used Tile Adhesive, but you could use ordinary filler instead. If you are trying to cover up polystyrene beads, you will need to put it on quite thickly. Cut a rectangle off an old credit card, and use it to plaster it on. Texturing the foam board is a bit easier, just water down the filler/adhesive and paint it on with a really old brush to give it a slightly gritty masonry look. The ends of the foam board will need a bit more than a smear of painted on filler. Wait till that is dry, then paint PVA on with an old brush, and sprinkle with sand. At this stage you can also do the base, and add a few random patches of sand around the rubble and at the base of the wall. |
Painting
|
|
There is a tendency (I know, because I've done it), to always paint stone grey. Although some stone is grey, most isn't, particularly when it has weathered and collected dust and grime. Don't give in to the cliche, but instead go for a more natural pale brown-grey. Most of the gothic cathedrals were built in cream coloured stone.
Then you can weather it a bit with some blotchy washes of greens and browns (vary the colours, but keep it subtle, don't splash on bright grass green). I used an airbrush on this (for the first time) to spray on some random patches of these various colours. To paint the floor, paint on the base colours at the same time as the first stage above. The 'white' tiles are actually nowhere near white, just a pale brownish grey. When you are drybrushing, you can just apply the same treatment to these areas, and this will weather them down nicely, so they all blend in. |
![]()
©2004. All rights reserved.
![]()